DIY Macrame Plant Hanger (Step-by-Step Tutorial)
This post may contain affiliate links: full affiliate disclosure.
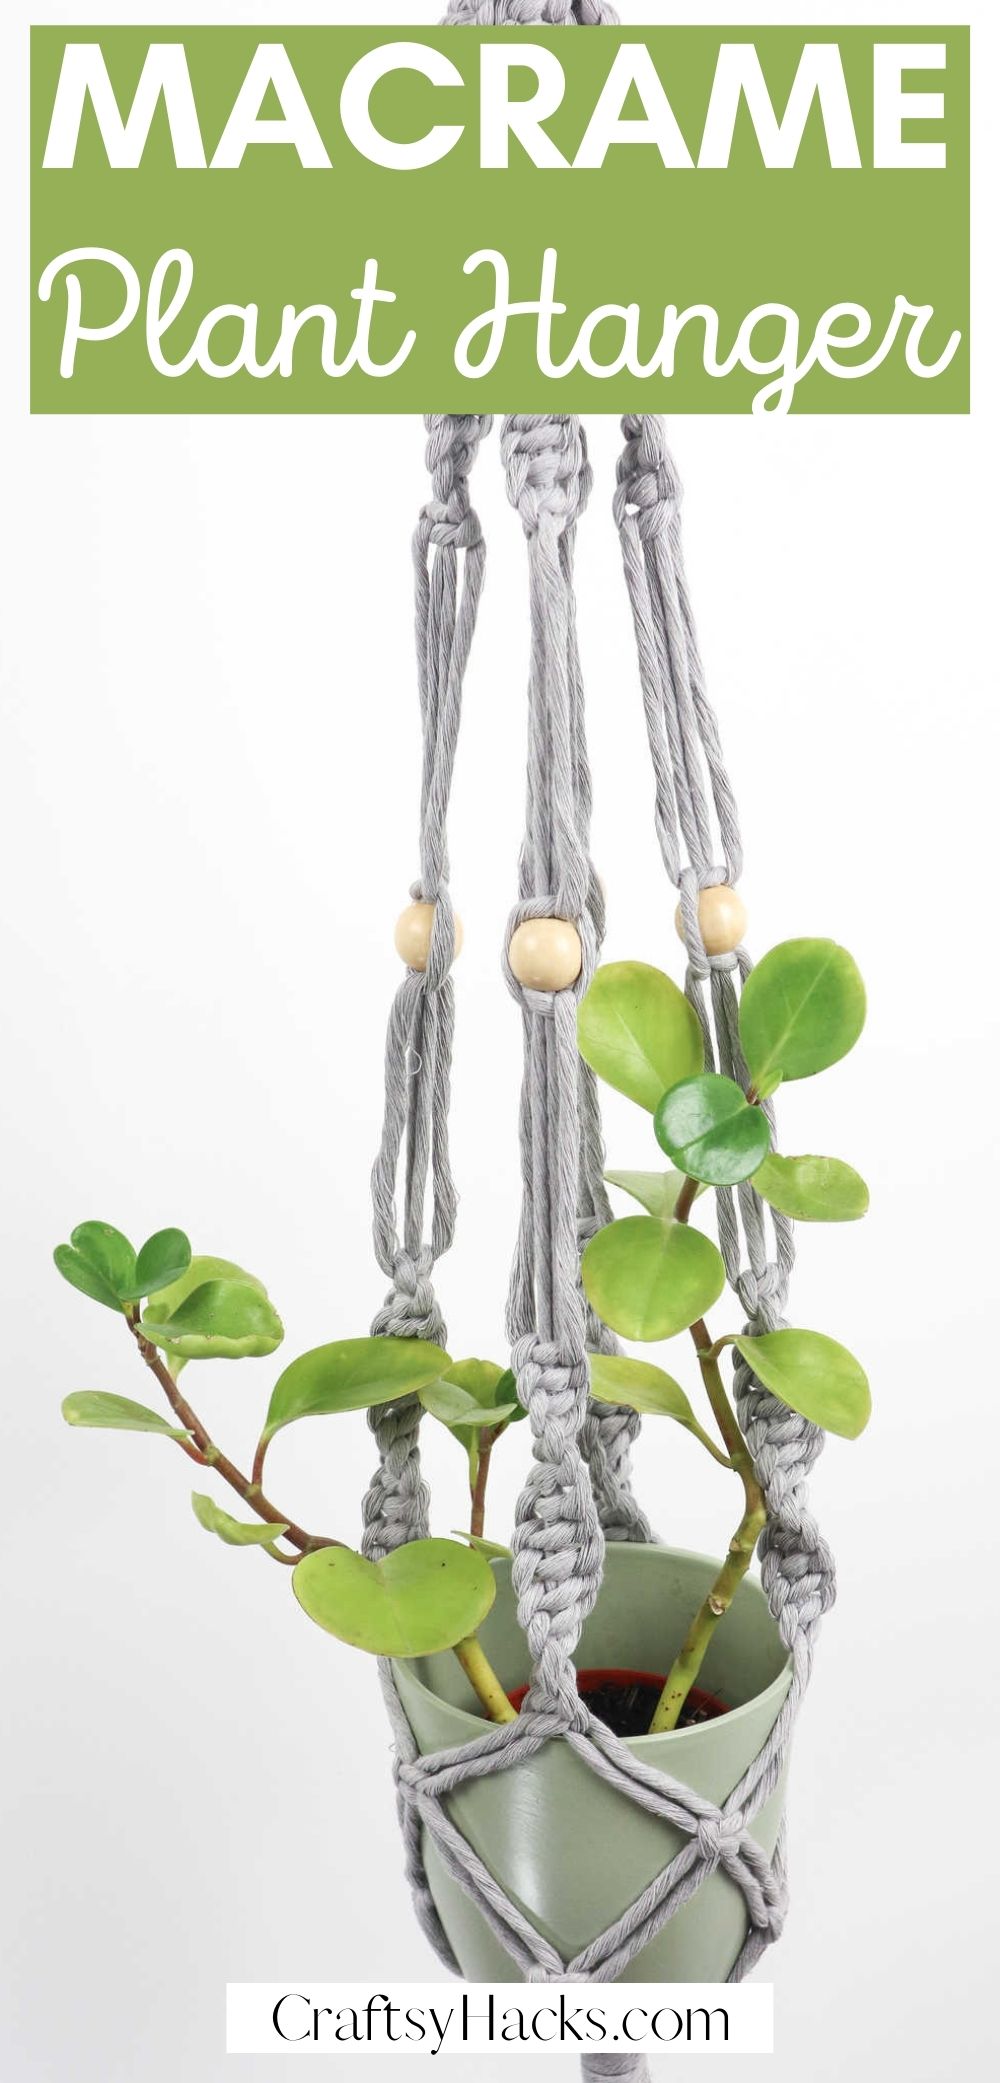
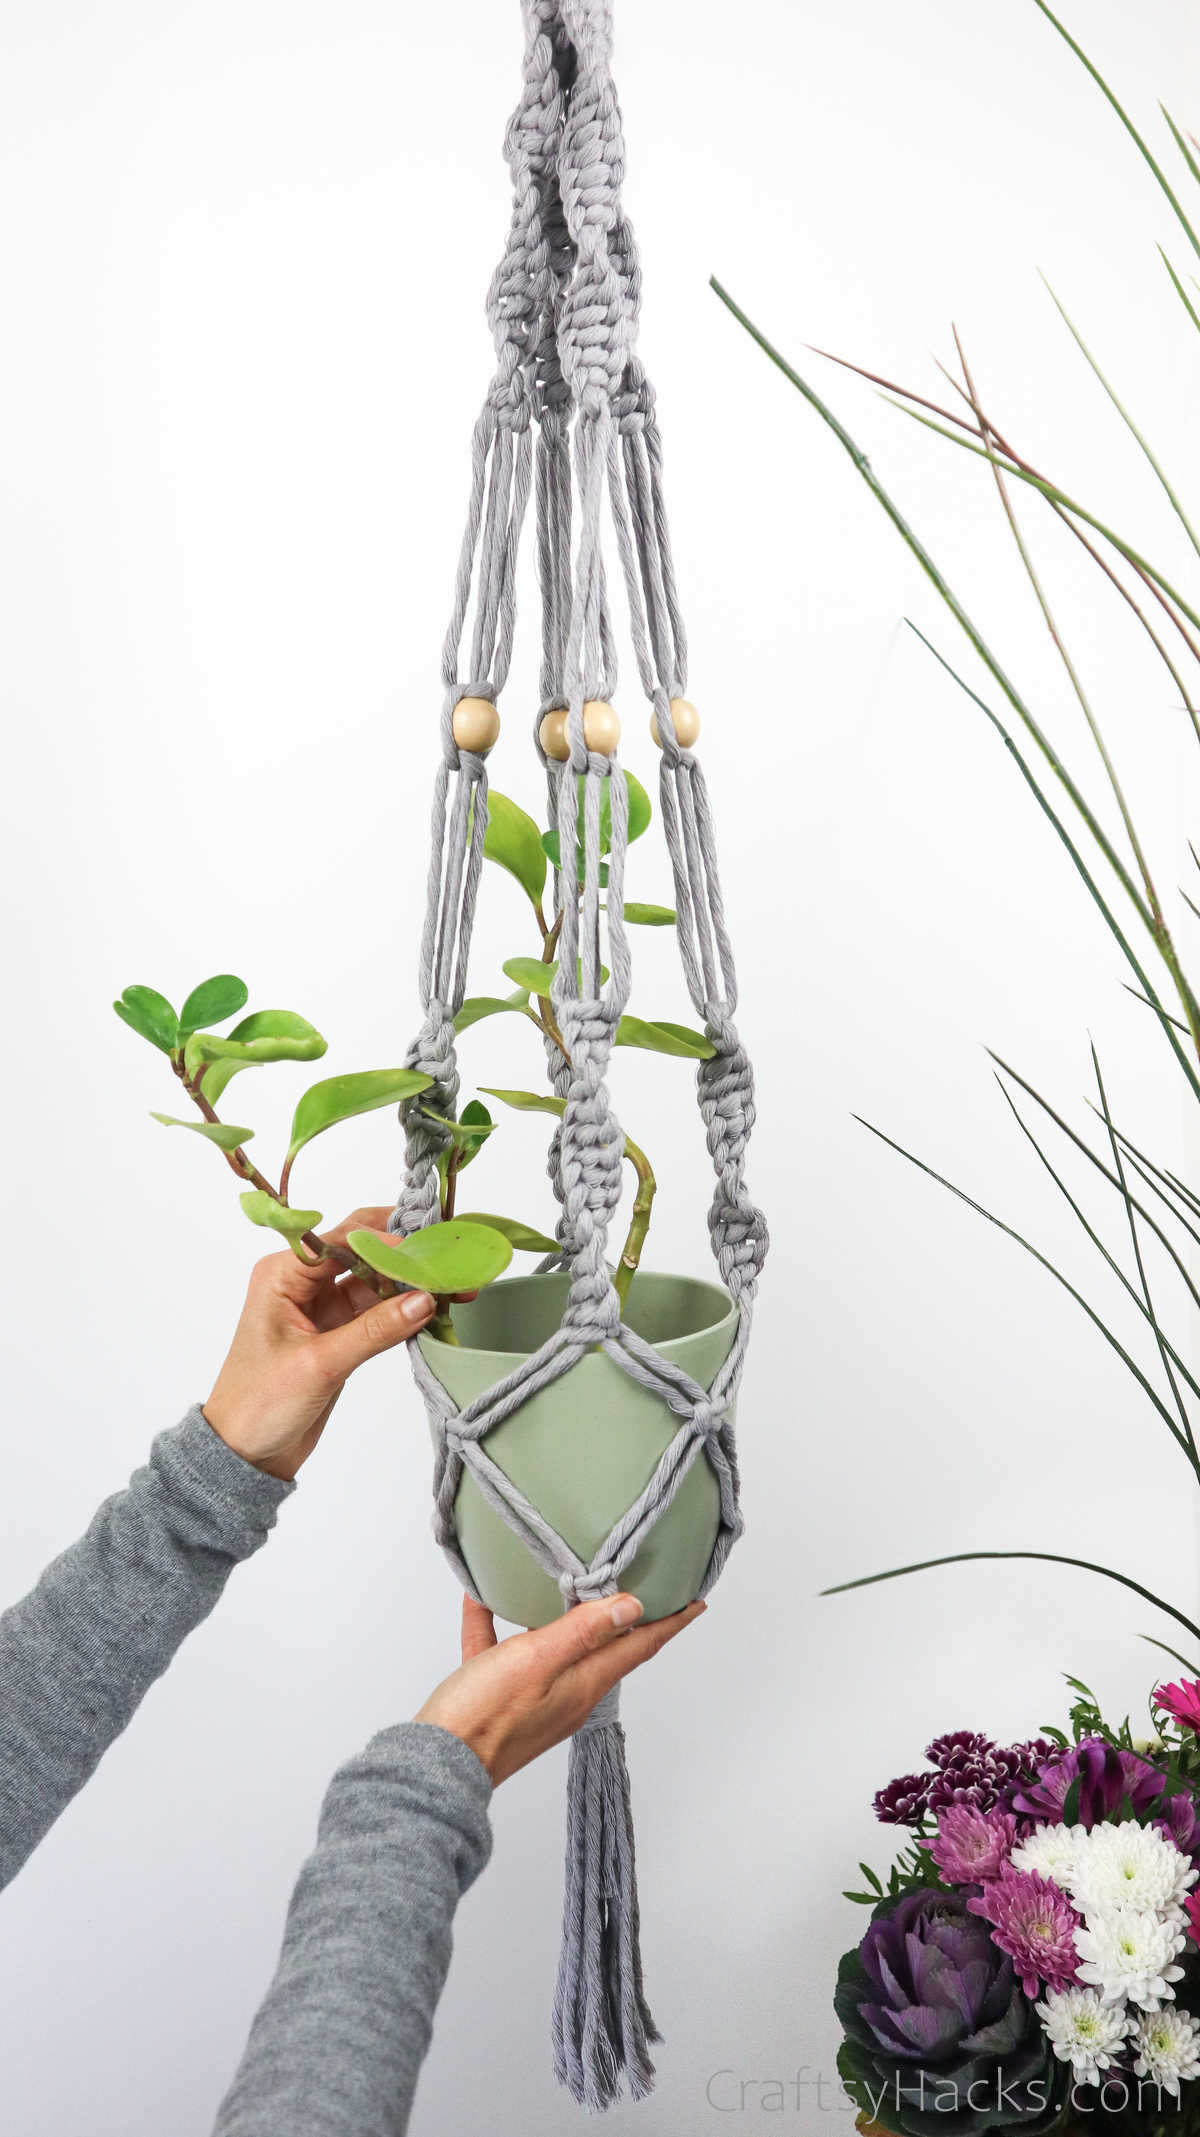
Love macrame? Make this macrame plant hanger to upgrade the way you display your plants! This is a great, relaxing DIY project for adults and even teens.
Macrame is all the rage these days, and rightfully so. Just look at how fabulous macrame craft items are and tell me you don’t want to fill up your home with them.
Take this macrame plant hanger, for example. It’s a lovely way to spice up your indoor garden. Don’t you think your home deserves a change from just regular planters on shelves and windowsills?
Well, you can hang these plant hangers indoors and outside as well, on your porch or deck. All you need is a hook to hang it from, and you’re set.
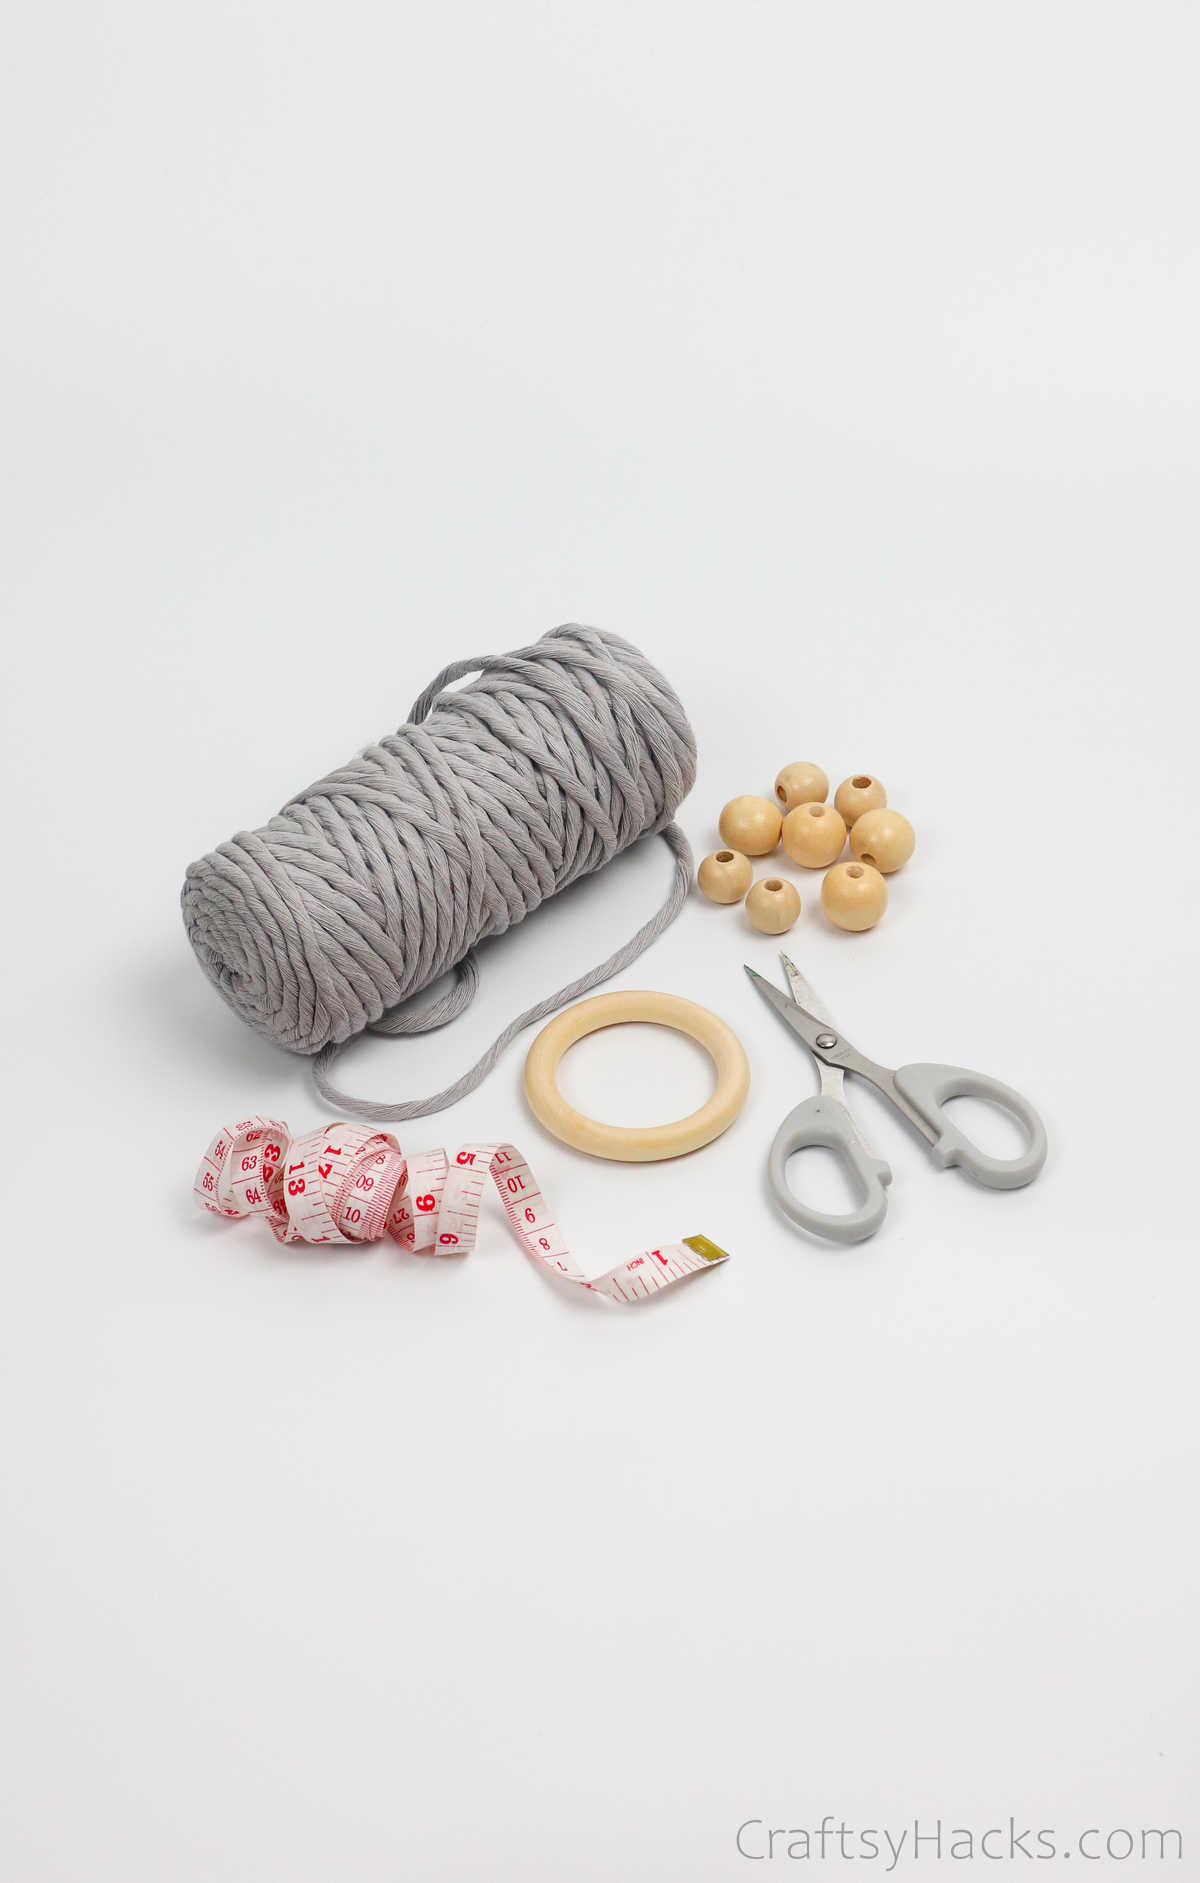
Supplies and Tools You’ll Need
Speaking of things you will need for this project, here’s a list of the supplies and tools you will need to assemble:
- 3mm cotton cord
- Scissors
- 2″ wooden ring
- Tape measure
- Beads (optional)
How to Make a Plant Hanger
You have a ton of colorful macrame cords to choose from. You will also find that you can choose the thickness and the type of cord(braided, single strand, twisted, and more).
Step 1. The first order of business is to cut your macrame cords. Depending on how big your planter or pot is and also how big you want the hanger to hang, the amount of cord needed will vary.
This particular project calls for eight cords, each of which should measure 170 inches or 14 feet, and two cords of 40 inches(3.5 feet). Go ahead and cut the macrame cords accordingly.
Step 2. Next, take your wooden ring. You are going to pull the eight macrame cords through it so they hang down on either side equally. You’ll have sixteen strands.
You should make sure that all the ends are equally aligned and also make sure that the cords don’t overlap on the ring.

Step 3. Pull apart the two sets of cords, eight cords each, as shown below.
Then, divide the cords into four sections each—two frontal sections and two in the back, with four strands in each section. Once you make your gathering knot, you’ll find it much easier to sort the stands into sections when you complete this step.
Step 4. To make a gathering knot, gather all the strands together just below the ring. Take one of the 40” cords and make a U with one end of the cord sticking up, just so.
Then, pull the longer end of the cord around all the strands and the U-shaped loop. Just go ahead and continue to wrap the cord several times over the strands and the loop.
When you’re almost at the end of the cord, stop wrapping it and simply pull the end through the U-shaped loop.
Pull the end on top firmly to pull the U-loop inside the knot to secure it.
Grab both the ends of the cord—the one you just pulled through the loop as well as the one that’s sticking out on top—and tug at them.
Finally, just snip the ends off and your gathering knot is all done.

Step 5. It’s time to start working on your design and make spiral knots. Gather four strands to form one section.
Hold two strands in the middle in place—you will be working with just the left and right strands to make the spiral knot. Pull the left strand over the middle to form a loop.
Then, pull the right strand over the left strand before pulling it under both the middle cords and through the loop you made.
Pull both the ends up and tug it firmly to form your first knot.
Step 6. Continue to make this single knot down the length of the cords. You will notice that the cords will start to spiral!

Step 7. Next, grab another four strands.
You’re going to make another set of spiraling knots down these four strands, too. You know the drill!
Step 8. Go ahead and finish up the other two sections, as well. This is how your macrame hanger should look when you’re done.
Just keep in mind that all four sections need to have the same number of spiraling knots or your hanger will be askey.

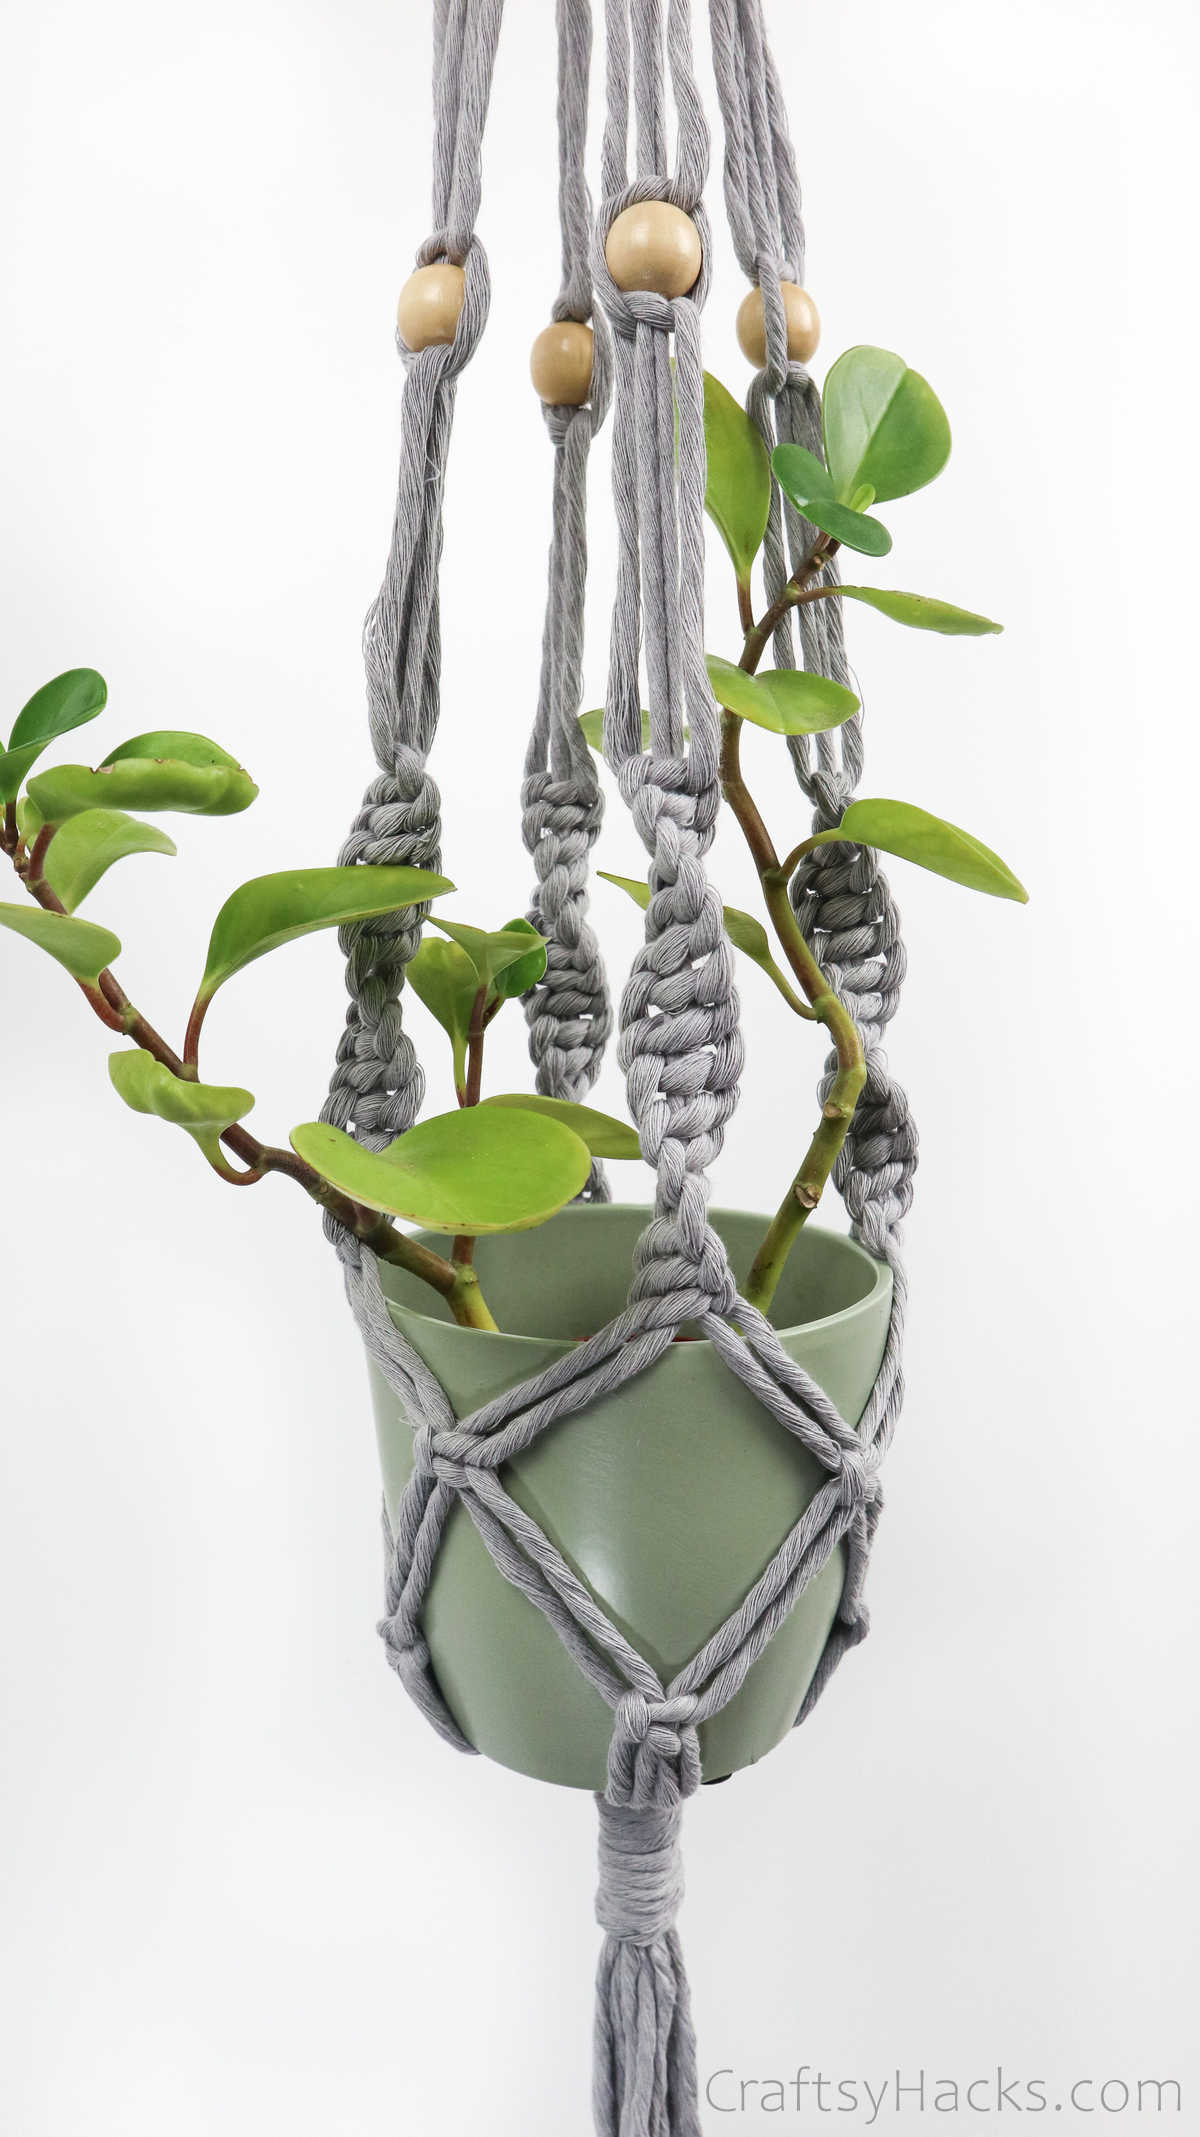
Step 9. For this next step, we’re going to add a bead—it’s completely optional, but I find that it really jazzes the hanger up. We’re going to embed the bead in between a square knot.
First, make one half of a square knot with the left side of the cord. Just remember to leave about 2 to 3 inches of gap after your last spiral knot.
Grab a bead and pull the two middle strands through the hole. Pull the bead up so it sits right below that half square knot. Then, grab the right strand and make the second half of the square knot.
Once you’ve pulled the right strand over the middle strands to form the loop, pull the left one over the right, under the middle strands, and then through the loop.
Tug both ends to secure the bead in place.
Repeat this step with all four sections, so that will give you four beads in total, as seen below. Make sure they are all properly aligned.
Step 10. Next, we’re going to make another set of spiraling knots to the bottom half of all four sections. Leave a gap of 2 to 3 inches and gather one section of four strands.
Go ahead and make your spiraling knots, as instructed.

Step 11. Now, grab two sections of spiraling knots. For this next step, you will be working with the four strands in the middle.
That means you will have to divide the cords, so you have four cords in the middle and two each on the left and right. Repeat this for the other two sections, as well.
We can refer to these two latter sections as section B, and the former as section A—if it makes it easier for you.
Step 12. Take the four cords in the middle and make a square knot.

Step 13. Grab the two strands on the right side of the middle strands.
You’re going to grab onto the two left strands from the other two sections you set aside earlier.
So, combining the two right strands from section A and two from section B, you will have four strands to make your next square knot.
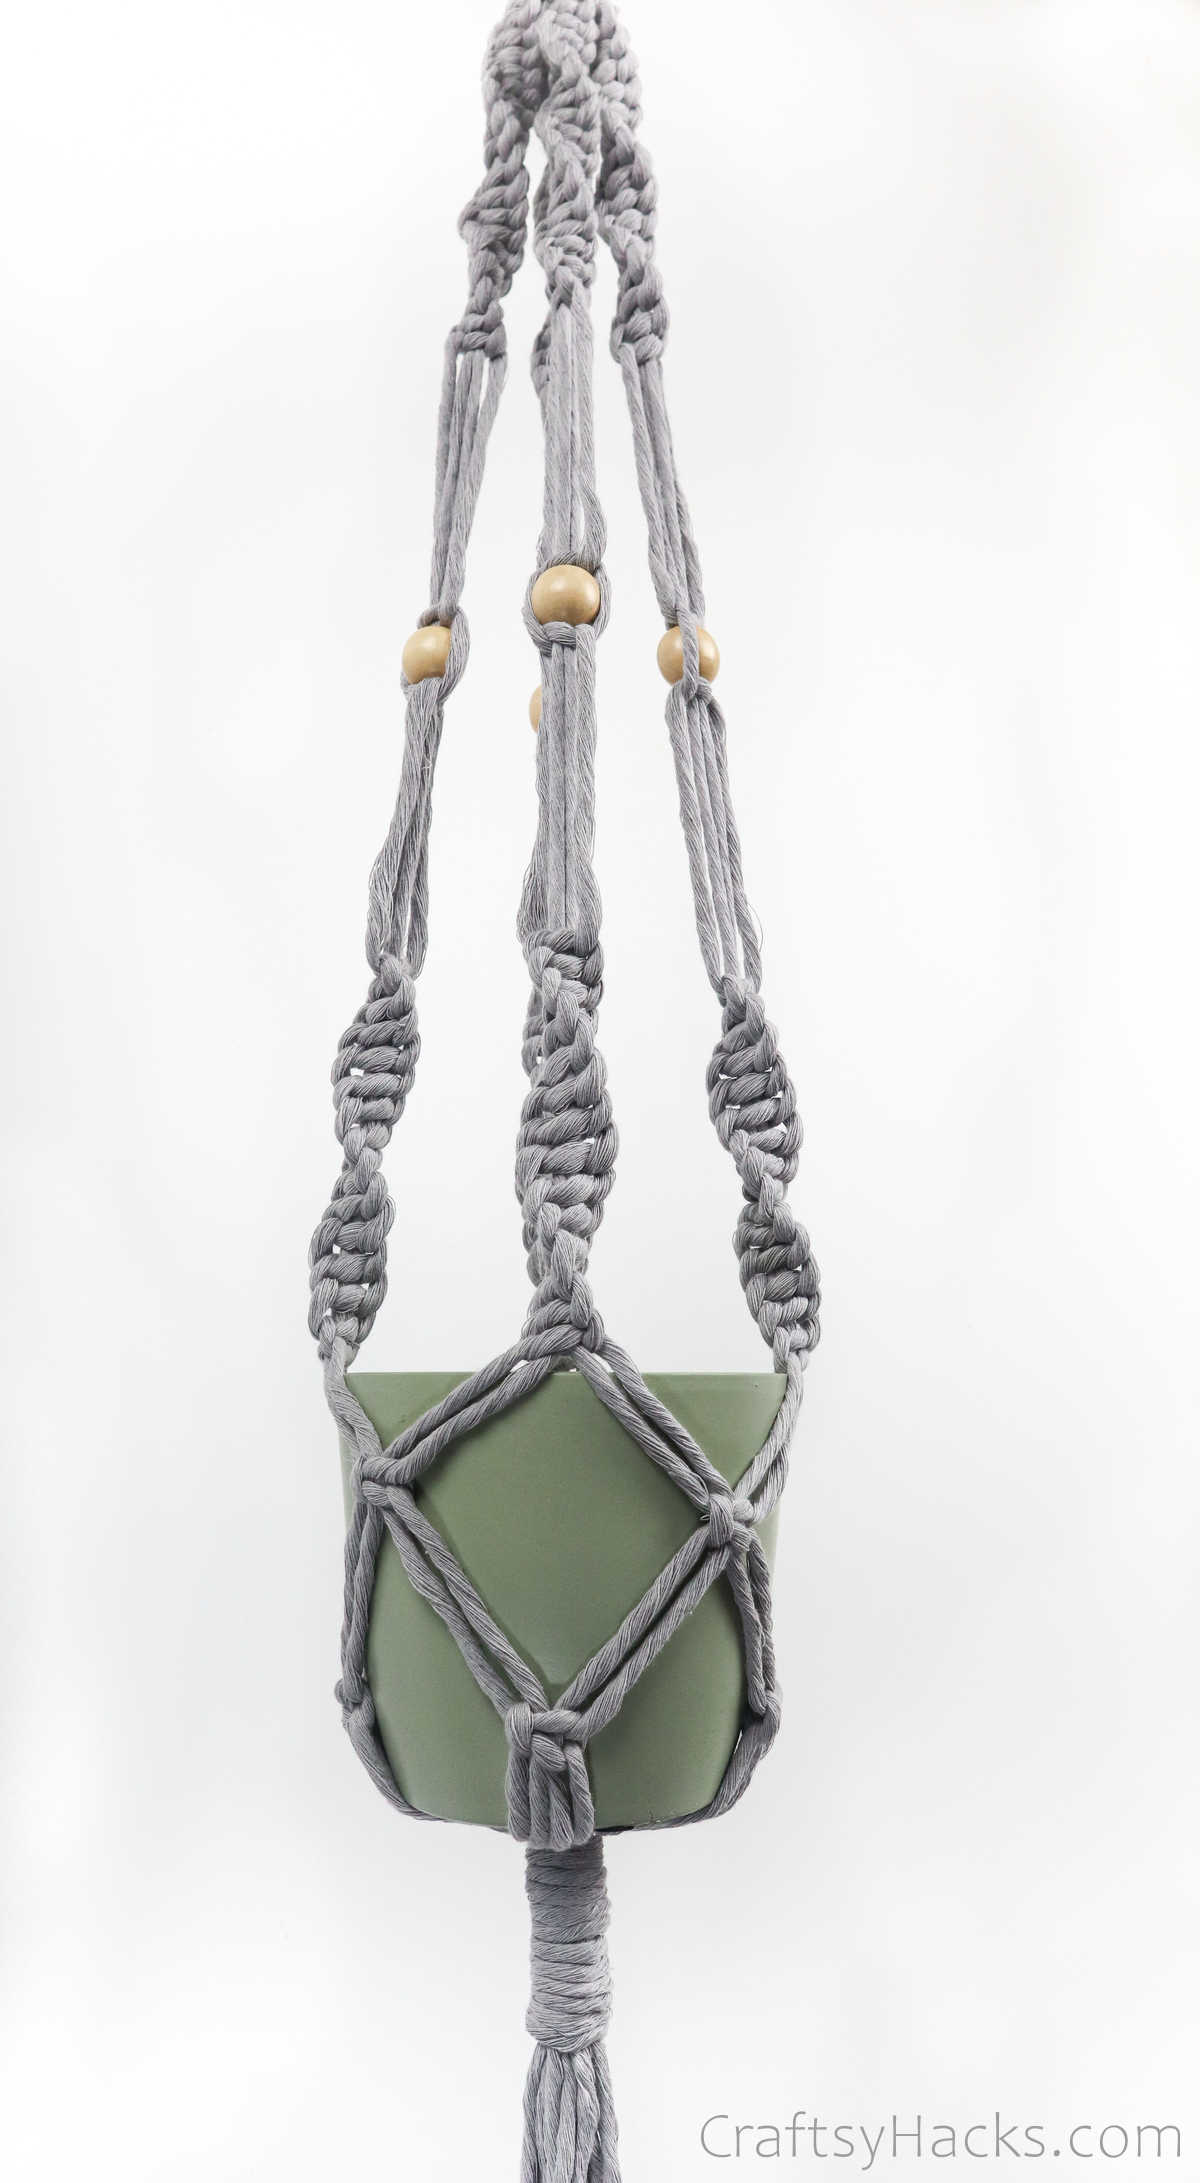
Step 14. Work your way around until you have four sets of square knots.

Step 15. It’s time to fit your pot or planter to measure the length of cord you’ll need to finish up your hanger. Place the pot snugly between the four sets of cords, as you see below.
You’ll be making another round of square knots by grabbing two strands from two sections and pulling them together to form another four-strand section.
Use the pot to figure out the center point where the next square knot needs to be.
Step 16. Work your way around the sections till you have another row of square knots, like the picture below.

Step 17. When you’re happy with how the hanger looks, go ahead and remove the pot. You’re almost done! There’s just one more step to go and that’s to make another gathering knot at the base to secure all the ends.
You already know how that goes. Just gather all sixteen strands and hold them in place while you take the second of the 40” strand. Make a U-shaped loop and wrap the longer end around all the strands and over the loop.
Pull the end through the loop and tug the ends to pull the loop under the cords. Finally, tug the two ends to tighten the knot.
Step 18. Finally, grab a pair of scissors and cut off the ends of the strands evenly. You can leave a few inches, though, if you prefer to have a tail under the pot.

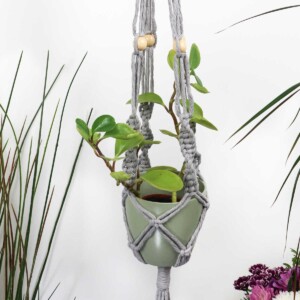
And there you go, your macrame hanger is ready to hang. Just place the pot inside and it’s all done!
How to Use This Macrame Plant Hanger?
This plant hanger can be used to hang your plants—money plants, succulents, and more—from your front porch, deck, or just about anywhere that can accommodate a hook.
Other Crafts You Might Enjoy Making
- DIY Macrame Keychain
- 47 DIY Projects
- DIY Macrame Earrings
- 37 Yarn Projects You’ll Love to Create
- DIY Dollar Tree Lantern
- 37 Upcycled Tin Can Crafts
- DIY Bracelet Out of Shoelaces
- 47 Scrap Fabric Projects
- DIY Rope Coasters
- 37 Crafts to Make and Sell
- DIY Leaf Candle Holder
DIY Macrame Plant Hanger (Step-by-Step Tutorial)
Video Tutorial
Materials
- 3 mm cotton cord
- 2 ” wooden ring*
- Beads optional
Instructions
- Gather all your supplies to get started.
- Cut 8 cords of 170 inches(14ft) and 2 cords of 40 inches(3.5 ft).
- Pull all eight strands through a wooden ring and align the ends. You should have 16 equal cords, each 85” long.
- Gather all the cords right under the ring and use a 40” cord to make a gathering knot. Tug the ends to secure the gathering knot.
- Divide the 16 cords into four sections of 4 strands each. Hold the two cords in the middle in place as you make a number of spiraling knots with the left cord as the lead. Repeat this step with the other three sections.
- Make sure that all four sections are of the same length and that you make the same number of spiraling knots for each section.
- Next, it’s time to attach a bead to each of the four sections. First, take one section of spiral knots. Leaving a gap of 2 to three inches from the last spiral knot, make one half of a square knot (with the left strand).
- Insert the bead through the middle strands and secure it in place with the second half of the square knot (with the right strand). Repeat this for the three remaining sections.
- Once again, leave a gap of 2 to 3 inches and make another smaller set of spiraling knots along all for sections.
- Now, grab two sections and take two strands on the right side of the first and two strands on the left of the second section—effectively, the four strands in the middle.
- Leave a couple of inches gap and make one square knot.
- Then, grab the two strands on the right from the second section and two strands from the left of the third section and make another square knot. Work your way around the four sections till you have a row of four square knots, all aligned.
- It’s time to place your pot in this hanger to determine exactly where you need to fasten off, so to speak.
- So, grab your pot and line it so that the rim sits right under the last of the spiraling knots. The row of square knots should be along the body of the pot.
- Next, gather two strands each from two consecutive sections and make another square knot. This one should be directly under the spiral knot and in between two square knots from the previous row. Refer to the picture to confirm the placement.
- Make three more square knots to complete another row.
- It’s time to fasten off your strands.
- Hold the pot in place and gather the strands under the base of the pot. Carefully remove the pot without moving the strands.
- Using the second 40” cord, make another gathering knot. Tug the ends to secure the knot in place under the wrapped cords.
- You can trim off the excess cords evenly. If you want your hanger to have a tail, feel free to leave a few inches before you trim the ends off.


Turned out great, measurements were great, directions understandable I like both the written and video directions.
As a beginner, this is the BEST instruction i’ve read in a month! Thank-you so very much. I have five new rolls of cord, just waiting for a good tutorial. The pictures are so very plain and easy to follow. Cant wait to get started.
So glad to hear it! ;>
Instructions are very easy to follow and I thoroughly enjoyed making this hanger. It looks really good. May I suggest including a few more measurements when creating the spiral knots to eliminate the need for guessing if we have enough cord left to finish the project! This is from a beginners point of view 😊
I love all your easy to understand instructions, especially the photos. Best tutorial I seen yet. ps. My hanger looks great!
The what kind of cord did you use, if you know the brand and where to get it would be wonderful, I love the design, you do lovely work, manythanks work
https://amzn.to/3sb5NKn here you go 🙂