41 Creative Dollar Tree Crafts for Low Budgets
This post may contain affiliate links: full affiliate disclosure.
Dollar Tree is an amazing place to get your crafting supplies for cheap. Transform Dollar store items into something that looks awesome!
Seeing all the beautifully decorated interiors online might leave you wanting to decorate your home the same way. However, you don’t have to spend enormous amounts of money, when you can opt for a DIY project and make your own Dollar Tree crafts.
With a little bit of creativity and a few materials, you can get crafty in no second! Of course, these Dollar Tree crafts might serve as just an idea for a craft on your own. Prepare to be blown away because these dollar store crafts will change your life.
1. Gold Dollar Store Frame
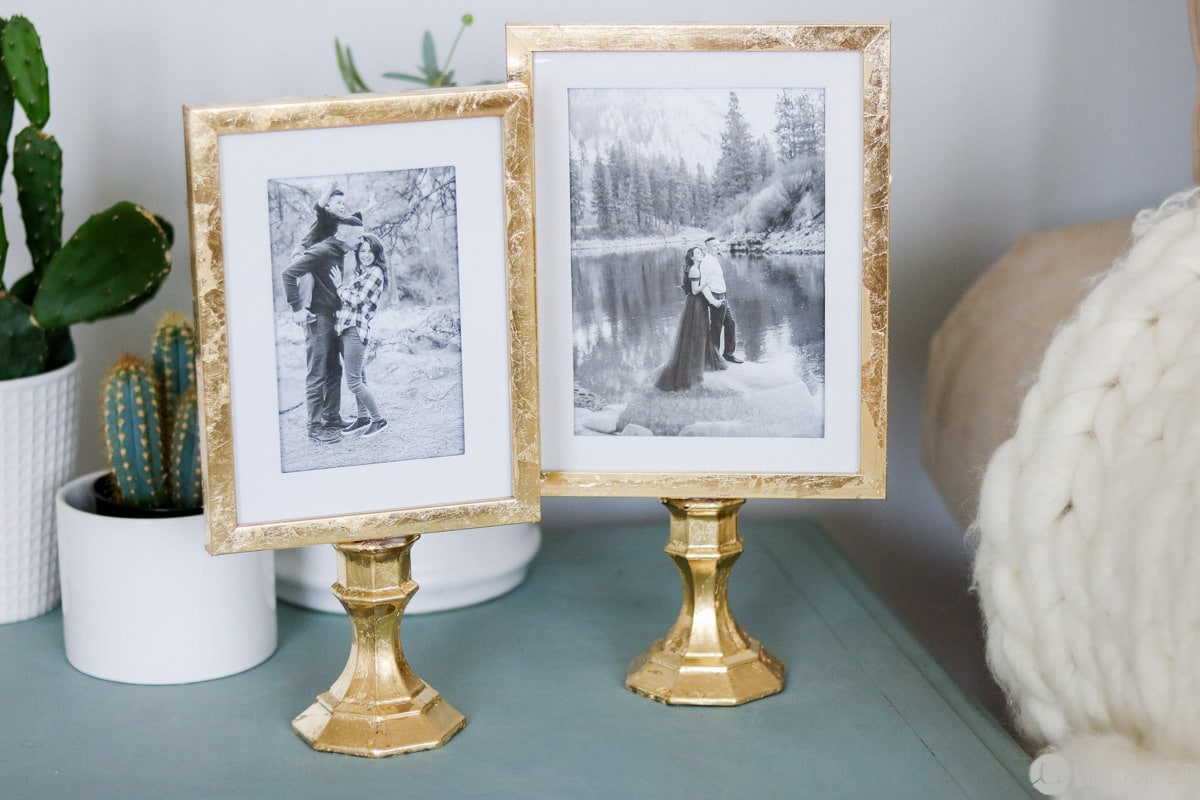
Credit: lilyardor.com
You will need two picture frames you can find at a dollar store. Also, two glass candleholders. In addition, you might need something like a dowel you can find here to create good support for the whole frame.
Some additional supplies you will need for this DIY are a glue gun like this one, gold spray paint and gold leaves, gilding adhesive, a brush, and a wooden dowel.
Spray paint the candleholders, then apply gilding adhesive to them and the frames before starting to apply gold leaves. After ten minutes, you can start applying the gold leaves with your fingers and remove the excess with your brush.
Attach the wooden dowel to the inside of the candleholders using a glue gun. Then, glue down the frame to the dowel and the candlestick holder.
And voila! You will have a beautiful gold dollar store frame. Check out more DIY dollar store frame crafts here.
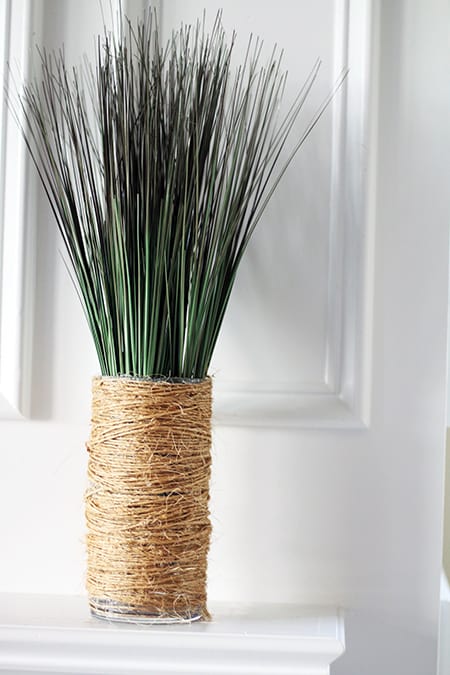
2. Glass & Rope Vase
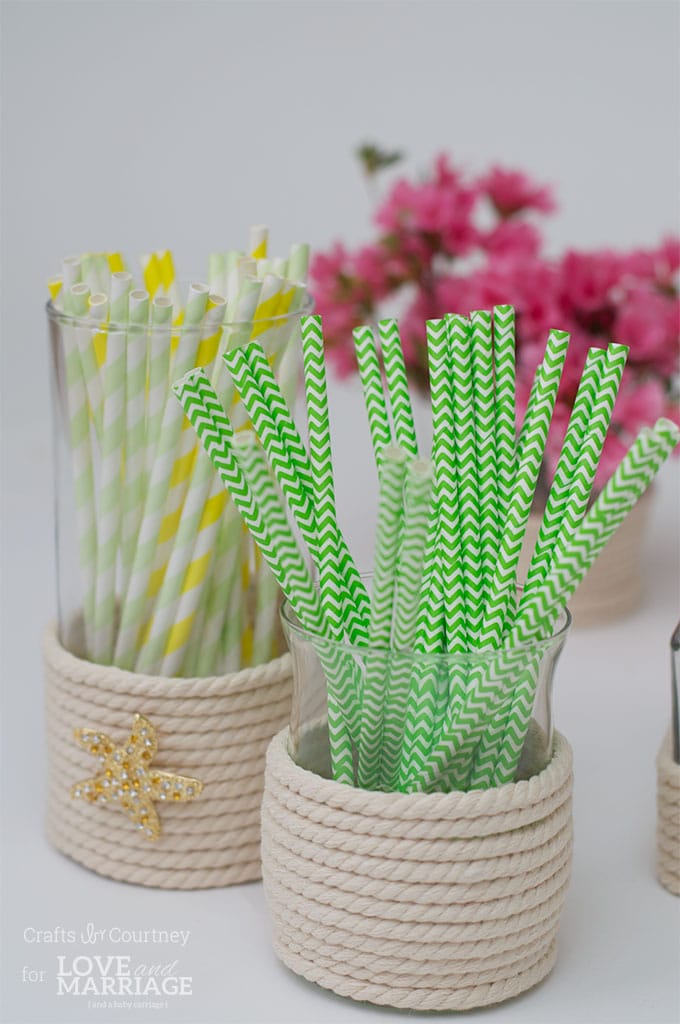
Credit: loveandmarriageblog.com
This vase makeover will be one of your favorite Dollar Tree crafts. It is easily made!
You can play with vase shape, size, and style! All you need for this project are a glass vase of your choice, glue gun, decorative rope, and a pair of scissors.
Start by adding the glue to the bottom of the vase using a glue gun and wrapping the rope tightly around the vase. Once you are satisfied with the look, cut the rope and glue the end of it to the vase.
3. Hanging Flower Basket
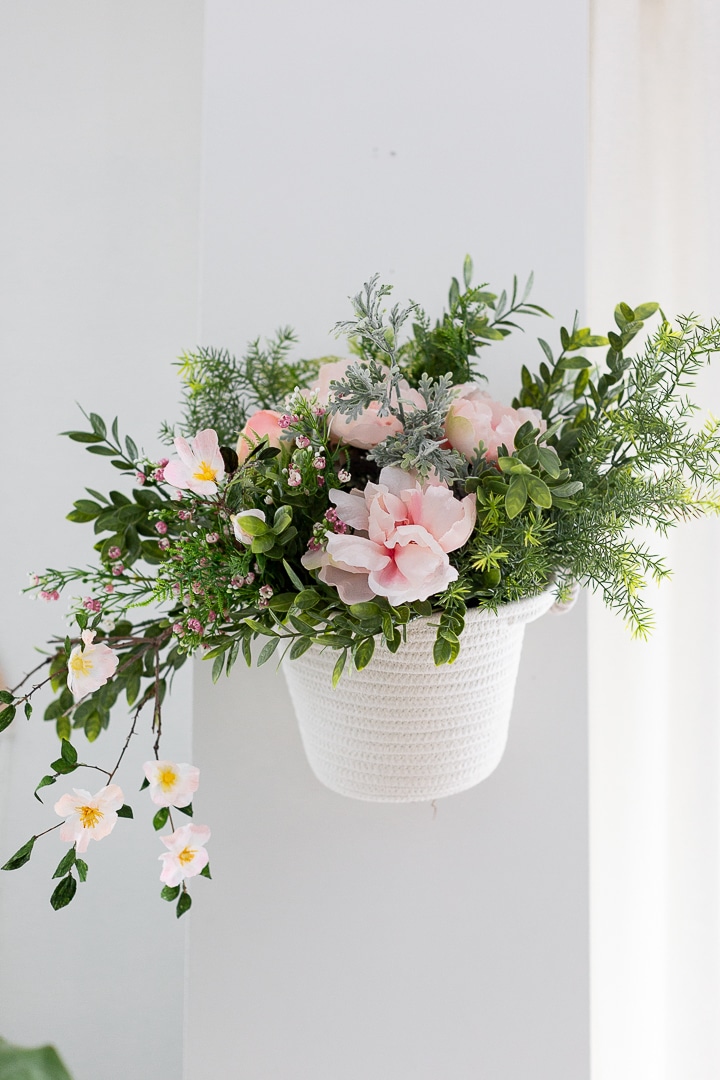
Credit: craftberrybush.com
This sweet and simple dollar store basket is easy to make. It can be a lovely little piece for your kitchen, entryway, or even your bedroom.
All you will need is a decorative rope, a dollar store basket, and some fake flowers of your choice. Start by tying the rope to the handles of your basket and then start adding the “greenery” in it.
Arranging flowers will be fun, and you can give it your personal touch. Finally, hang the flower basket somewhere on the wall and enjoy your view every day!
This is a nice DIY craft for teen girls.
4. Antiqued Plaque

Credit: creationsbykara.com
To create a beautiful antique looking plaque, you won’t need much. Head to the Dollar Store or simply find a few of your old ceramic or metal trays.
Use spray paint in the color you prefer and paint your tray with a couple of spray paint layers. Then use a dark craft paint which you can water down a little bit, to get the consistency similar to ink.
Use a paintbrush to start adding the dark color to your tray and start creating the antiqued look. Once you apply paint, brush it off with an old rug or piece of cloth.
In the end, add some vinyl letters, names, monograms, sayings to your antiqued plaque. You can also add some antique-looking accessories such as the keys you can find here, ornaments and glue them down to the tray.
5. Votive Candle Holder
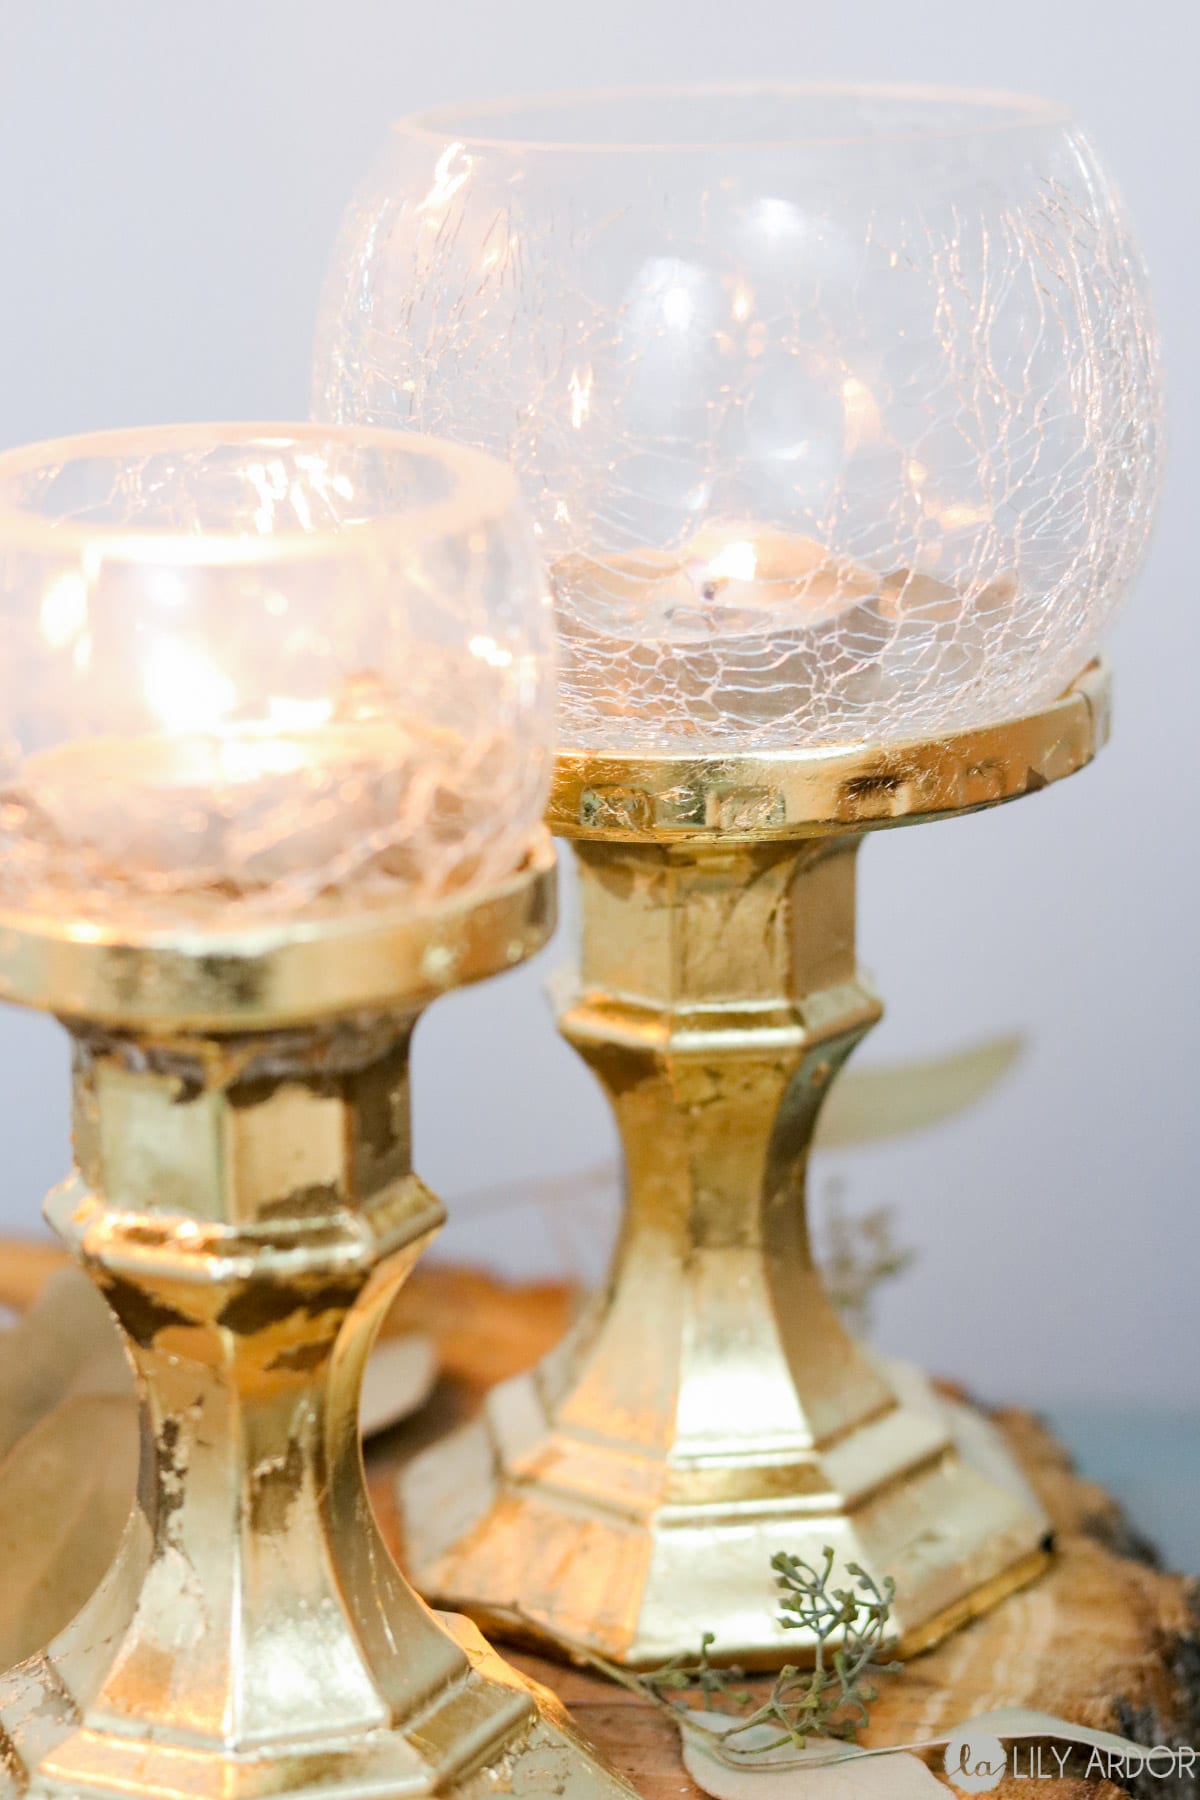
Credit: lilyardor.com
A candle holder can be a nice decoration for your home. Putting one on a table, mantelpieces, shelves, or anywhere else can make the whole room look a little more sophisticated.
If you want to make this gorgeous and elegant votive candle holder, you can head to the nearest dollar shop or use some old trinkets. Take a look at what you will need.
Get a couple of cheap glass candle holders, gold spray paint, some gold leaves, gilding adhesive, old jar lids, and a glue gun.
6. DIY Dollar Tree Beach Glass
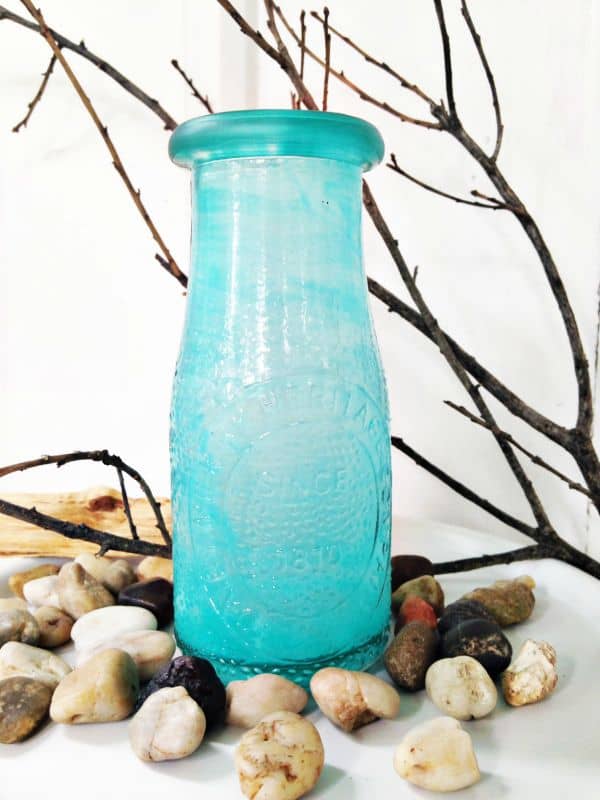
Credit: thehomespunhydrangea.com
Those who like a little bit of the nautical twist to their decor can make this beach glass bottle without too much effort.
Mix some white glue in a disposable container or a bowl. Then, add a couple of drops of both colors. When you get the desired color, you can stop stirring the mixture.
Then, take the foam brush, dip it into the mixture and start painting your bottle (both inside and outside). Let it dry for a few hours, and your little project is done!
This is a lovely craft to make and sell!
7. DIY Fruity Mason Jar
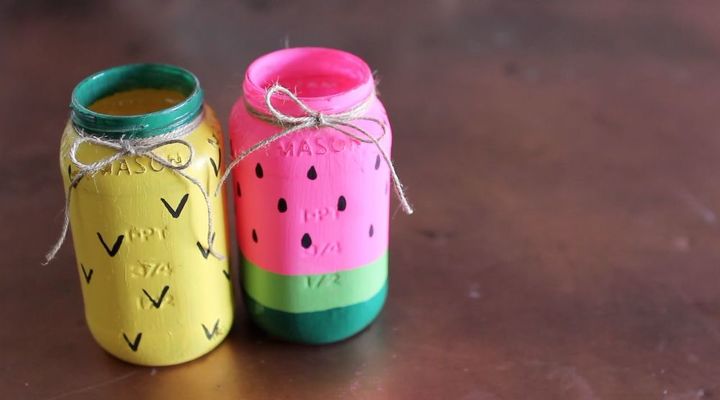
Credit: hometalk.com
Mason jars are just great. Even better are colored mason jars you can use to decorate almost anything!
It can be a nice touch to your garden or balcony. Get a few mason jars and choose which fruit you are going to draw.
Then, using a bigger brush, paint the jars with the color of your choice.
Some additional accessories you can use are ribbons, utility ropes, and others you think could match the fruity mason jars. For an old and rustic look, use sanding paper like this and gently brush the dry painted surface.
With a more precise painting brush, which you can find here, add details to your jars, and this craft is finished!
Check out more mason jar projects that would be a perfect gift.
8. DIY Reverse Canvas Sign
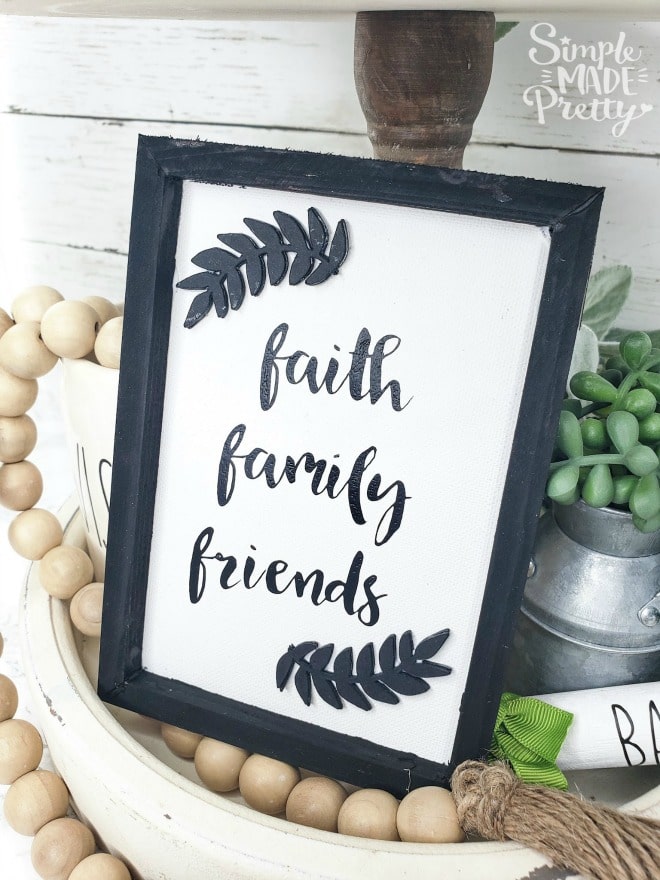
Credit: simplemadepretty.com
Making the reverse canvas is easy. All you need to do is get a canvas and flip the white rear side to the front.
Remove the staplers from the back of our canvas using a flat-headed screwdriver. Buy the frame for your canvas and paint it the way you want or simply buy a frame in a color that you like.
Then, simply stick the image or text to the canvas and press with an iron. Cut out some leaves from heavy black cardstock and glue them around the text or image.
Use the staple gun to attach the frame to the canvas. Make sure that the size of the staples is not too big.
9. Succulents
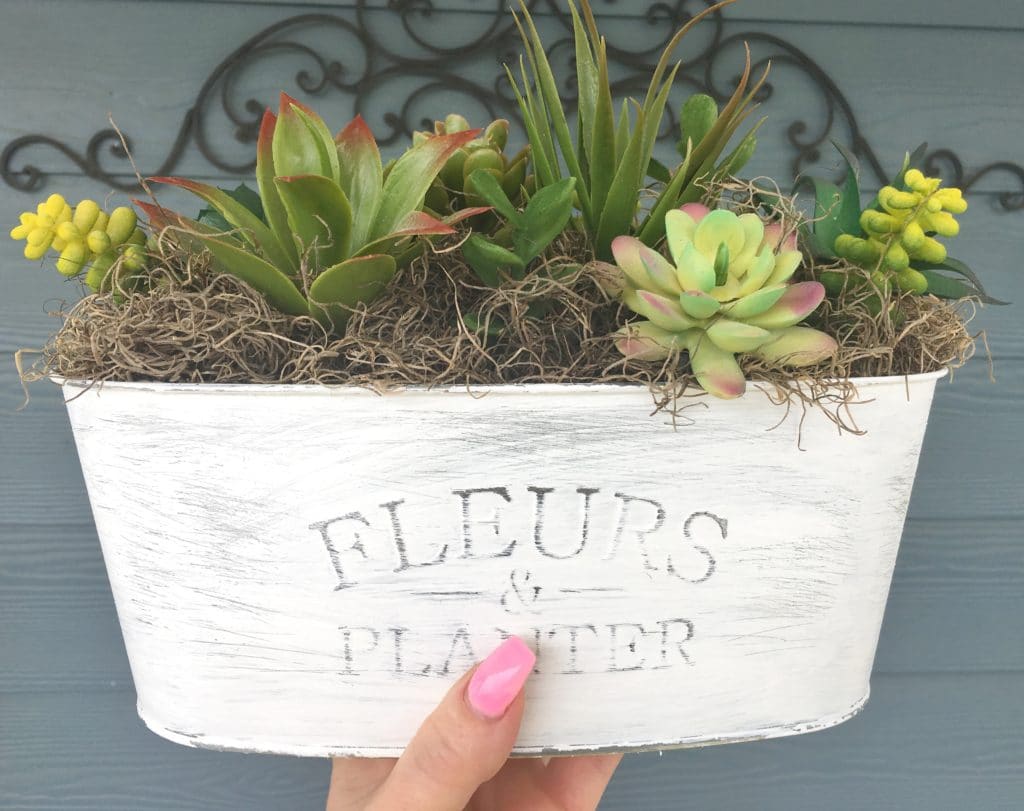
Credit: heytonya.com
Choose a perfect old looking flower tin from the nearest dollar store and paint it with spray paint. Then, use medium-grit sandpaper to get the old shabby vintage look.
Afterward, add a floral foam inside the tin and start arranging the succulents. Fill in all the gaps with some moss and add raffia to make it look even cuter.
You can find fine floral foam here.
10. Fall Jars
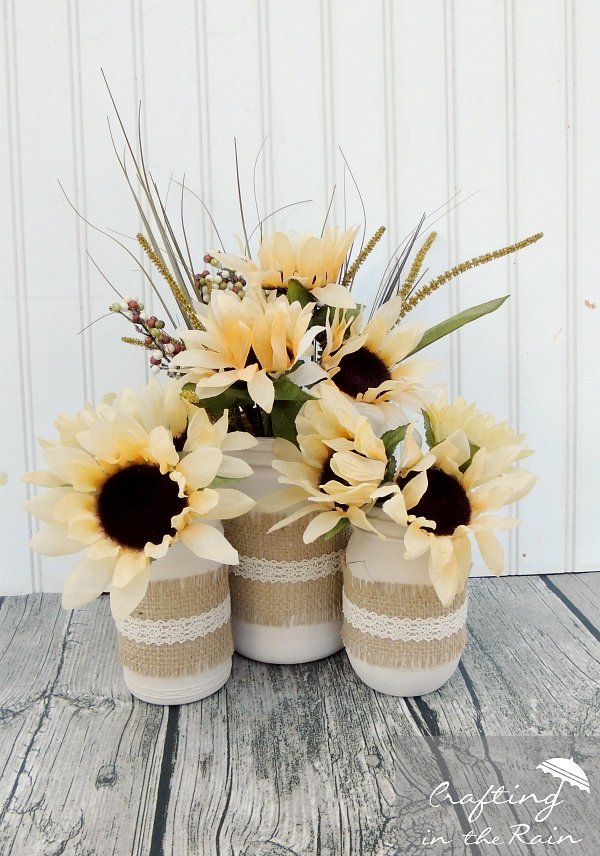
Credit: craftingintherain.com
What you will need for this DIY project are jars, FolkArt chalk paint, hessian fabric like this, fake sunflowers, and other plants such as grass. Also, a hot glue gun
Paint the jars with several coats of chalk paint. Then, if you want to achieve the distressed look, use some sandpaper. Measure the hessian fabric or a burlap ribbon and glue it around the jar – just across the middle.
11. Easy Thanksgiving Centerpiece
Credit: passionatepennypincher.com
Thanksgiving might be all about food, but it is also about preparing decorations for it. To make your Thanksgiving table look marvelous, get crafty and check out this DIY.
You will need a big glass jar, some twine, and a glue gun. Wrap the twine around the jar and glue it to the glass surface. You don’t have to be precise when gluing it.
You can get natural jute twine here.
12. Trendy Decorative Lantern
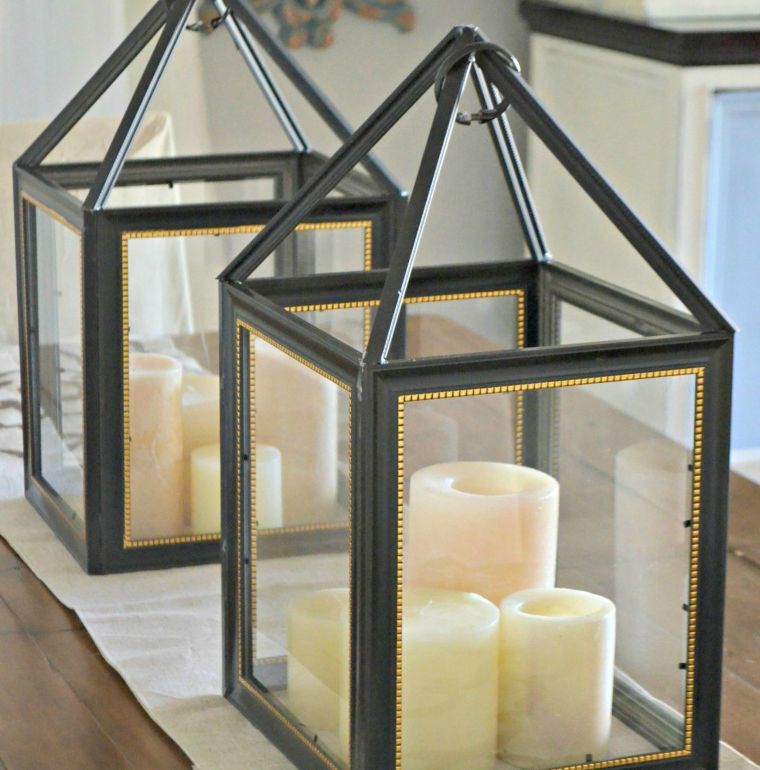
Credit: hip2save.com
Did you know that you can have those expensive-looking lanterns in your home and make them really quickly?
Go get some flat sided photo frames here, some pliers and a hot glue gun. If you could find a shower curtain ring or any similar item, that would be perfect for this little DIY!
Take the frames apart and glue them together to form a cube-like shape. Make sure to leave the glass inside the frame.
Break apart more frames and use the sides to create the top of the lantern. Lastly, add the little curtain ring at the top of your lantern to make it look super realistic!
This is a lovely Farmhouse décor project.
13. DIY Vintage Signs Made From Foam Board

Credit: littlehouseoffour.com
Gather the following material: foam board, clear wax, some letters, ruler, utility knife, command strips, and aging dust.
Cut the board to the size you need and use the ruler to measure. Mark where the letters should be and then glue them one by one.
Cover the board with the clear wax and then dust some aging dust. The last step is to hang the sign wherever you want to!
14. Lavender Candle Wreath
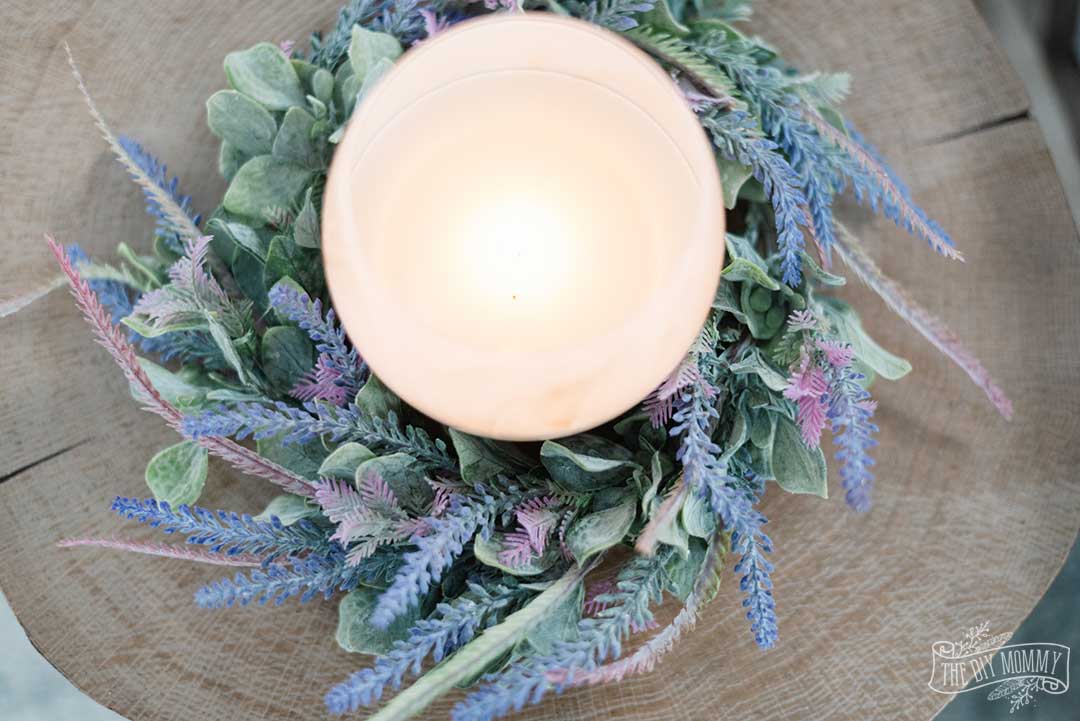
Credit: thediymommy.com
Lavender is often used for interior decor, especially to decorate tables. If you want to make a cute lavender candle wreath here’s what you need to get:
Some faux flowers (of course, lavender, and even some lamb’s ear you can see here), wire, and a finished wire wreath.
Using wire cutters, arrange lavender around the wire wreath forms and secure it. Complete the full circle, and you are done!
15. Easy Black and White Dollar Tree Succulent Vase
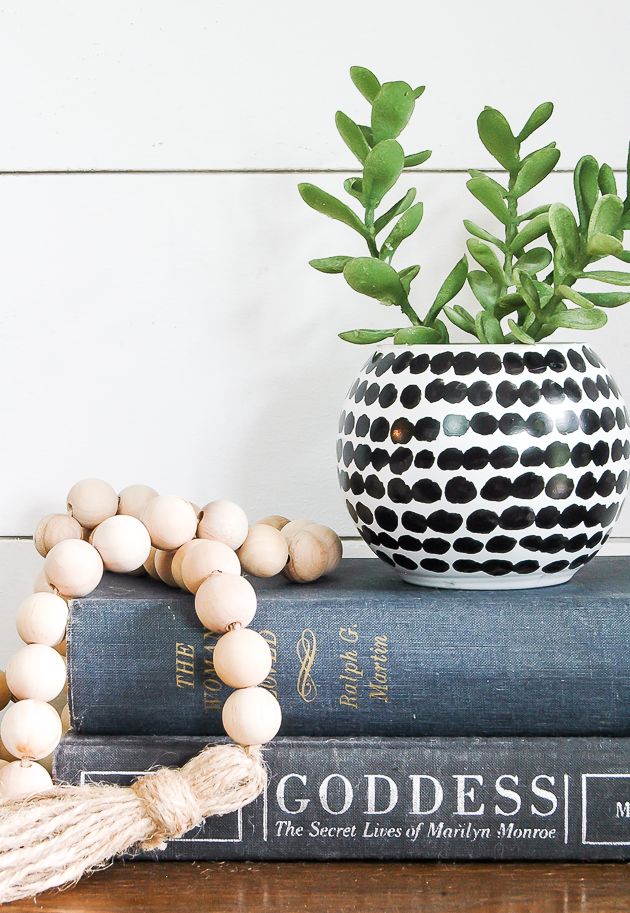
Credit: littlehouseoffour.com
Get a clear glass vase, white spray paint for glass, black paint marker, water-based finish, and of course, some succulents.
First of all, spray paint the glass vase and let it dry. You might need to do several coats of paint.
Use the marker to draw dots or any shape you like in a pattern that you prefer. When it is dry, cover with a protective finish.
The vase is finished, and all you need to do is add the succulents or even some rocks or sand in it.
Get black markers here!
16. DIY Dollar Tree Chalkboard
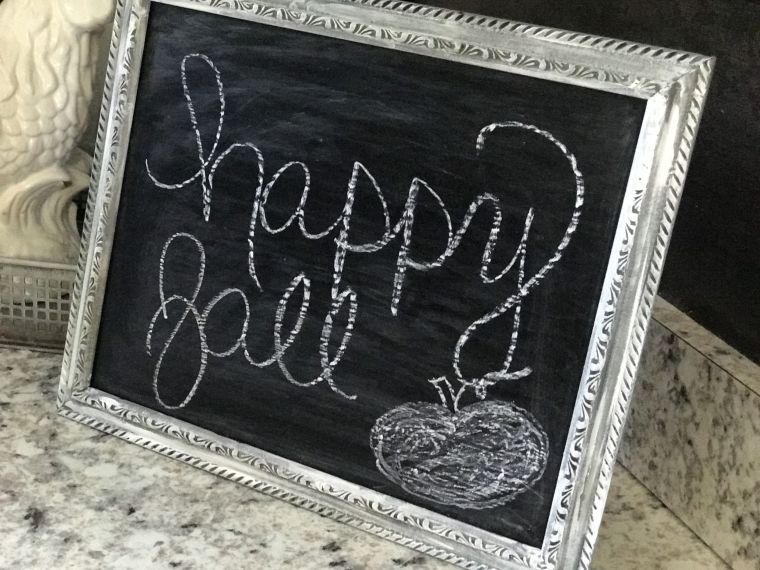
Credit: re-fabbed.com
For this one, find a frame you like and get a pack of white chalk. You will need some black or dark chalkboard paint, and that’s pretty much it.
Here is a black chalkboard paint I recommend.
Take the frame apart and paint the glass with chalk paint. Wait until it is dry and repeat the process a couple of more times until you like the result.
Touch up the frame if you feel like doing that, or even paint it with some leftover paint that you have. Put the glass inside the frame, and your DIY chalkboard is complete!
17. Spring Terrarium with Dollar Tree Frames
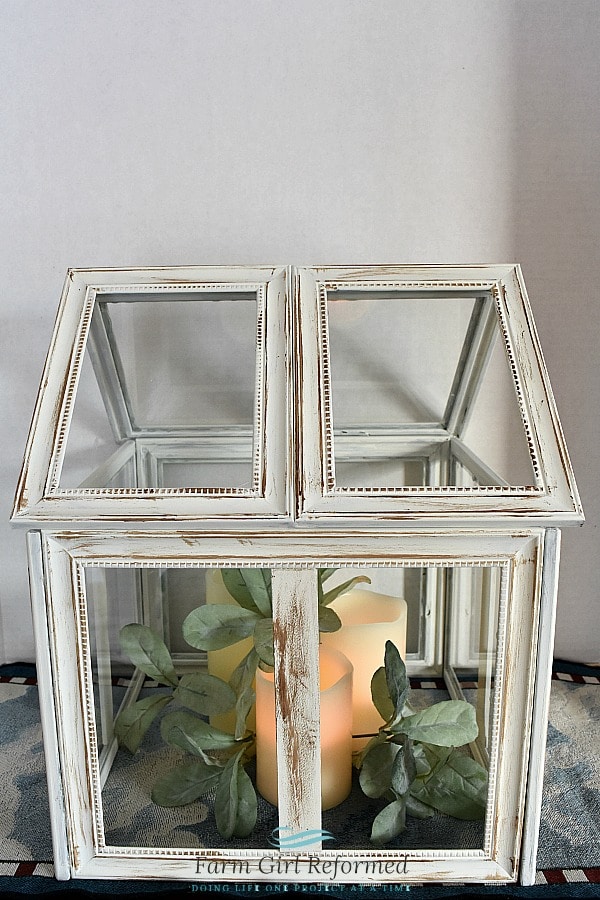
Credit: farmgirlreformed.com
Similar to the trendy decorative lanterns, this spring terrarium DIY project will be super fun and easy! Get some bigger and smaller photo frames, a couple of paint sticks, wood glue, hot glue, white paint, and some stain.
Start by taking the picture frames apart and then paint them with the paint sticks. Then glue the sides of the frame to make a cube-like shape.
Every terrarium must have a rooftop, so using the remaining of the frames, create one. Glue everything together and decorate with herbs and candles inside.
18. Mini Easter Egg Topiary Dollar Store Craft
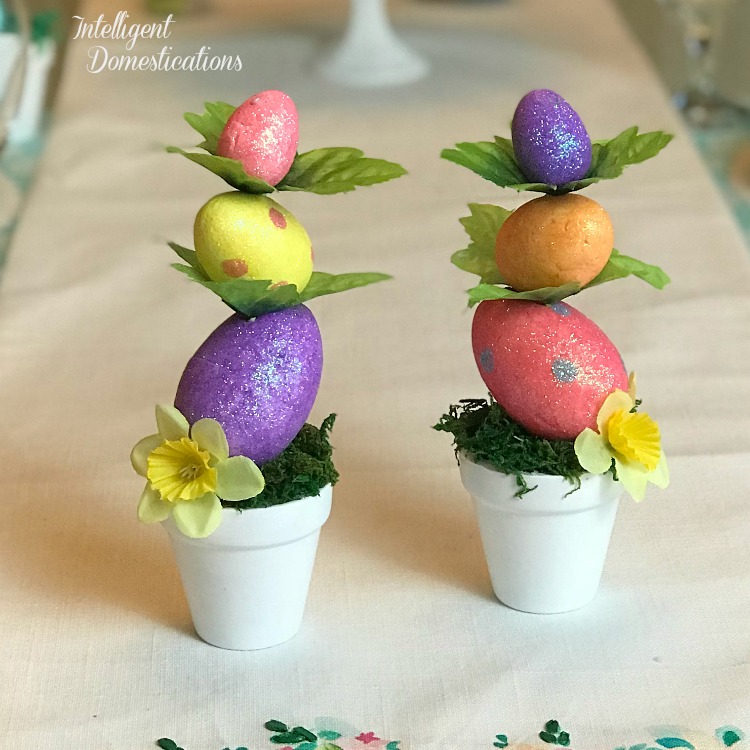
Credit: intelligentdomestications.com
As far as the supplies are concerned, you will need a mini flower pot, foam Easter eggs, and accessories such as ribbons, flowers, moss, etc.
Firstly, paint the mini flower pot, then add some styrofoam to it and glue some moss on top to cover the styrofoam. Then, place a skewer stick in the middle of the foam and secure it.
Lastly, you will need to add the eggs, one on top of another, and decorate them according to your wishes.
19. Farm Fruit Basket Wagon Planter
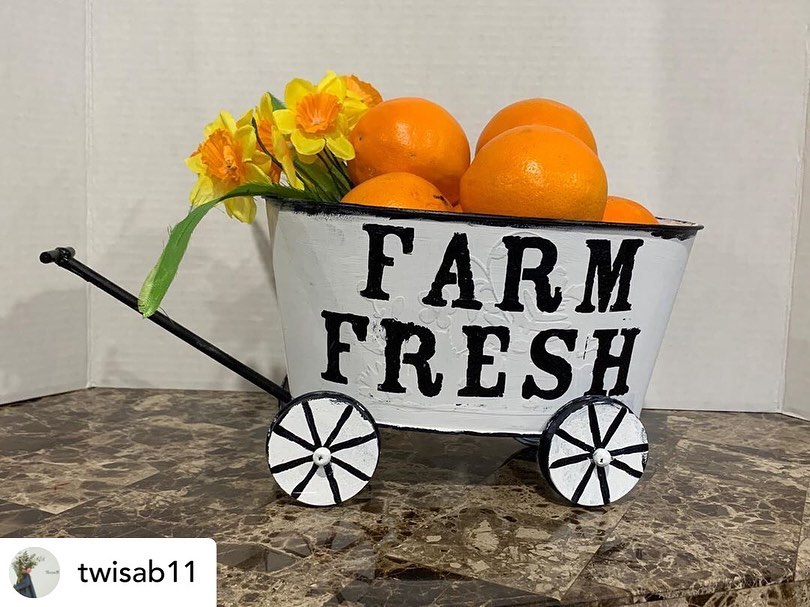
Credit: Instagram
Find an old antique looking flower tin, some black and white chalk paint, and recycled jar lids.
Paint the skewers black and use white paint to cover the flower tin and four jar lids. Then, using a thin painting brush, draw lines to make the jar lids look like wagon wheels.
Glue the lids around the tin and glue the skewers to one side of the basket to look like a wagon handle. Once everything is dry, put some fruit and flowers in it to decorate your farm fruit basket wagon planter.
20. DIY Faux Topiaries
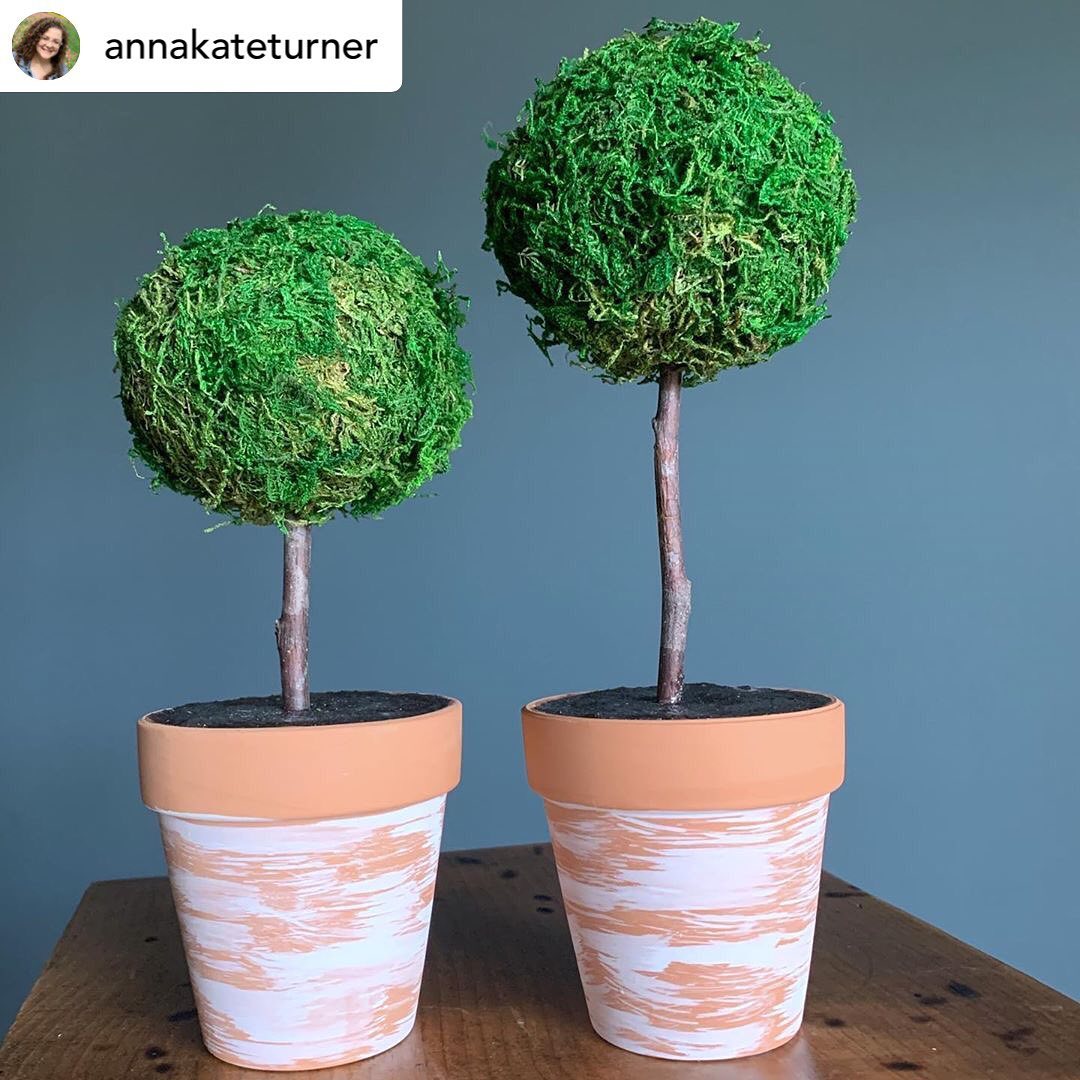
Credit: Instagram
To make these fabulous DIY faux topiaries that look like little trimmed trees, you will need a ceramic pot, a stick or a smaller branch, a styrofoam sphere, hot glue, plaster, moss, and some paint.
Take the styrofoam ball and start gluing moss onto it. Glue the moss thickly to cover all the styrofoam surface.
Mix the plaster with some water and add it to the ceramic pot. When it is semi-dry, add a branch with the tree trunk and secure it until the plaster dries completely.
Add more moss to the plant pot, and this amazing DIT topiary is ready to be placed on your table!
21. Floral Vintage Candle
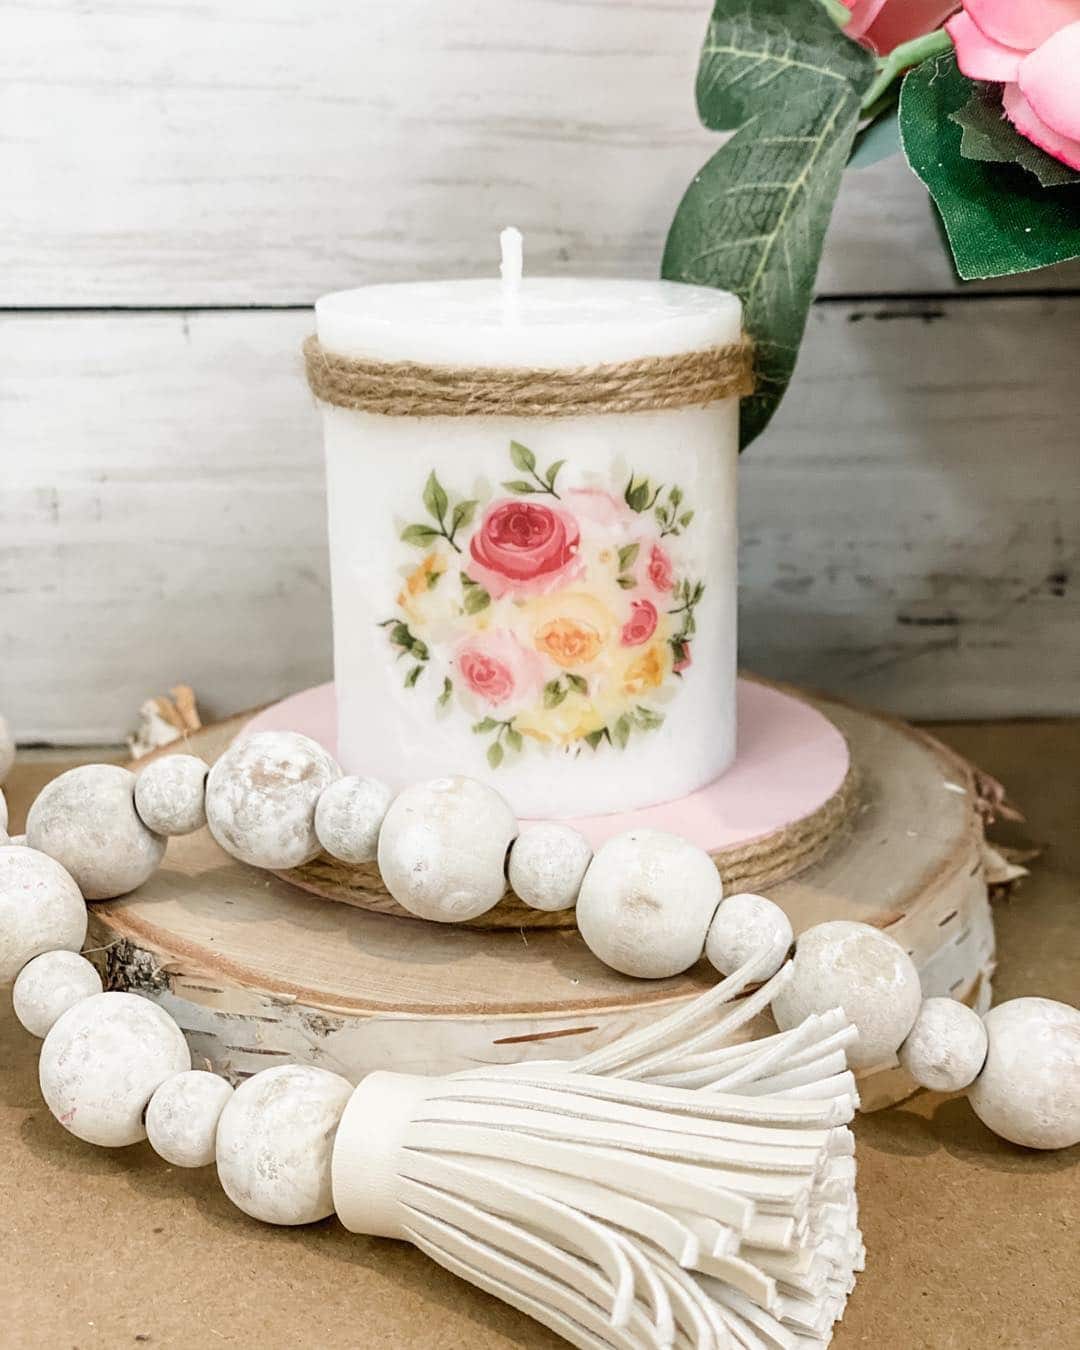
Credit: Instagram
Anyone interested in this DIY will be amazed by how easy it is to make this lovely candle. Buy a white candle and use a Wagner heat gun to transfer an image to the side of it.
Decorate with jute rope like this one. Attach it to the candle using hot glue. Pair the candle with a decorative wooden stand you can put underneath it.
22. Dollar Tree Lantern
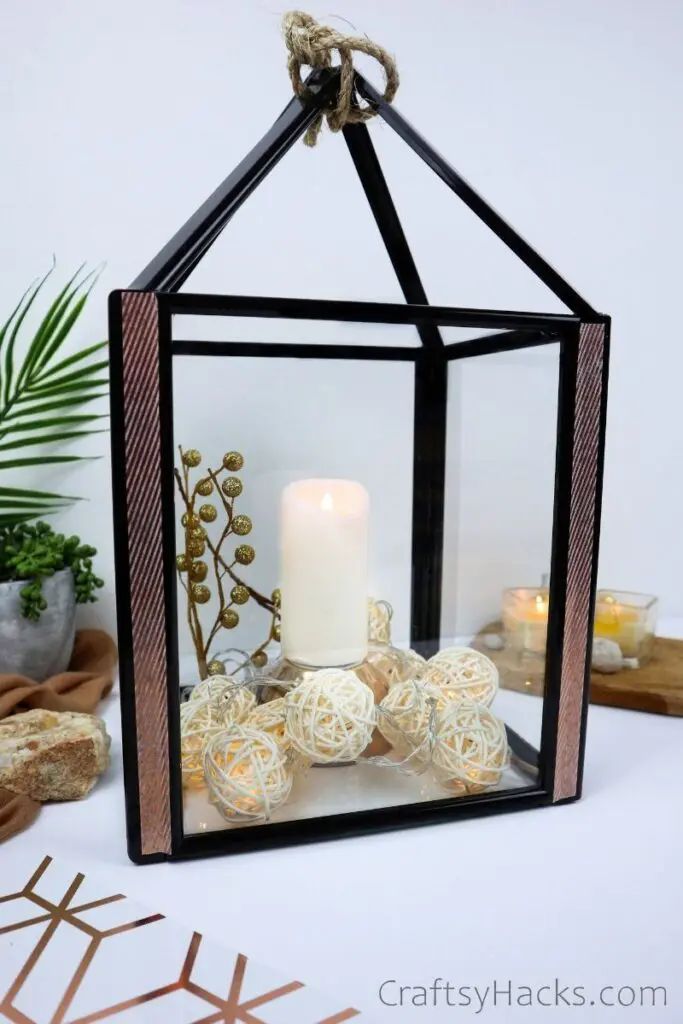
Credit: craftsyhacks.com
Take a look at this fabulous lantern! Whether you’re looking to light up your home or spice your decor, this lantern has your back.
The first thing you’ll need is a few wooden frames from a dollar store near you. They have plenty to choose from and will be perfect for dismantling for parts to make the lantern.
While you’re dismantling the frames and building your lantern, you can think of different ways to decorate it. You can start with a couple of rolls of this decorative tape and then add glitter, sparkle, and light to it!
23. Confetti Bowl

Credit: modpodgerocksblog.com
I can’t quite get over the sheer awesomeness of this confetti bowl! Just feast your eyes on all that color and texture!
If you’ve ever worked with confetti before, then you already know how fun those projects can be. So all you have to do now is grab some from here to get started.
You will also need a balloon to use as a shape for your bowl. You will also need an actual bowl to hold your balloon. Finally, grab some mod podge from here and a sponge brush, and you can start making your bowl.
24. Yarn Wrapped Glass Vase
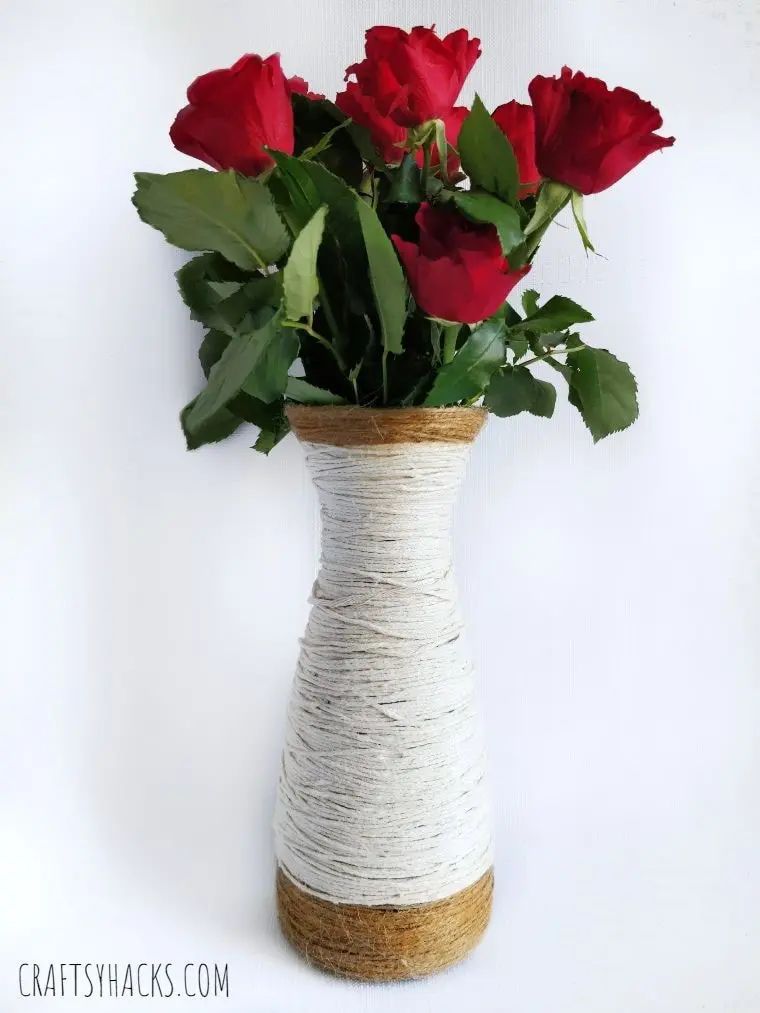
Credit: craftsyhacks.com
I absolutely love any project that involves yarn. But you don’t have to learn how to crochet or knit to work with yarn in this project.
If you have an old vase lying about that is a little too shabby to display, then this is the perfect opportunity to upcycle it. You can cover up any dents or scratches when you wrap the yarn all around it.
So, pick out a skein or two of colored yarn—you can also use jute or hemp twine—from your stash. Then, fire up your hot glue gun and start wrapping!
Check out more DIY Dollar Tree vases here.
25. Disney Countdown Craft
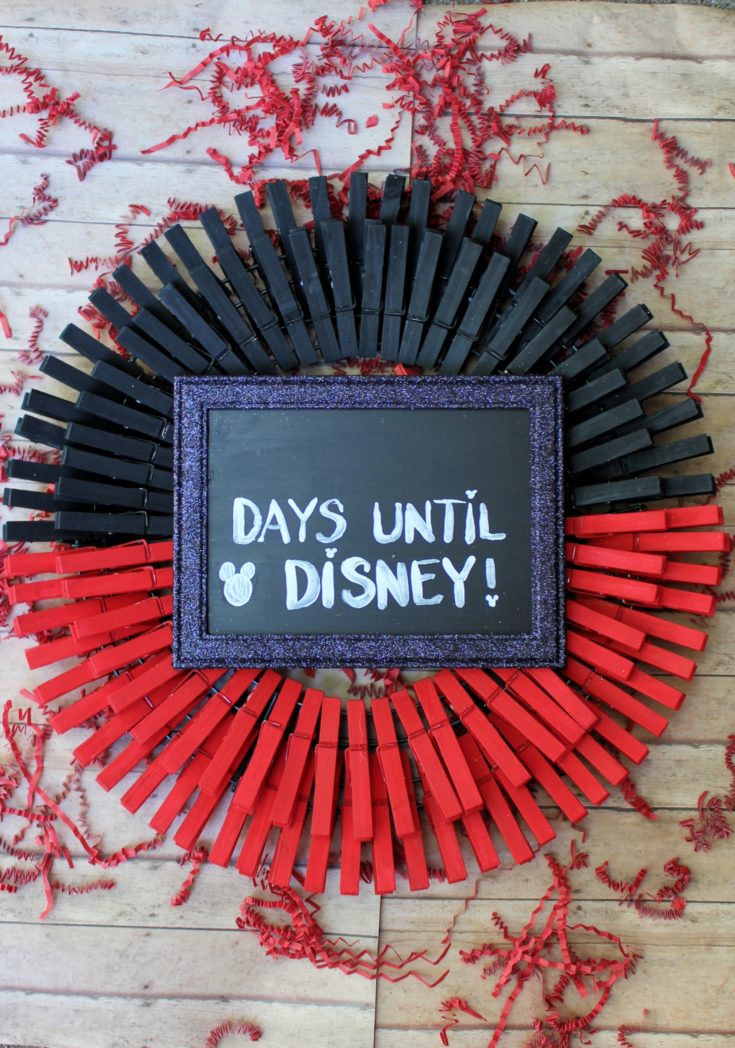
Credit: savvymamalifestyle.com
Find me a kid—or even a grown-up—who doesn’t love Disney and I’ll eat my hat with ketchup. We all grew up with Disney always there to add sparkle and magic to our lives.
So, here’s a Disney wreath to take over and add that much-needed color and fun to your home! Grab some clothespins from here first.
You can find all the other items on your list of materials for this red and black Mickey Mouse-themed wreath at a local dollar store. It’s inexpensive, easy-to-make, and looks adorable, too!
26. Wood Tiered Tray
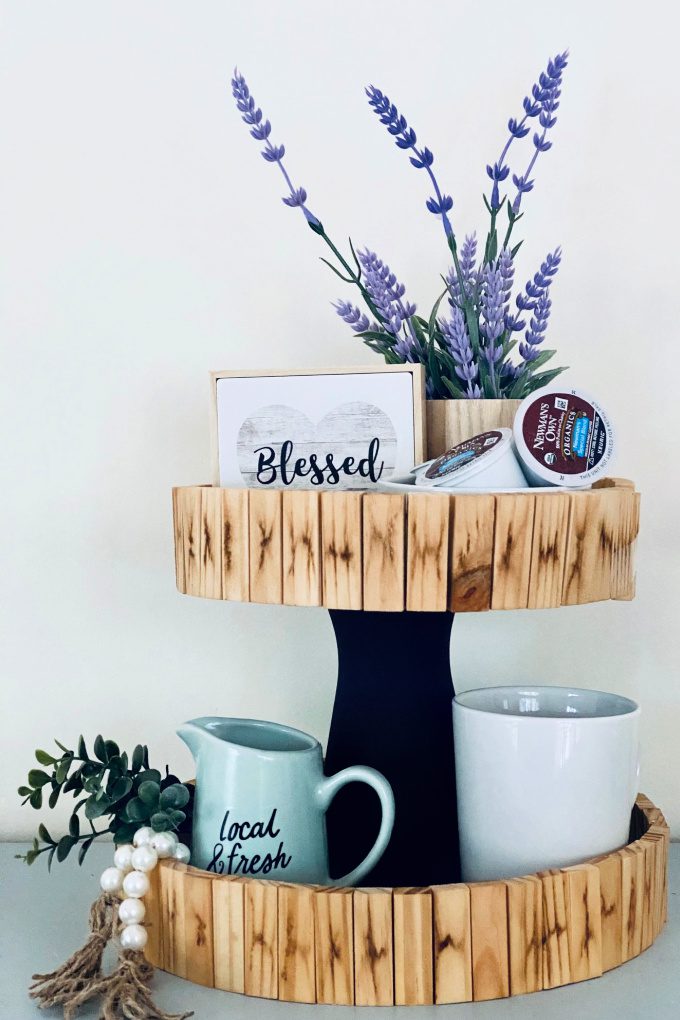
Credit: jugglingactmama.com
A tiered wooden tray like this is just the kind of base you can work with to put up your seasonal decor. Just imagine this tiered tray perched next to your coffee maker, stuffed with Christmas treats and accompaniments for your hot beverage.
Head over to a dollar store near you to pick up everything you need for this project. While you’re at it, remember to stock up on your edibles, too.
That means you’ll be shopping for coffee pods, choco chips, marshmallows, syrups, and more to help you decorate this tiered tray.
27. Farmhouse Window Frame
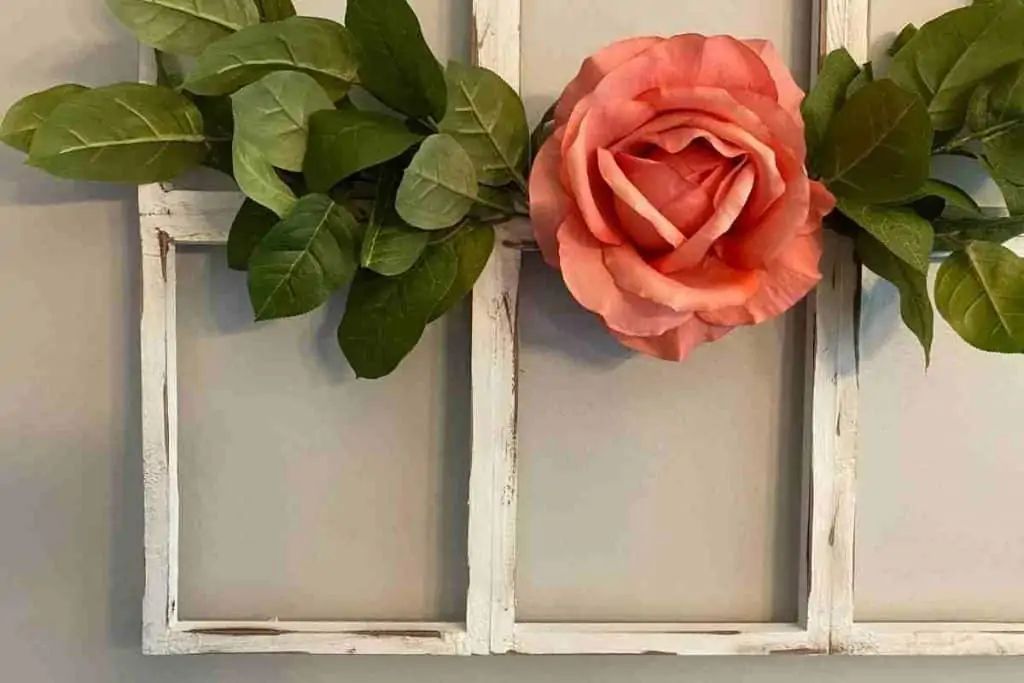
Credit: restoredecorandmore.com
Don’t you just love how quaint and rustic farmhouse decor can be? Take this farmhouse wooden frame, for example. It’s made entirely out of canvas frames that you can pick up here or at a dollar store.
By using these canvas frames, you get to eschew all those power tools you might otherwise need. So this project is cost-effective and easy to make!
It has just the right amount of country living mixed with oodles of personality. That gorgeous rose and those ivy leaves add color to the frame, too.
Check out these DIY dollar store frame craft ideas for more inspiration!
28. Pillow Cover
Credit: heatherednest.com
Dollar stores have a surprising collection of bandannas that you can choose from. Why, you might ask, do you need to buy bandannas? Well, how else are you going to make these bandanna pillow covers?
This 10-minute DIY is perfect for beginners to learn how to sew. But it is just as easy to make if you decide to sew your pillow covers by hand, too.
Alternatively, with this stitch adhesive, you can just do away with any sewing altogether. While you’re shopping for your bandannas, remember to pick up an appropriately sized pillow insert, too.
29. Fall Mug

Credit: rufflesandrainboots.com
Who doesn’t love to cuddle up with a good book before the warm fire on a cold fall night? What’s missing from this picture, however, is a hot cup of your favorite beverage—pumpkin-spiced hot cocoa, perhaps?
These fall mugs would be perfect for your hot cuppa. You can enjoy the ‘sweater weather’ and the ‘light a fire weather,’ just like the mugs indicate.
With your Cricut machine to help you design your font and template, your DIY mugs will be ready in no time. You can even gift them to your loved ones so they can enjoy their hot beverage in these fabulous mugs, too!
30. Tape Resist
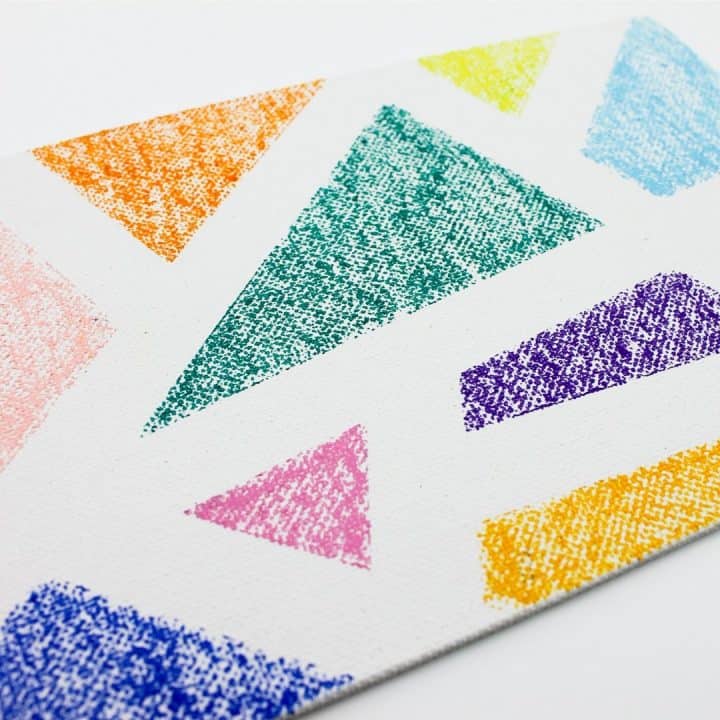
Credit: feastforafraction.com
If you’re not familiar with tape resist art, it’s when you tape over certain parts of the canvas and paint over and around them. Sounds simple, right?
But you’ll be surprised at just how beautiful tape resist art can turn out. You can experiment with patterns, colors, and even the width of the tape you use.
You’ll end up creating geometric patterns and designs on the canvas that will blow your mind. All that’s left to do is hang your art up for everyone to enjoy!
31. Wooden Snowman Ornament
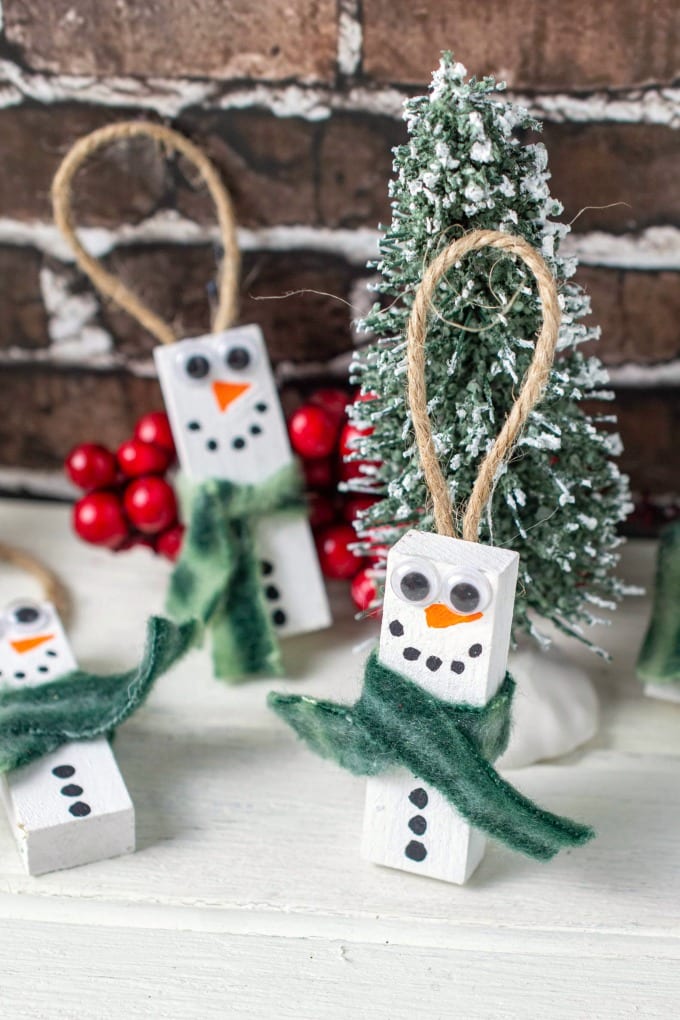
Credit: jugglingactmama.com
These wooden snowman ornaments are so utterly easy to make, but they can do so much to jazz up your Christmas tree. Each of these ornaments adds a ton of character and quirkiness to the trees and color, too!
You can pick up little wooden blocks at a dollar store near you. Or, just buy a Jenga kit(look here) or Tumbling Towers game and decorate them to make your ornaments.
Grab your brushes, paints, and some googly eyes from here and start crafting!
32. Love Sign
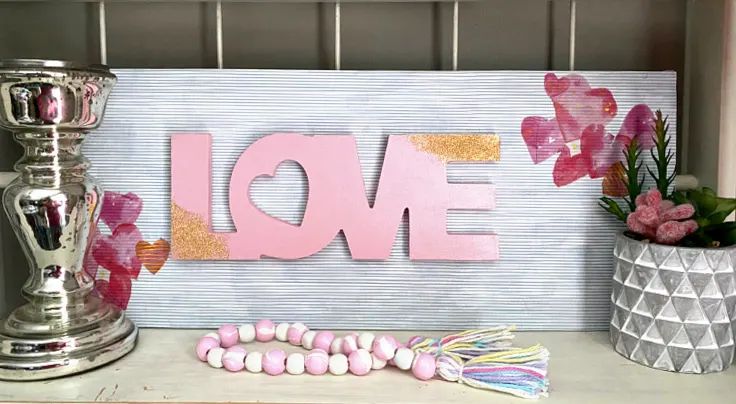
Credit: ourcraftymom.com
Looking for a sign that your partner’s The One? Well, while you mull things over, why not make your own sign of love? Check out this pretty DIY Dollar Tree love sign!
Go ahead and assemble everything you need for this project, including your craft essentials and scrap wood for you to work with. You can consider using wood scraps leftover from previous DIY projects and repurposing them for this one.
If you want to add some sparkle to your sign, then pick up some of this glamor dust. Then, use a foam brush to dust the ends of the sign with glamorous gold dust!
33. Travel Mug
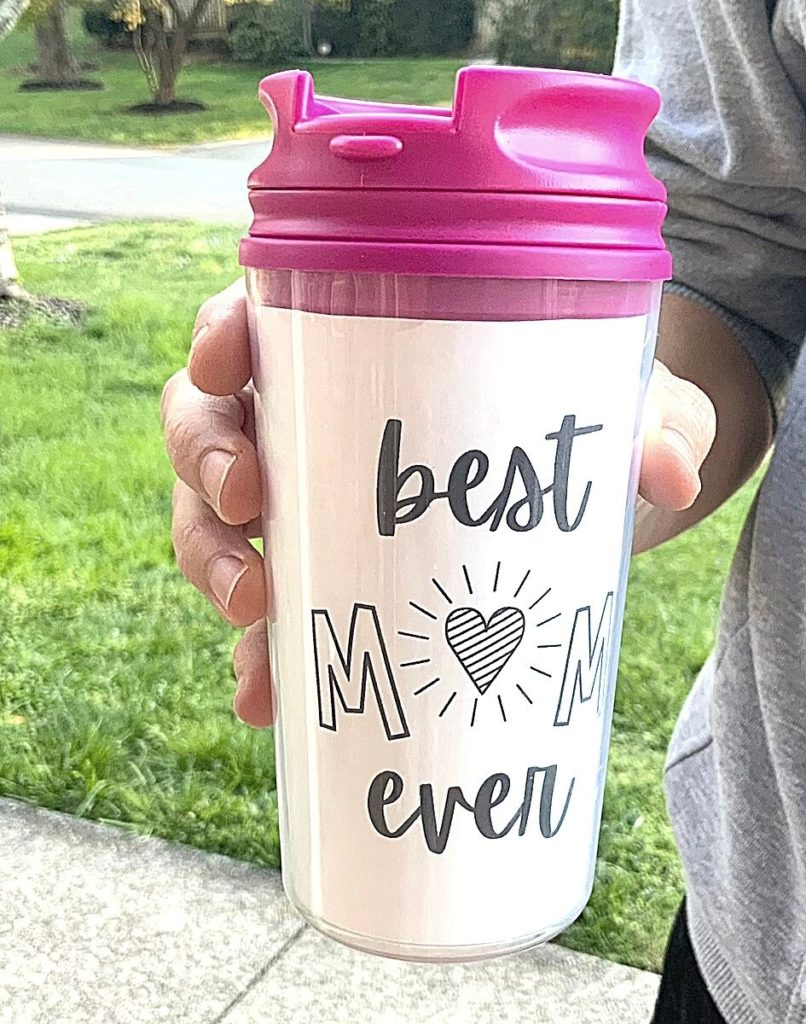
Credit: originalmom.com
What’s that one thing—that lifesaver, even— that gets you through your commute every day? You guessed it—your travel mug, of course!
There’s no long queue or never-ending traffic you can’t face with a travel mug like this one filled with your favorite beverage. Did you know that you can customize and personalize your travel mug?
Just twist the glass cover off and slip in a paper design in place. If you’ve got a birthday or special day like Mother’s day coming up, then it can be a wonderful gift, as well.
34. Gnome Wreath
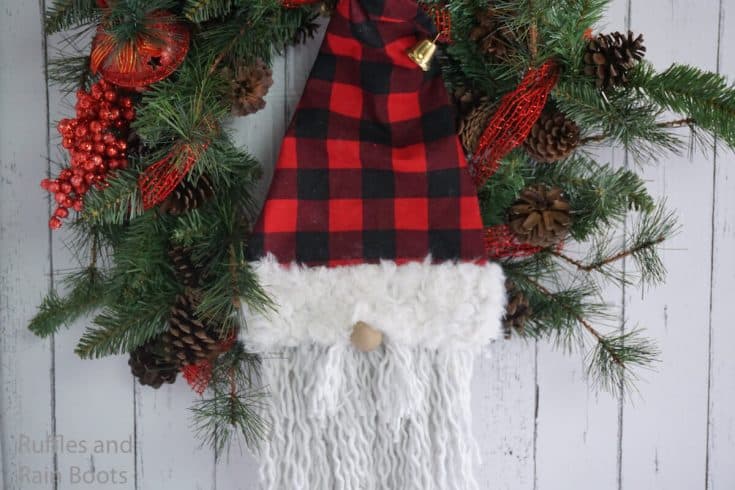
Credit: rufflesandrainboots.com
Dollar store happens to have all the fixings to make the most adorable Christmas gnome wreath. Don’t you just love how this cute button-nosed gnome is decked up as Santa?
It would be the perfect wreath to add character to your front door. It would also set your wreath apart from all the other generic wreaths out there!
A word of caution, though: this wreath can get pretty heavy if you don’t watch out. So remember to pick your materials carefully so that your wreath stays up!
A sturdy wreath frame like this can help you with that!
35. DIY Dollar Tree Rope Vase
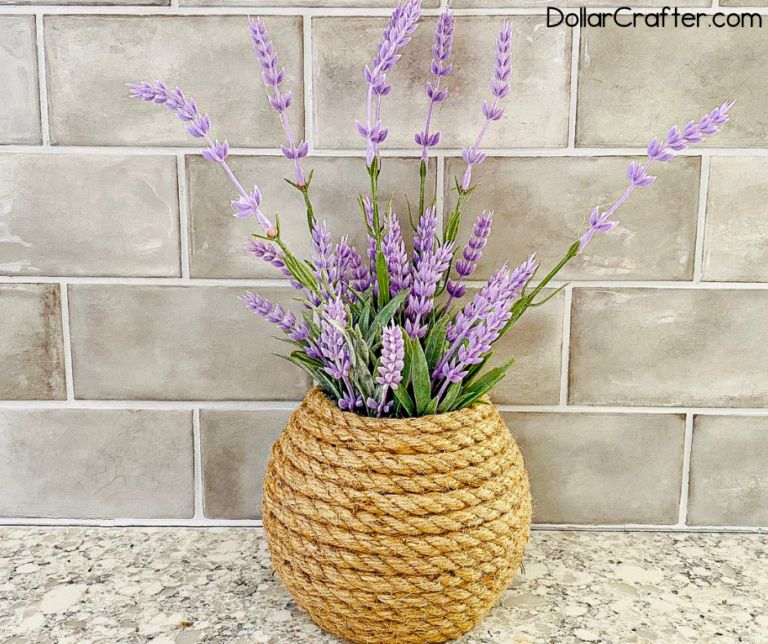
Credit: dollarcrafter.com
A rope-wrapped vase can bring a ton of texture to your decor. It all comes down to the width and ply of the rope you use, as well as the material you pick.
Jute nautical rope like this is definitely more rustic, while cotton rope can add some boho-chic vibes to the palette. So, to make this DIY vase, pick out your rope and then a bowl to wrap it around.
You can pick one up here, or you can upcycle an old vase or fishbowl you have already!
If you’d like to explore more DIY projects for teens that involve yarn or rope-wrapped items, then check out:
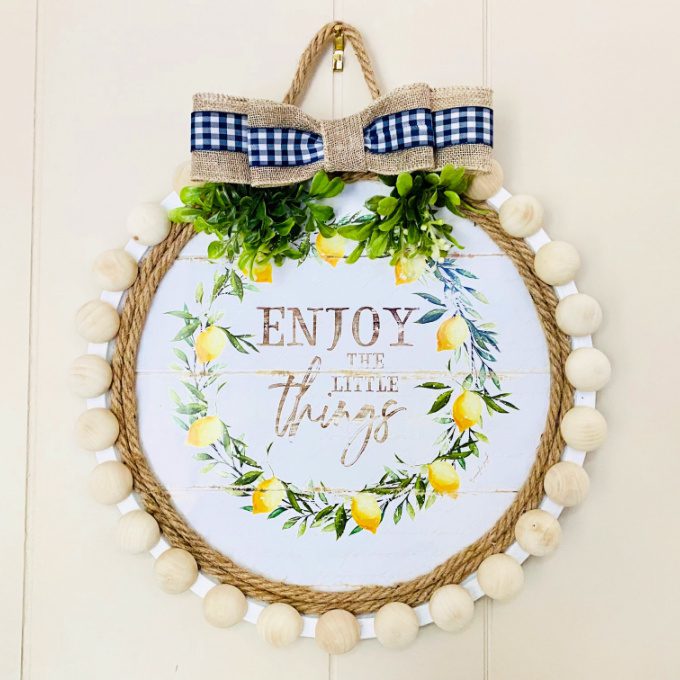
36. Plate Decor
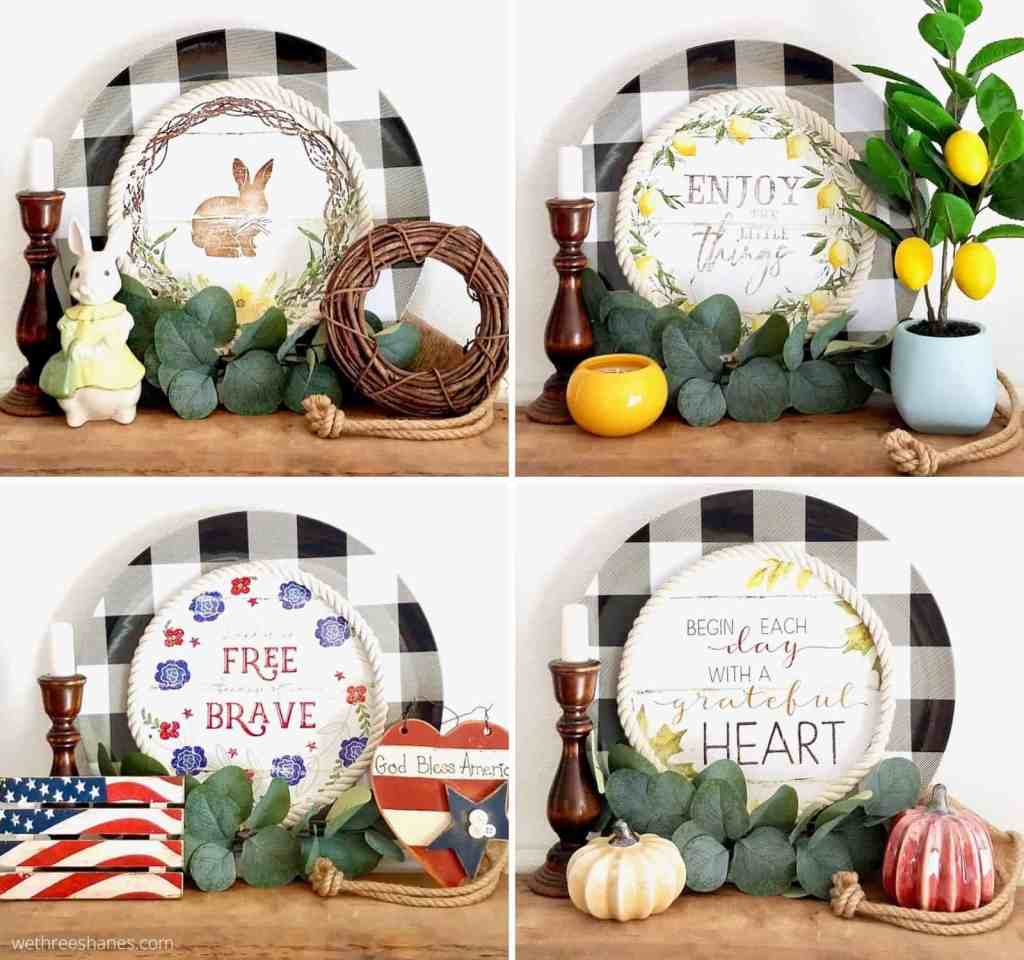
Credit: wethreeshanes.com
Dollar stores have a ton of plates in their catalog. The next time you’re there, pick up one of those plates; you’ll need one to make this gorgeous sign plate!
It’s fresh and zesty, with bright pops of yellow from the lemon and dark minty green from the leaves. You can almost smell those lemons just from looking at the picture!
You can also place a candlestick in one corner to offset the tableau. For one final rustic touch, why not lay a bit of corded rope around the potted lemons?
37. Hugs and Kisses Book Stack
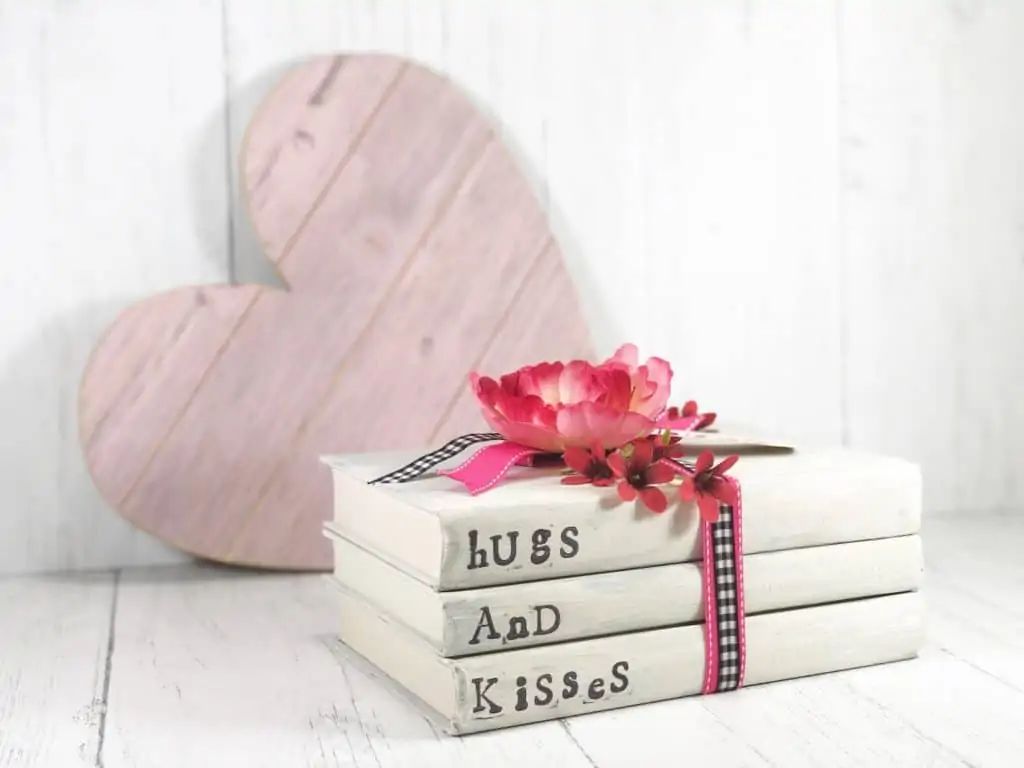
Credit: hispanaglobal.net
Everybody loves a good stack of books artfully placed and stacked as a display of sorts. Coffee table books are great for that purpose, yes, but they can be quite pricey.
How about you make your own stackable books? You’ll find everything you need at a dollar store near you.
A book stack like this one is super easy to make, and you’ll be surprised at just how much character they bring to a room. Just customize it with words or phrases of your choosing, and, voila!
38. Hot Chocolate Mug Gift
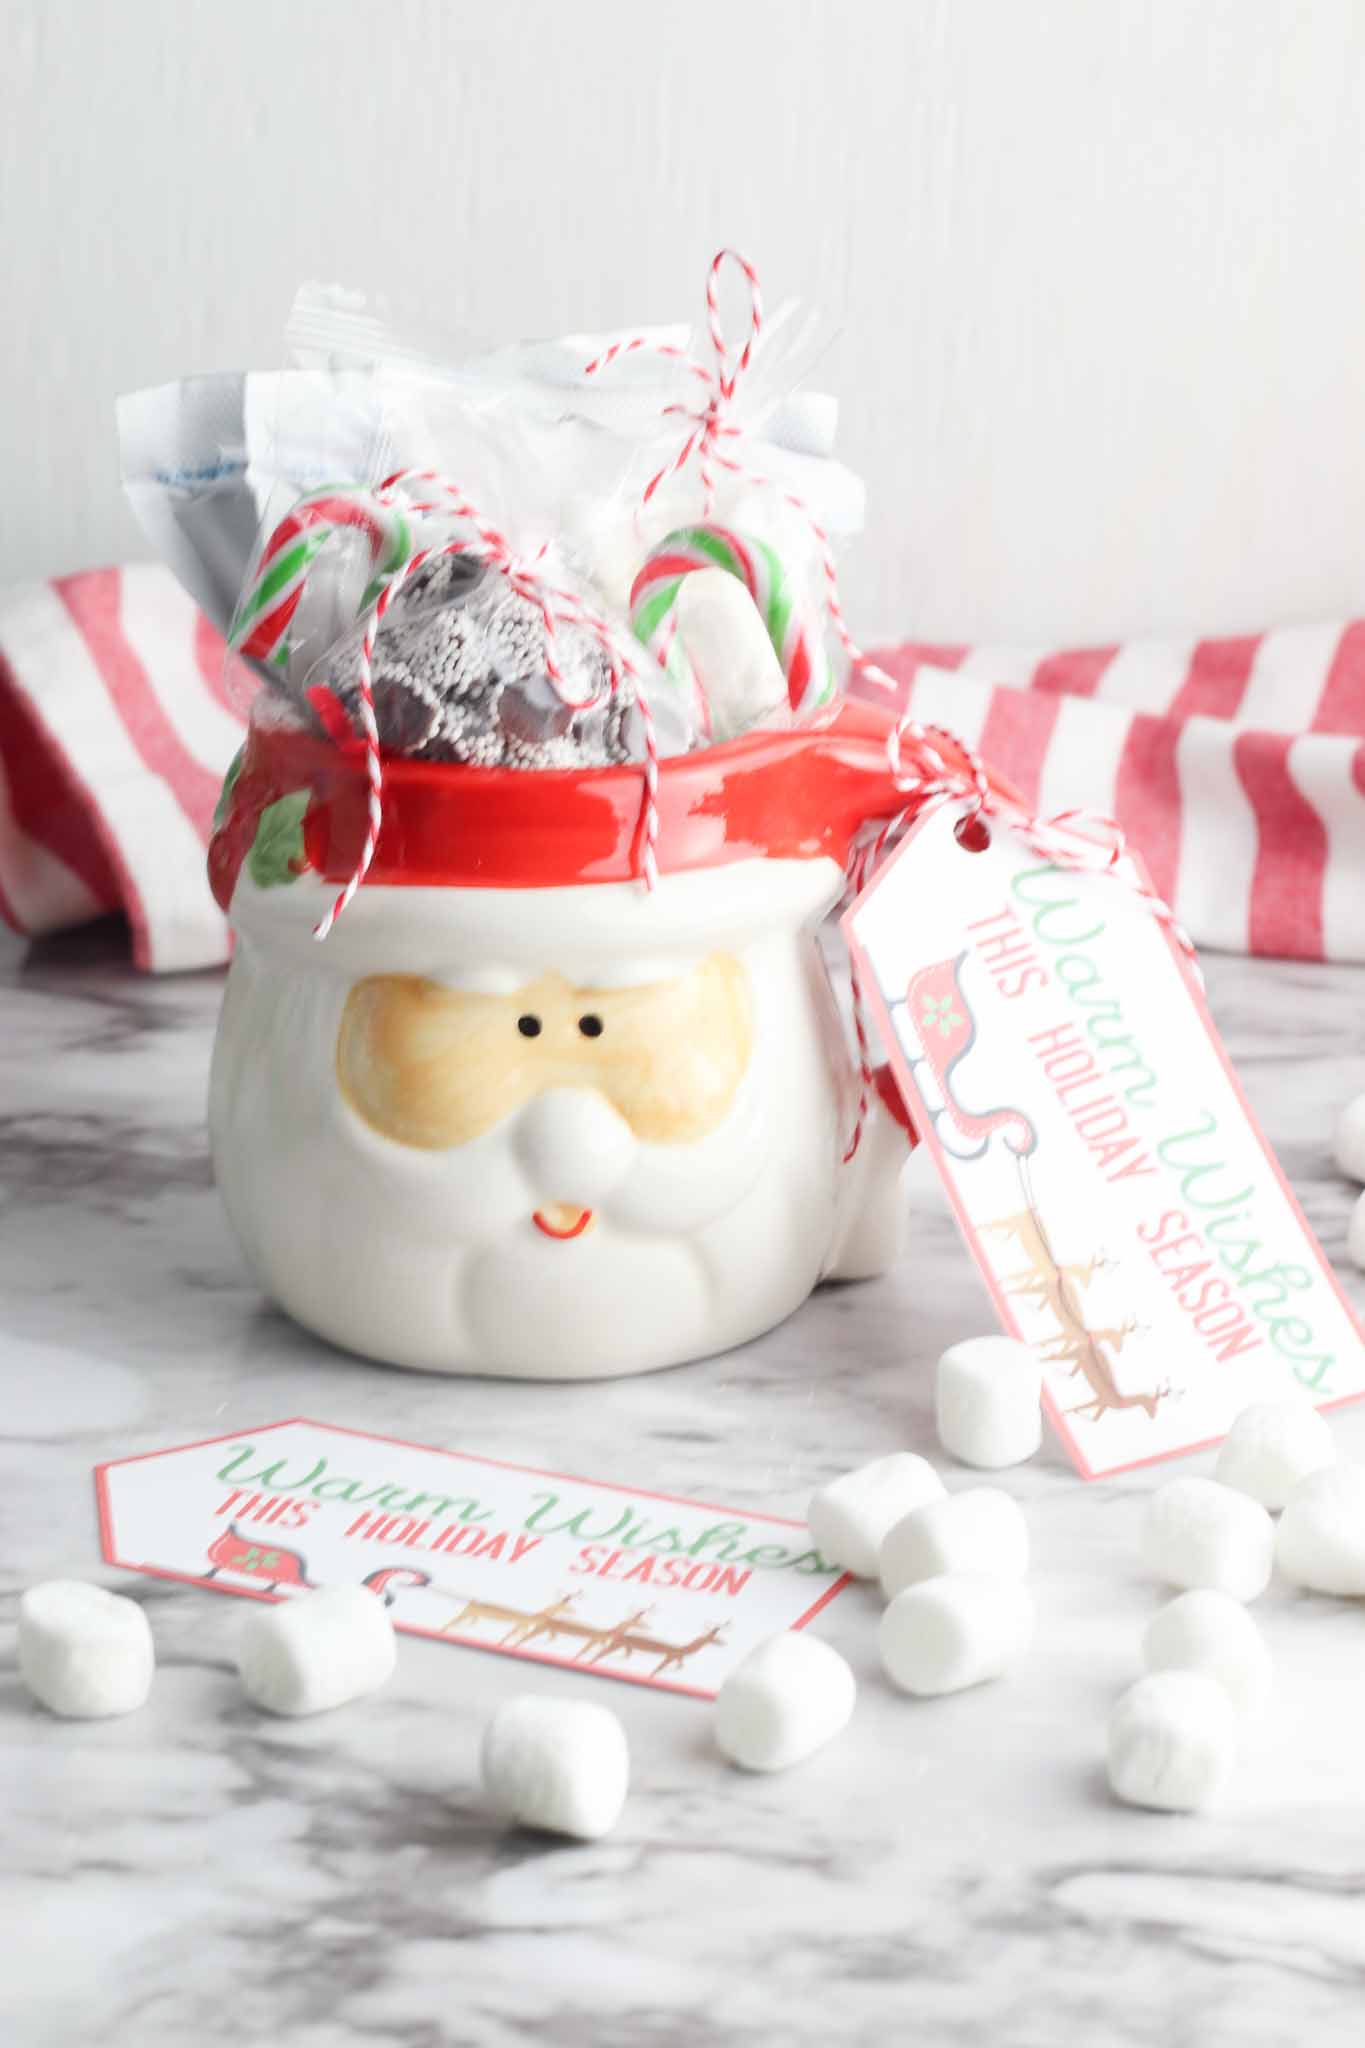
Credit: brooklynactivemama.com
Remember that gorgeous fall mug from earlier? Well, the months go by, and the seasons change, so come Christmas, you can gift this Santa hot chocolate mug!
It has all the fixings needed for a cup of good old-fashioned hot chocolate. But here’s the best part: you can customize to your heart’s content.
You can make little hot chocolate stirrers and pick out any number of add-ons, combinations, and more! How does a cup of salted caramel hot chocolate topped with bits of Snickers sound?
39. Bird Finger Puppet Origami
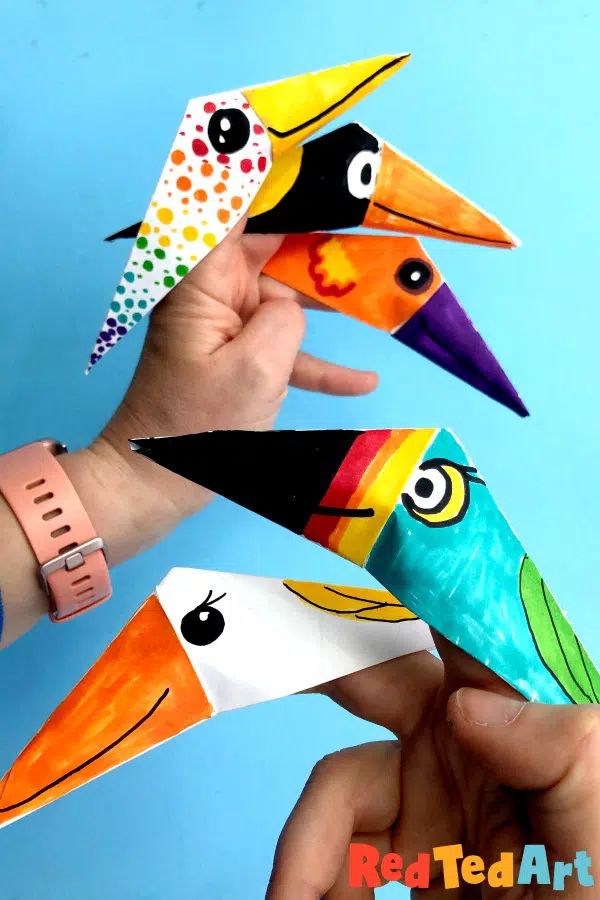
Credit: redtedart.com
Origami is an art that takes time and patience to master. Luckily, that and some paper is all that you need when it comes to choosing supplies for origami projects.
These origami finger puppets, for example, can be made in just under five minutes! Once you’re done with the folding, you can paint the birds accordingly.
You can use paint pens or just regular acrylic paint. Do you want to make your birds a little more realistic? Just add googly eyes instead of drawing them.
40. Pizza Pan Wreath
Credit: jugglingactmama.com
As a hard-core pizza connouisseur—fan simply does not cover the extent of my adoration for pizzas—I would go wild for a pizza pan wreath.
Even if the pizza pan is just used as a wreath form, I’d still love how creatively it has been incorporated. This beachy wreath might not exactly look like pizza, but all those lovely lemons sure do look zesty.
Do you want to enhance the beachiness of your pizza pan wreath? Then go ahead and add a few beads, a big checkered bow, and even a bit of rustic jute twine
41. IPAD Case
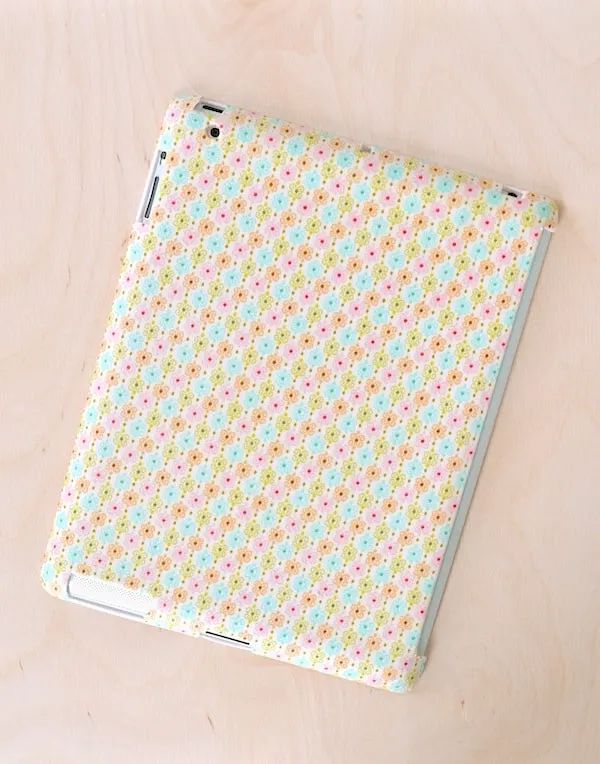
Credit: modpodgerocksblog.com
iPad cases can be pretty pricey if you’re buying them at the Apple store. And besides, don’t you want something more…you?
The only way to have the perfect case for your iPad is to simply make your own. That way you get to pick the color, pattern, or design.
First, though, you will need to pick up a plain iPad case at a local store—you’ll find a hard case cover for just a buck. Then, you can apply mod podge and adhere any fabric of your choice to the back of your iPad.
Conclusion
Do you like any of these dollar store crafts? Which one is your favorite? Make sure to share them with your friends!


Great gift ideas! Thanks!
First time on the website, but as a crafter, I will come back again, again, again and AGAIN!!!!!!! Love it