DIY Sparkling Icicle
This post may contain affiliate links: full affiliate disclosure.
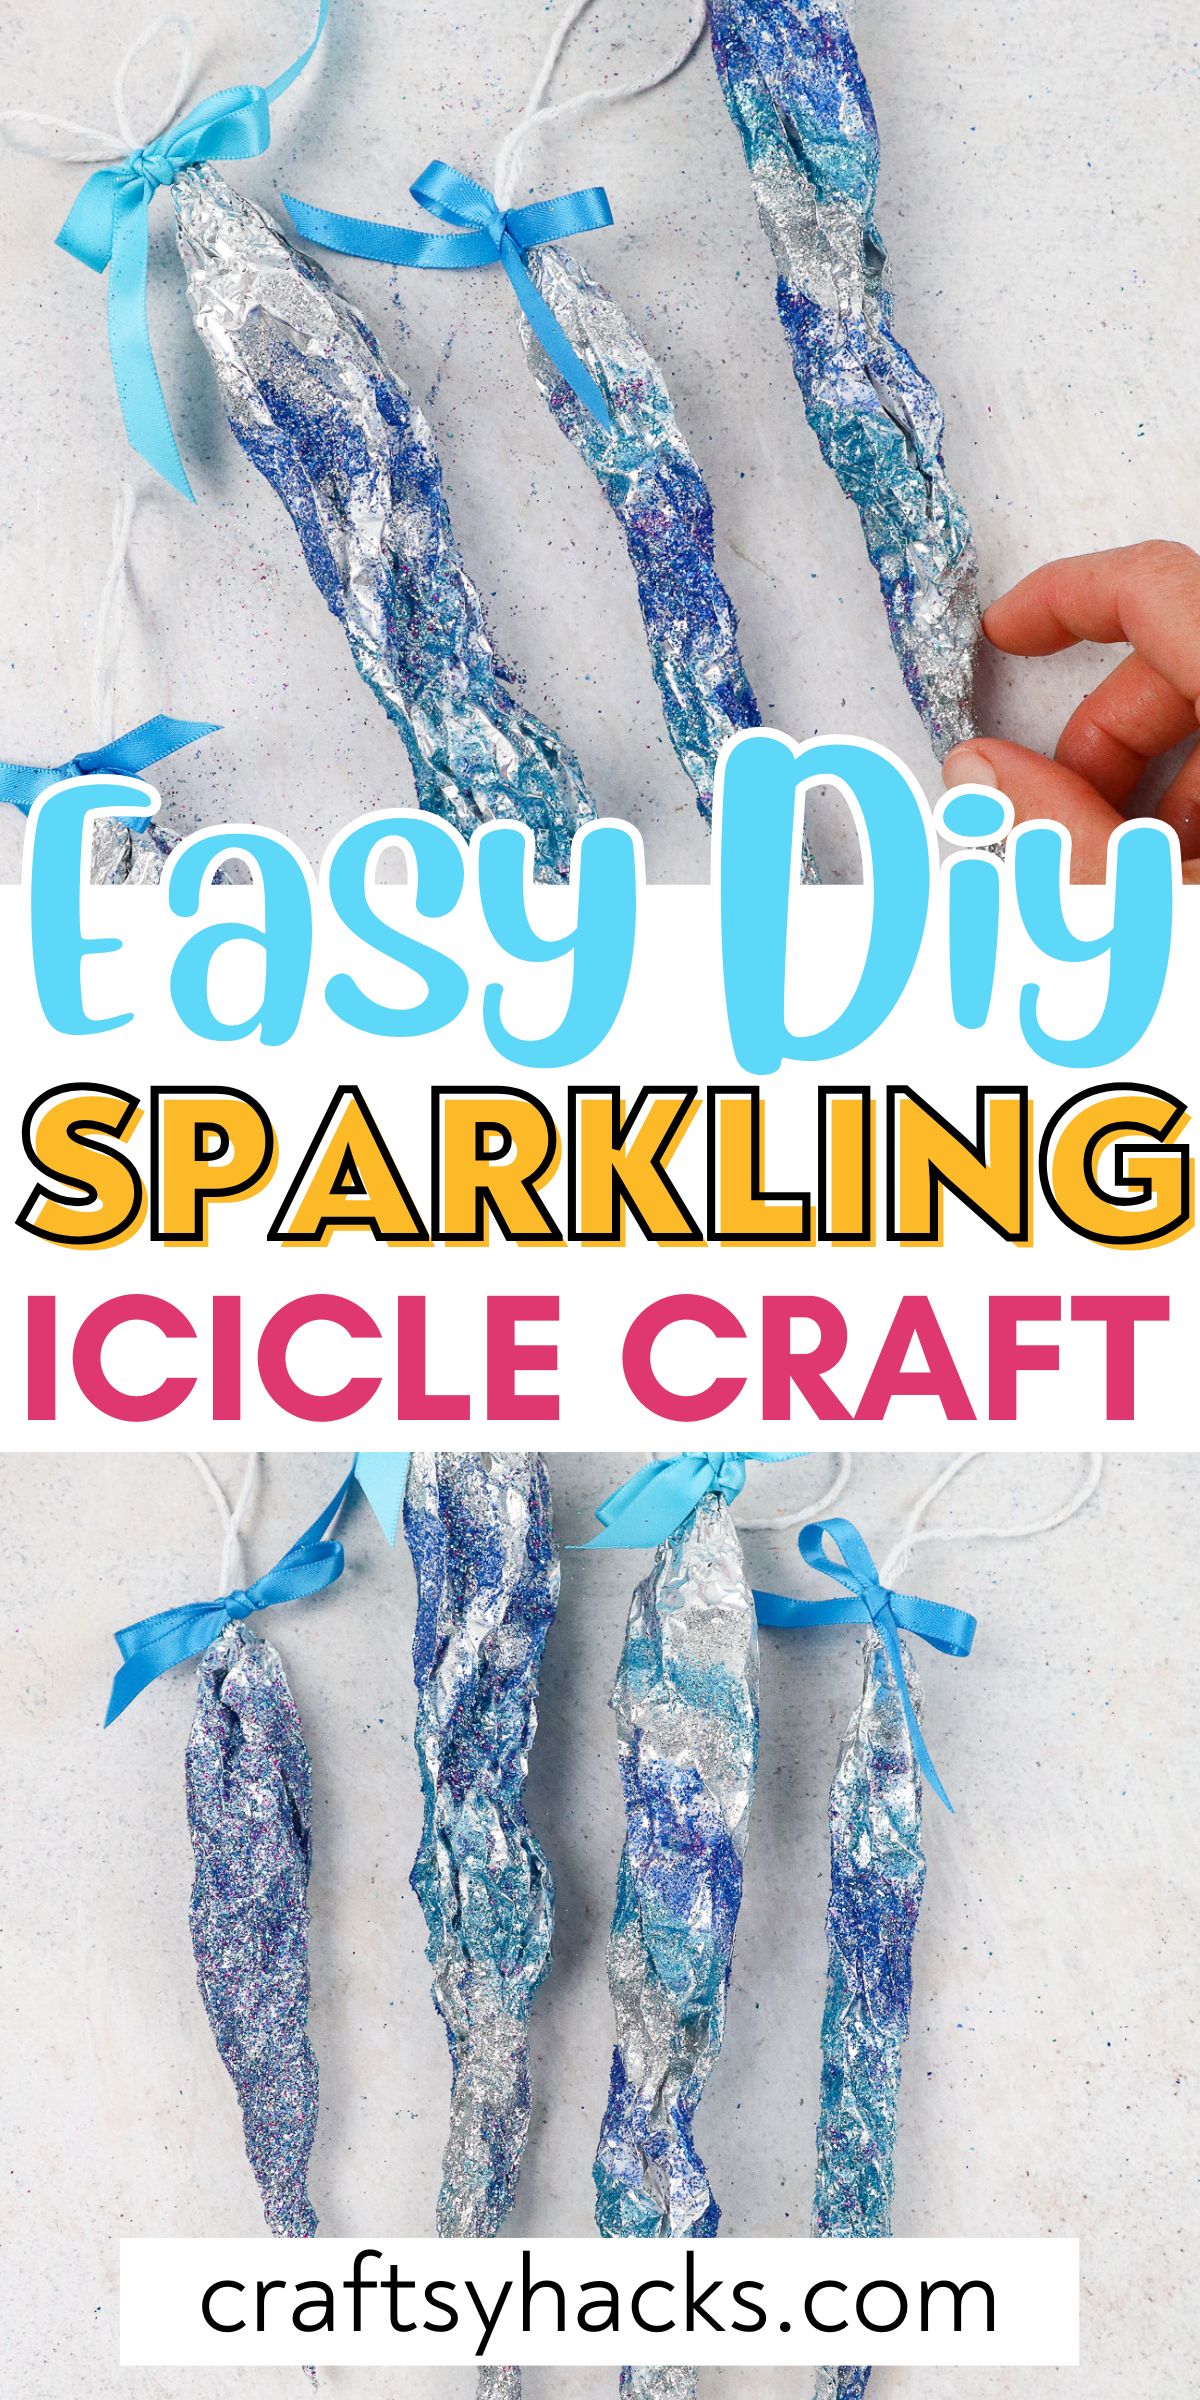
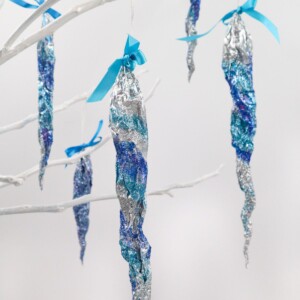
I love creating seasonal homemade décor that is beautiful, unique, and festive. If you are the same way, I bet that you will love this DIY sparkling icicle project.
This is a fun, fast, and easy project to do. It comes together quickly with a few basic materials that you probably have on hand.
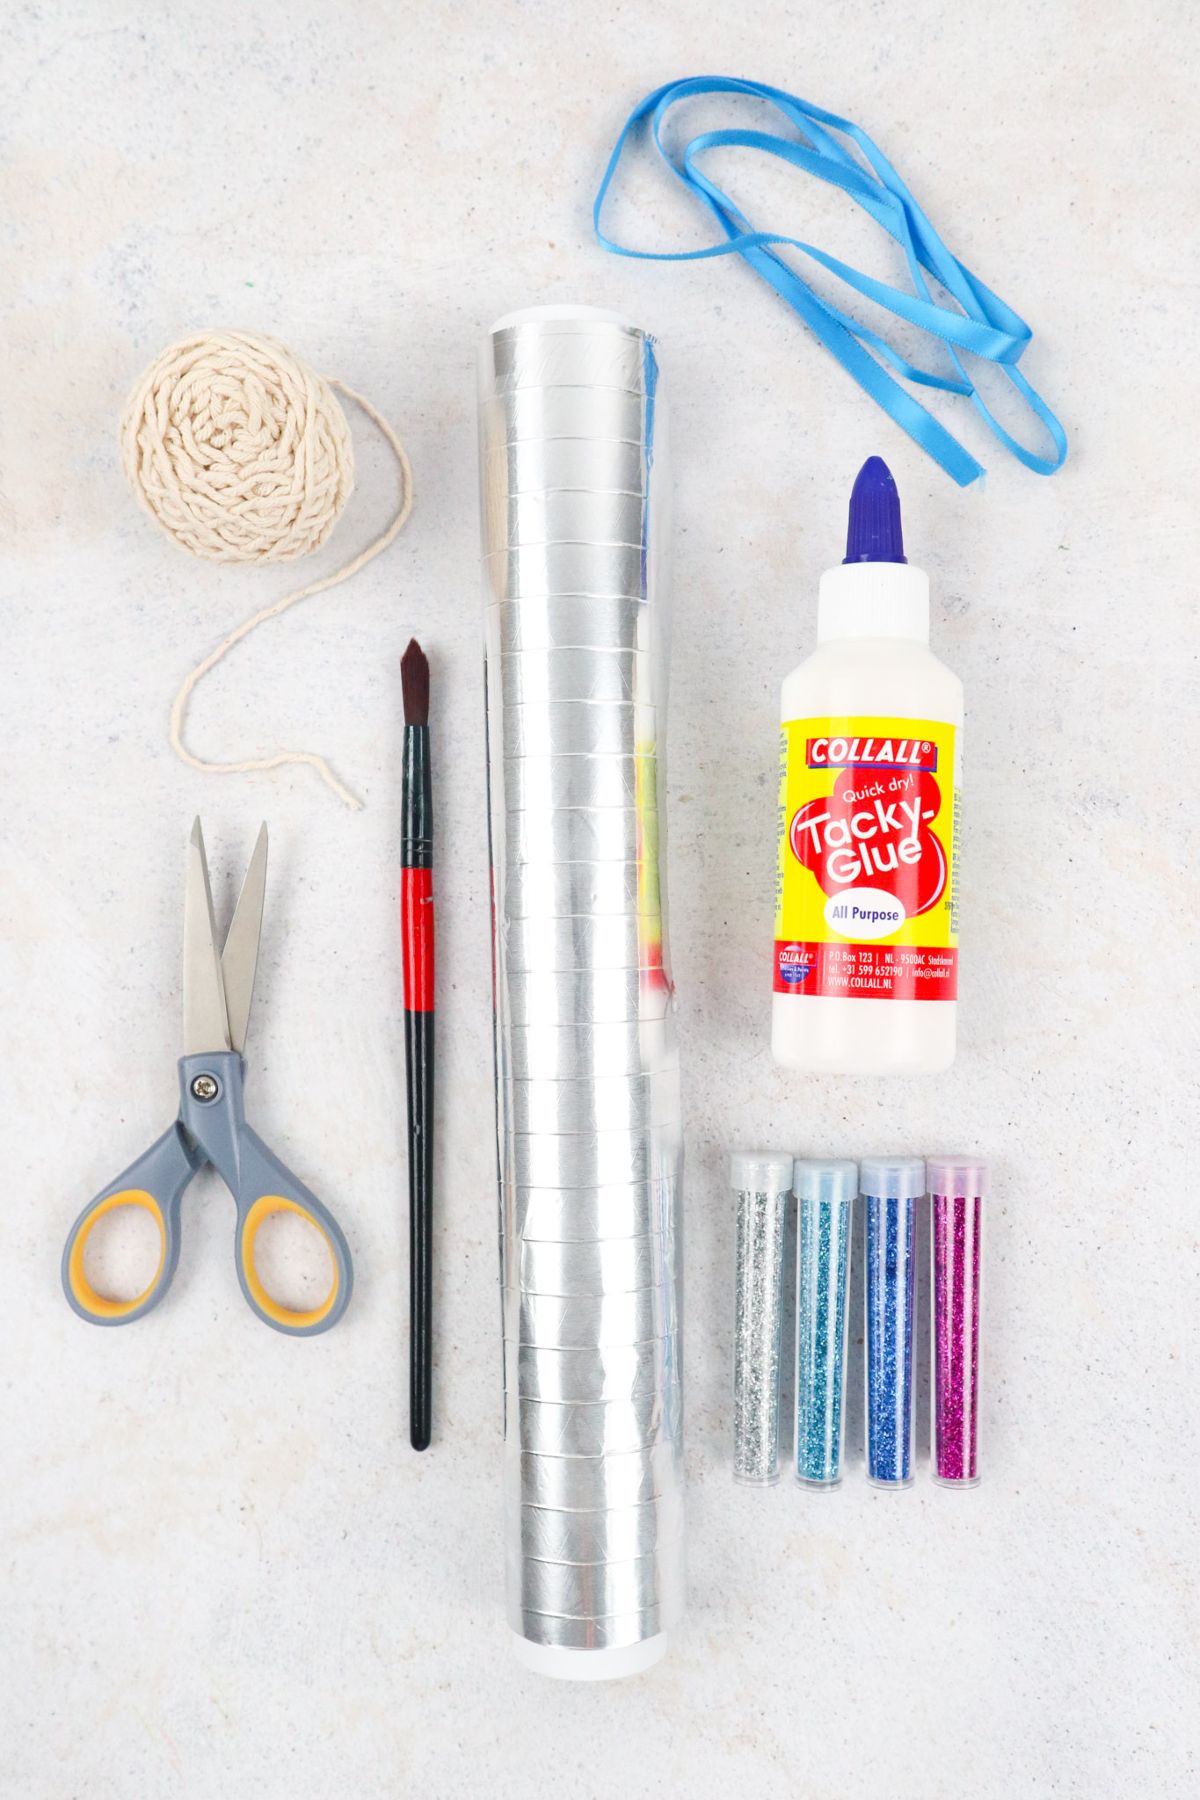
To make your own DIY sparkling icicles, you will need foil, tacky glue, glitter powder, and twine. You can also add a ribbon at the end if you want to make your icicle extra glitzy and glamorous!
These sparkling icicles are the perfect way to celebrate the winter season. They would be perfect for any winter party.
If you have little ones that are obsessed with Frozen, you can make these icicles together. Kids will love decorating their rooms with these or using them as décor for birthdays and other gatherings.
Supplies You’ll Need
- Aluminum foil
- Tacky glue*
- Paint brush
- Glitter powder
- Scissors
- Twine
- Optionally: Ribbon
*This type of glue becomes transparent once it dries.
How to Make a DIY Sparkling Icicle
Step 1. Let’s begin by cutting out a piece of aluminum foil from your roll of foil.
Step 2. Now, fold the top part of the foil down about 1 inch.
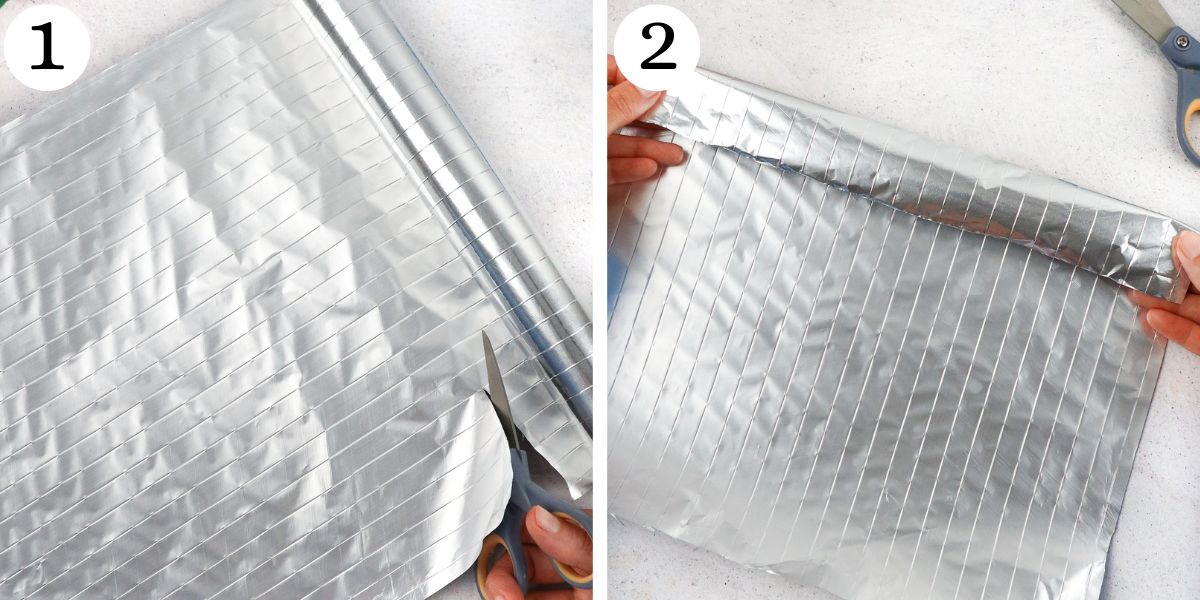
Step 3. Next, fold up each of the bottom corners to about the middle of the piece of foil. When you are finished with this step, you should have two symmetrical triangles.
Step 4. Now, cut out a 9” piece of twine and make a knot at the end.
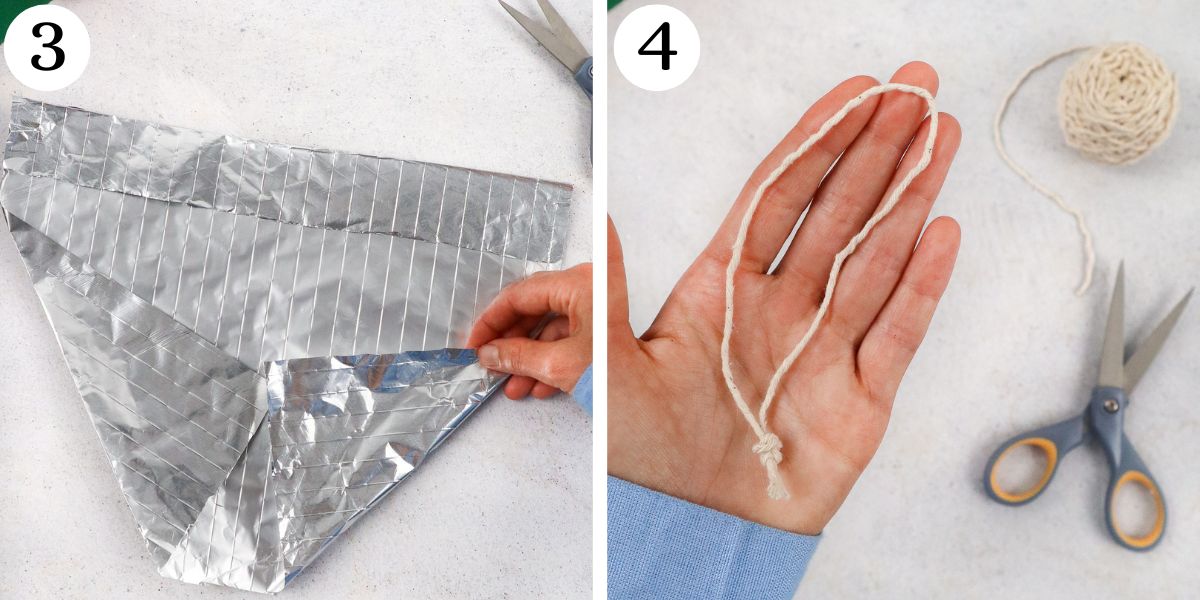
Step 5. Next, add some glue to the top corner of the folded foil. Attach the piece of twine here, with the knot on the glue.
Step 6. Start to loosely roll the aluminum foil into a cylindrical shape. To do this, you should start from the side where you have attached the twine.
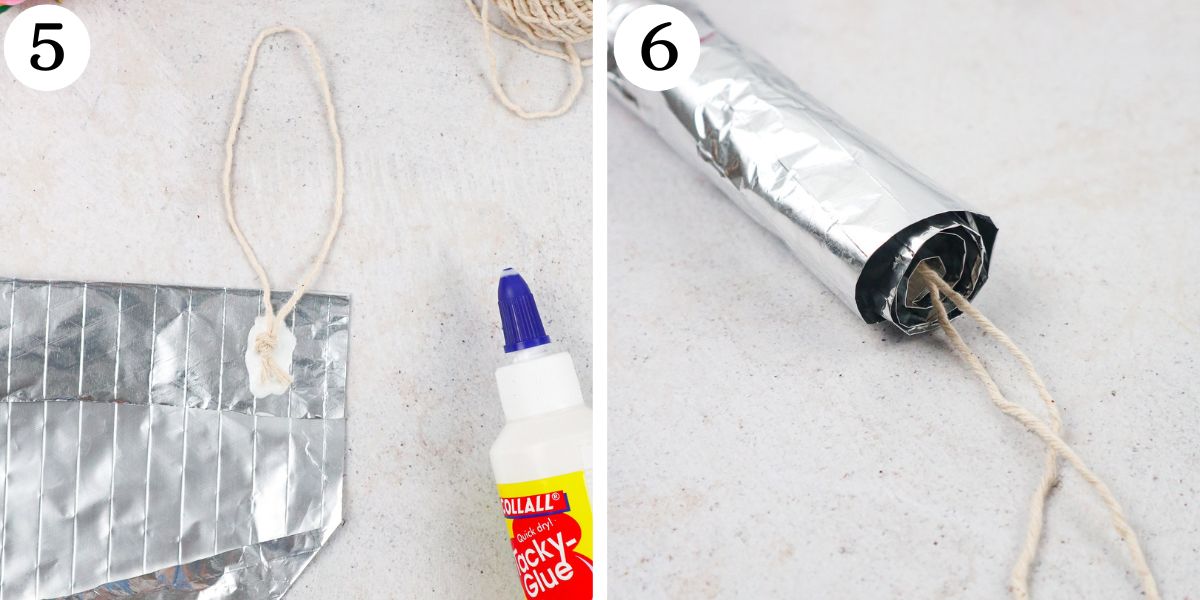
Step 7. When you are done rolling the foil, squeeze the top of the foil around the twine tightly.
Step 8. Now, it is time to form your foil into an icicle shape. To do this, start at the top and squeeze the foil gently.
When you get to the bottom, squeeze the foil tightly so that it becomes narrow at the bottom and looks like an icicle.

Step 9. You can make different sized icicles. Some can be smaller and some can be larger.
Step 10. Next, get your paint brush and use it to brush a thin layer of glue all over your icicle.
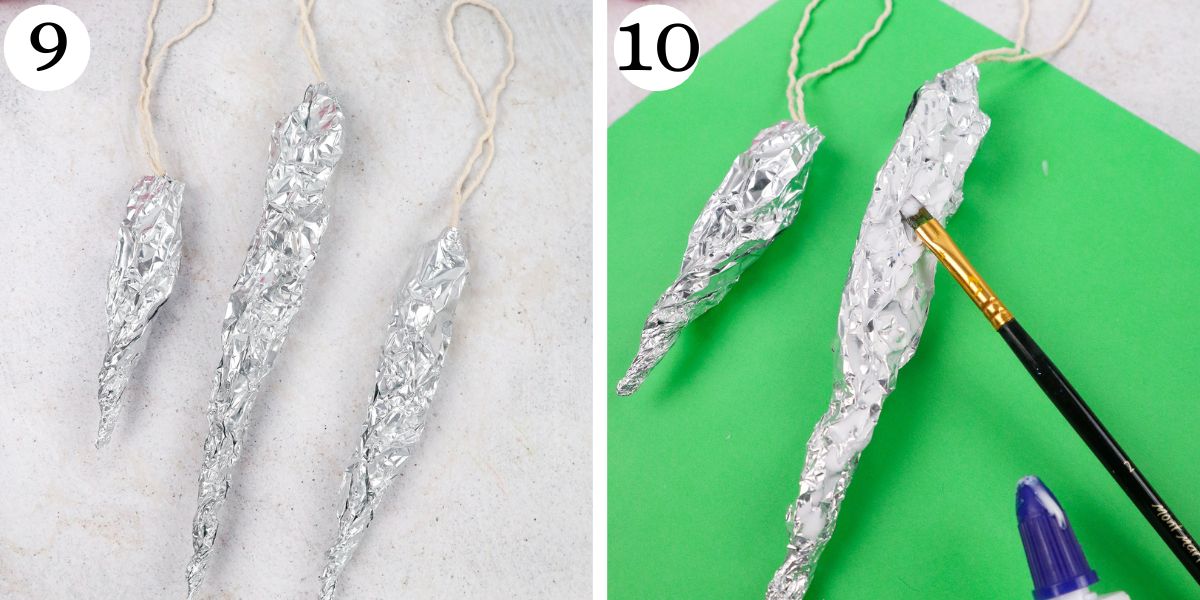
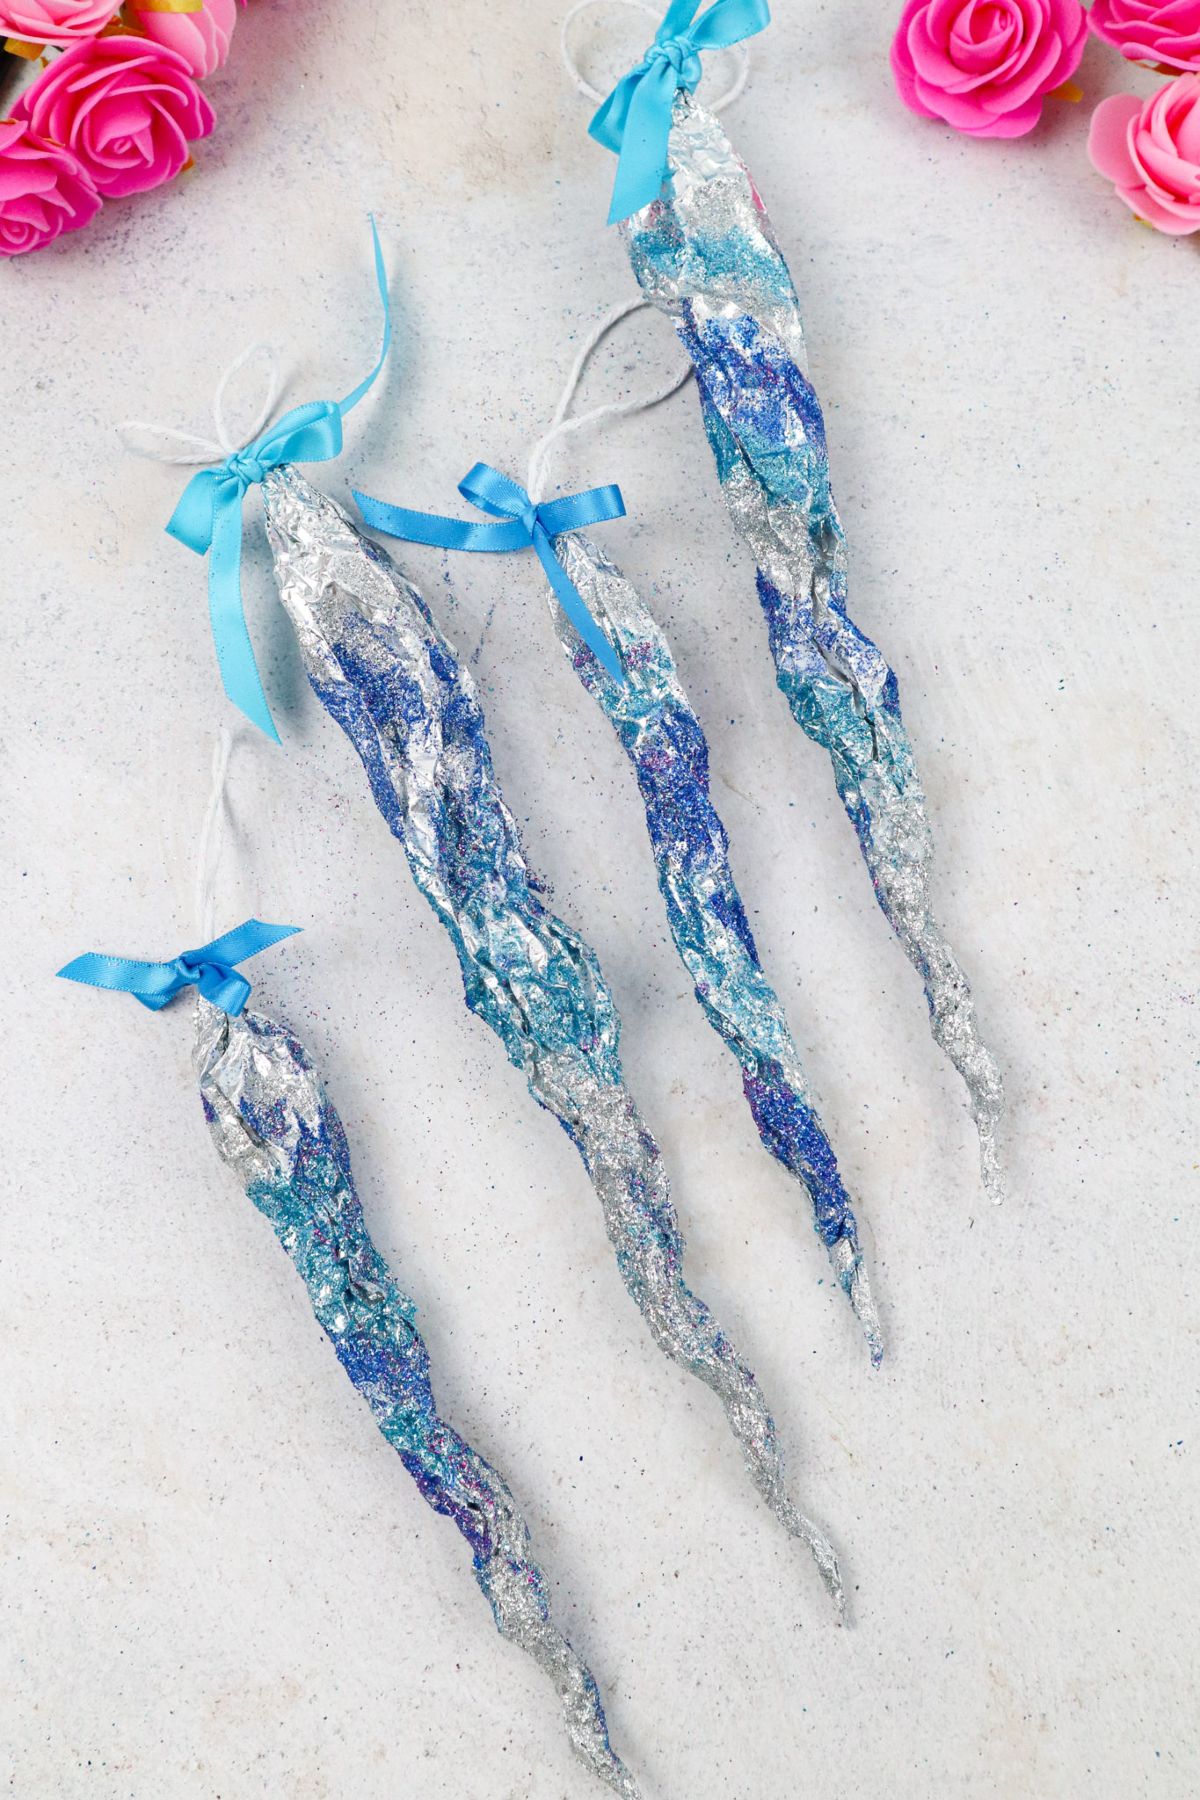
Step 11. Let’s add some glitter and make your icicle sparkle! To do this, apply your glitter powder randomly all over your icicle.
Alternatively, you can make lines with your glue and sprinkle the glitter powder over it for a neater look. Be sure to let it dry completely.
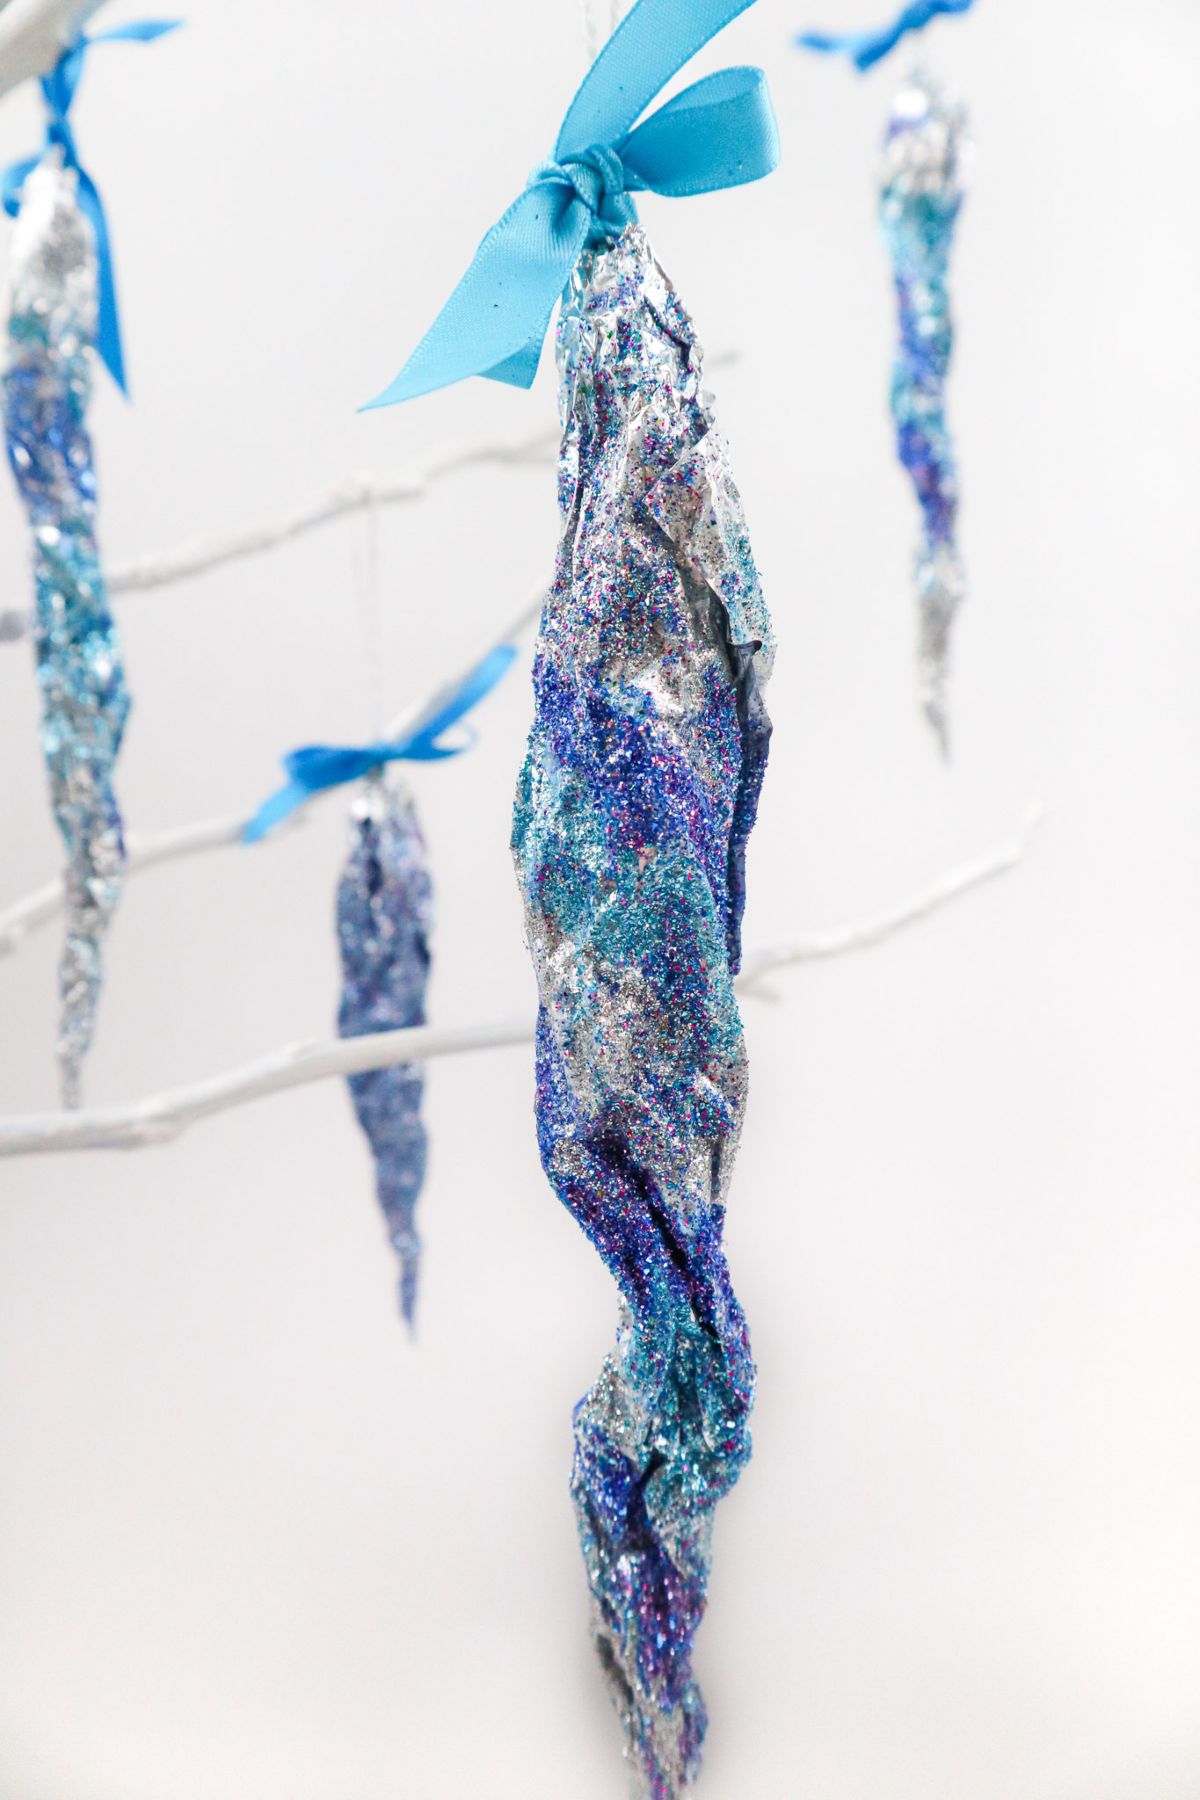
Step 12. Your icicle is complete! You can hang it up and add a ribbon at the top if you’d like.

How Long Do These DIY Sparkling Icicles Take to Make?
These DIY sparkling icicles are quick to make. It should take about 20 minutes in total to form and decorate your icicle.
The glue will need about 30 minutes to dry. In total, you should be able to make one of these in about 50 minutes.
More Craft Ideas
DIY Sparkling Icicle
Equipment
- Scissors
Materials
- Aluminum foil
- Tacky glue *
- Paint brush
- Glitter powder
- Twine
- Optionally: Ribbon
Instructions
- Let’s begin by cutting out a piece of foil.
- Now, fold the top part of the foil down about 1 inch.
- Next, fold up each of the bottom corners to about the middle of the piece of foil.
- Cut out a 9” piece of twine and make a knot at the end.
- Add a bit of glue to the top corner of the folded foil. Attach the piece of twine here.
- Now, roll the aluminum foil into a cylindrical shape. Start from the side where you have attached the twine.
- Next, squeeze the top of the foil around the twine tightly.
- Now, let’s form the foil into an icicle shape. To do this, start at the top and squeeze the foil gently.Squeeze the bottom more tightly so that it becomes narrow at the bottom and looks like an icicle.
- You can make different-sized icicles.
- Use your paintbrush to spread a thin layer of glue all over your icicle.
- Add your glitter powder randomly all over your icicle or make lines with your glue and sprinkle the glitter powder over it for a neater look.Let it dry.
- Your icicle is complete! You can hang it up and add a ribbon at the top if you’d like.


