DIY Paper Jellyfish
This post may contain affiliate links: full affiliate disclosure.

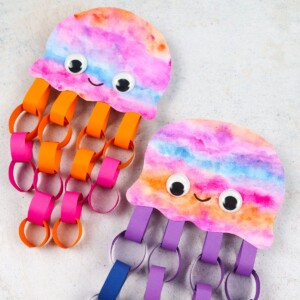
Any little kid will enjoy creating these colorful paper jellyfish. With sweet faces, googly eyes, and vibrant tentacles, these DIY Paper Jellyfish will brighten up any home or classroom.
These cute jellyfish are made using A4 paper, construction paper, paint, a ruler, and glue. Your little ones will have a great time painting and assembling their jellyfish.
This project allows children to practice painting, cutting, using a ruler, and gluing. Let’s get started on this fun project!

Supplies You’ll Need
- A4 Thick white paper sheet
- Colored construction paper sheets
- Watercolour paint*
- Paintbrush
- Black marker
- Googly eyes
- Glue stick
- Scissors
- Ruler
*I used watercolors but markers or crayons will also do.

How to Make DIY Paper Jellyfish
Step 1. First, we will paint our jellyfish. I started by adding a little bit of water to the blank paper because it helps the colors blend together more.
You can skip this step. If you want to do this, make sure that your paper is thick enough to handle it!
Now, start painting with your watercolors.
Step 2. You can play with patterns and designs. For this jellyfish, I made horizontal stripes and added some dots and then let everything blend.
I like a bold and vivid look, so I used many different colors. When you like what you have created, let your painted paper dry.

Step 3. Draw your jellyfish heads.
Step 4. Cut out your jellyfish heads.

Step 5. Attach your googly eyes and draw a smile.
Step 6. Now it is time to make the tentacles. To do this, we will need to draw rectangular strips.
Draw several straight lines about 10” long vertically on your colored paper. Then add one horizontal line across all the lines in the middle.

Step 7. Cut all your rectangles out. If you want longer tentacles, you will need more rectangles.
Step 8. Take 1 rectangular strip. Glue the ends together to create a drop-like or leaf-like shape.
Make 4 of these.

Step 9. Take 1 of your strips and insert it through one of your drop or leaf shapes.
Step 10. Glue the ends to create a loop.

Step 11. Keep going in this way, adding more loops to your chain as you go. You can add as many as you’d like, depending on how long you want the tentacles to be.
Keep going until you have added loops to all your drop shapes.
Step 12. You can make the chains as long or short as you would like. Two of my chains were shorter and two were longer.

Step 13. Glue each paper chain to the back of the jellyfish’s head.
Step 14. Your DIY paper jellyfish is finished!

Watch How to Make
How Long Do These Jellyfish Take to Make?
Your jellyfish will come together quickly. Painting your jellyfish, making the chains, and gluing on the tentacles will take about 15-20 minutes.
Keep in mind that you do need to wait for the paint to dry. Factoring in drying time, this should take you 25 minutes to 1 hour to complete.

More Crafts Like This
DIY Paper Jellyfish
Video Tutorial
Equipment
- Paint brush
- Black marker
- Scissors
- Ruler
Materials
- 1 A4 Thick White paper sheet
- Construction paper sheets colored
- Watercolor paint *
- Googly eyes
- Glue stick
Instructions
- The first step is optional. I started by adding some water to the paper because it helps the colors blend together more.Now, start painting.
- I made horizontal stripes and added dots and then let everything blend together. You can do whatever design you would like.When you like what you have created, let your paper dry.
- Draw your jellyfish heads.
- Cut out your jellyfish heads.
- Attach your googly eyes and draw a smile.
- Draw straight lines about 10” long vertically on your colored paper and then add one horizontal line across in the middle.
- Cut all your rectangles out. These will be the tentacles.
- Take 1 rectangular strip. Glue the ends together to create a drop-like or leaf-like shape.Make 4 of these.
- Take 1 strip and insert it through one of your drop or leaf shapes.
- Glue the ends to create a loop.
- Keep going in this way, adding more loops to your chain as you go. You can add as many as you’d like.Keep going until you have added loops to all your drop shapes.
- You can make the chains as long or short as you would like. Two of my chains were shorter and two were longer.
- Glue each paper chain to the back of the jellyfish’s head.
- Your DIY paper jellyfish is finished!


