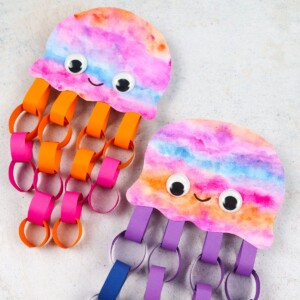
DIY Paper Jellyfish
Create adorable DIY paper jellyfish with this tutorial. Perfect for kids and beginners, this craft is easy to make with a few simple craft supplies.
Video Tutorial
Equipment
- Paint brush
- Black marker
- Scissors
- Ruler
Materials
- 1 A4 Thick White paper sheet
- Construction paper sheets colored
- Watercolor paint *
- Googly eyes
- Glue stick
Instructions
- The first step is optional. I started by adding some water to the paper because it helps the colors blend together more.Now, start painting.
- I made horizontal stripes and added dots and then let everything blend together. You can do whatever design you would like.When you like what you have created, let your paper dry.
- Draw your jellyfish heads.
- Cut out your jellyfish heads.
- Attach your googly eyes and draw a smile.
- Draw straight lines about 10” long vertically on your colored paper and then add one horizontal line across in the middle.
- Cut all your rectangles out. These will be the tentacles.
- Take 1 rectangular strip. Glue the ends together to create a drop-like or leaf-like shape.Make 4 of these.
- Take 1 strip and insert it through one of your drop or leaf shapes.
- Glue the ends to create a loop.
- Keep going in this way, adding more loops to your chain as you go. You can add as many as you’d like.Keep going until you have added loops to all your drop shapes.
- You can make the chains as long or short as you would like. Two of my chains were shorter and two were longer.
- Glue each paper chain to the back of the jellyfish’s head.
- Your DIY paper jellyfish is finished!
Notes
*I used watercolors but markers or crayons will also do.
Tried this craft?Leave a comment below with your rating! I love the feedback and respond to every comment!