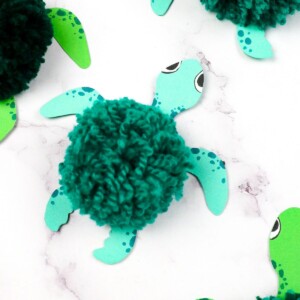
Yarn Turtle Craft
These DIY Yarn Turtles are cute and colorful and make for a perfect, easy DIY project even the kids can do.
Equipment
- Black and white markers
- Green marker
- Pencil
- Scissors
Materials
- Green yarn
- Greenish craft paper 6" x 6"
- Cardboard piece 6" x 3.5"
Instructions
- Use a writing utensil to draw a turtle. If you need assistance drawing one, print and cut out a simple silhouette to aid yours.
- Cut out the turtle with a pair of scissors. Be careful around the ligaments–it can be delicate in the area.
- Add detailing to your turtle–facial features, spots on the body, etc. I used black, white, and green markers, but play with color if you are interested.
- Prep your piece of cardboard. Cut about an inch of space out in the middle of the piece.
This cardboard will act as your ribbon guide. Similarly, you can make a piece sign and do the same with your fingers. - Wrap your yarn around the outside of the cardboard guide. Do it enough that it’ll appropriately create a shell.
- Continue to wrap your yarn and recenter anything that needs it. Once you’re ready, snip the yarn off and set aside.
- Cut a 12-inch piece of yarn for the pom pom tie. This piece of string will anchor the pom–make sure not to trim the tails at any point.
- Take your piece of yarn and thread it through the middle of your gathered yarn. Cinch it all by tying a knot into it.
- Cut either side of the outer loops to create the pom pom. This step should release the ball entirely from the cardboard.
- Trim and fluff any bits of the pom needed, keeping the tail intact.
- Continue to round your pom pom and organize anything that is needed.
- Pick up the turtle body and cut small but stable slits into either side of the turtle body.
- Grab your pom pom again and add it to the turtle. Slide the tails onto the slits and secure it on the back.
- Reshape any last-minute bits, and you’ll have a completed yarn turtle craft!
Tried this craft?Leave a comment below with your rating! I love the feedback and respond to every comment!