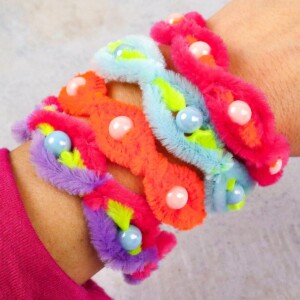
Pipe Cleaner Bracelets
A cute and sweet DIY craft for teens, adults and even kids! Colorful and very easy to make.
Video Tutorial
Materials
Instructions
- Position your pipe cleaners so that the ends are lined up. Then, twist them together. Keep twisting until about 2.5” of your pipe cleaners are intertwined.
- Place a bead onto the middle pipe cleaner and push it all the way down.
- Hold all three pipe cleaners together. Create an oval shape around the bead.
- Next, twist all three pipe cleaners around your bead two times.
- Now, repeat what you have just done a few more times. Start by placing a bead on the middle pipe cleaner again and then create your oval shape around that bead, and finally, twist all three pipe cleaners around that bead two times.
- Keep repeating these steps until you have enough beads to make a bracelet. Five beads worked for me, but it is likely that small children may only require three or four, depending on the size of their hands.
- 7 We are almost done! We only have a few more finishing touches. Twist the ends of your pipe cleaners just like we did in Step 1. This twisted section should also be about 2.5” long.
- Create a circle by putting the two ends of your bracelet together.
- Now, measure your hand to ensure that you will have a perfect fit for your wrist and start twisting the two ends of your bracelet together to close it.
- Continue twisting the ends of your bracelet over each other until it is closed. Your gorgeous bracelet is all ready for you to show off!
Tried this craft?Leave a comment below with your rating! I love the feedback and respond to every comment!