How to Make Resin Coasters (Step-by-Step)
These DIY resin coasters are a super fun DIY decoration for anyone's home. A great easy resin craft adults and teens can make.
Video Tutorial
Equipment
- Silicone molds
- Plastic cups
- Placemat
- Spatulas
- Kitchen torch
- Paint brush
- Face mask
- Gloves
Materials
- Epoxy resin
- Hardener
- Resin pigments
- Mica powder
- Acrylic marker
- Acrylic paint
- Glitter optional
Instructions
- Gather all the different items on the list of supplies given to you to get started.
- In a plastic cup, pour the right proportions of resin and hardener and use a stick to mix both substances together thoroughly. If you don’t stir the two liquids properly, the resin will harden unevenly.
- Pour the resin into four smaller cups, but set aside a small quantity for later.
- Add your different colors of liquid dye and mica powder to the four different cups of resin and stir them all till the colors are thoroughly mixed in.
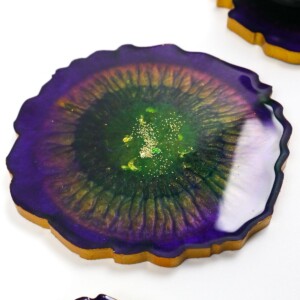
- Pour each color of resin onto the mold, starting from the outermost layer and working your way in. This will give you more control on how the liquid spreads.
- Feel free to experiment with the color patterns and designs.
- Then, when you’re satisfied with how your coaster looks, pour the clear resin you set aside earlier over the colored layers. If you pour right down the middle, the resin will push out evenly to the edges in a domed-effect.
- Use a toothpick to burst all the bubbles on the surface. Alternatively, swiftly run a blowtorch flame over the surface and your bubbles will disappear instantly. However, be careful not to burn the resin or the molds in the process.
- You can add gold flakes and glitter to the resin at this stage, too, and pour some more resin over them to create a top coat. Once again, grab your blow torch and get rid of all the bubbles on the surface.
- Cover the coasters with a raised protector to protect them from dirt and dust particles. Allow the coasters to dry for 24-48 hours before you pop them out of the mold.
- Your coasters are almost ready; just paint their edges with glittery gold paint and prop them up on a small cup as you wait for them to dry.
- Once the paint dries, your coasters are ready to use!
Tried this craft?Leave a comment below with your rating! I love the feedback and respond to every comment!