Hot Cocoa Craft
Make your own hot cocoa paper craft with this simple DIY tutorial. A cute and cozy craft project for winter.
Video Tutorial
Materials
Instructions
- Create your hot cocoa mug template by drawing a 3” x 3” square onto colorful cardstock using your ruler and marker.Then, draw a curved line across the top of the square and another curved line across the bottom of your square.
- Draw your mug handle. You can use a half heart shape or a “C” shape to do this.
- Cut out your hot cocoa mug and handle.
- Trace your template three times onto three different pieces of cardstock to make your other mugs.
- Take your mug handle template and trace it onto three different pieces of cardstock as well.
- Cut out your traced hot cocoa mugs and handles.
- Now, get your glue stick and attach each handle to its mug.
- Draw a narrow oval about 2.5” long onto your brown paper.
- Cut out your oval.
- Trace it three more times onto the brown paper and cut these out so you have four ovals in total.
- Glue the brown pieces onto the tops of each mug. This is the hot cocoa!
- Draw a white line on each mug just below the brown hot cocoa. This marks the top rim of the mug.
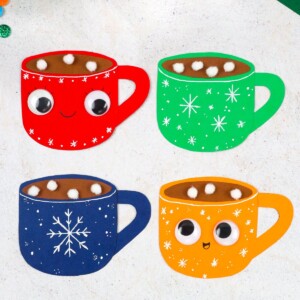
- Decorate your mugs however you would like.I drew snowflakes, but you can do whatever your heart desires.
- Here is another example of how you can decorate your hot cocoa mugs.
- Glue your white pom poms onto the brown hot cocoa for marshmallows! I think 3 or 4 pom poms are perfect.
- Your hot cocoa craft is complete!
Tried this craft?Leave a comment below with your rating! I love the feedback and respond to every comment!