DIY Worry Pet
DIY worry pet craft tutorial – fun, calming, and perfect for kids to make at home or in the classroom.
Video Tutorial
Materials
- Cuddly fabric 9"x 5"
- 16 mm safety eyes
- Plastic stuffing pellets *
- Sharp scissors
- Thread and needle **
- funnel
- Fabric marker
- Pins
Instructions
- Spread your fabric out in front of you and make a circle on the back of it. Add dots to mark where the eyes will go and add a 1” wide gap for the stuffing on the bottom.
- Use your scissors to poke out the dots you have made for eyes.
- Insert the screw part of one of the eyes into one of your holes.
- Secure it by attaching the back piece of the safety eye on the back of your fabric.
- Do the same with the other eye.
- Fold the fabric in half as shown and add pins to keep it together.
- Start stitching along the lines all the way around.
- Leave an opening at the bottom and make a tight running stitch.
- Now, trim the fabric around the circle. Be sure to leave a little extra fabric where the opening is.
- Turn the fabric right side out.
- Use your fingers to open the gap for the stuffing.
- Use your funnel to add stuffing to your worry pet.
- Begin to close the opening.
- To close the opening securely, fold the fabric in and hand stitch to complete your project.
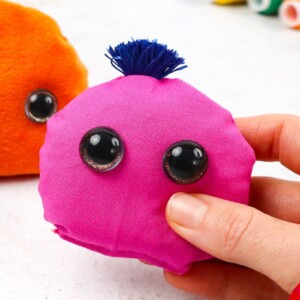
- Your sweet, cute, and cuddly worry pet is complete!
- Have fun playing around with these and trying out different colors of fabric!
Notes
*You could also use pillow stuffing or rice instead of pellets.
**The thread and needle should be the same color as your fabric.
Tried this craft?Leave a comment below with your rating! I love the feedback and respond to every comment!