DIY Wedding Centerpiece Out of Upcycled Bottles
Looking to decorate your wedding on a budget? This DIY wedding centerpiece is a beautiful DIY project anyone can make to contribute to the day of your life.
Video Tutorial
Equipment
- Scissors
- Ruler
- Markers
Materials
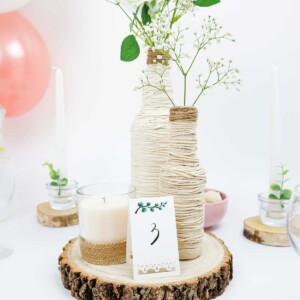
- Wood plaque
- 2 bottles ideally different sizes
- Jar candle
- 1.5 mm cotton cords or thicker
- Thick white A5 paper
- 1 ” wide jute ribbon
Instructions
- Gather all your supplies to get started on your DIY centerpieces.
- Before you begin, though, make sure you scrub, rinse, and dry your bottles to remove any dust, grease, or grime from it.
- Add a bit of hot blue to the bottom of your bottle.
- Next, unravel the cord and stick the end to the bottle. Hold it in place while it adheres.
- Then, grab your glue gun once again and line another layer of hot glue around the bottle, following it up with a length of cord over it.
- That’s pretty much it; just continue to apply hot glue and then wrap the cord around the bottle all the way up to the mouth.
- Fasten off and make sure that the end is secured with a little extra dab of glue.
- Switch out the cotton cord for some jute twine and wrap it around the mouth.
- Feel free to overlap the cord and twine as much as you like—it doesn’t have to be perfect as long as it is stuck in place.
- Repeat the entire process with one more bottle.
- Grab your wooden baseboard and hot glue both the wrapped bottles onto the surface.
- Next, grab a plain white candle in a glass jar and line some hot glue around the bottom. Stick a length of just ribbon around the bottom of the candle and then, stick the candle itself on the board, next to the bottles.
- The next step is to make table cards to indicate the table number. Feel free to decorate these cards however you like: with doodles, sketches, decorative borders, with beaded wire strung across it, and bold font for the numbers.
- Finally, add a few sprigs of baby’s breath, faux florals, and more to bring the entire centerpiece arrangement together!
Tried this craft?Leave a comment below with your rating! I love the feedback and respond to every comment!