DIY Snowflake Lanterns
Looking for a fun winter craft? Make a DIY Snowflake Lantern! This easy project is perfect for kids and adults.
Equipment
- Scissors
- X-actoknife
Materials
- Dark colored cardstock paper 24.5" x 10"
- Cutting mat
- Semi transparent paper *
- Craft paper 8"x 8"
- Glue stick
- Ruler
- Pencil
- Black marker
Instructions
- Divide your cardstock paper into 3 even rectangular parts (8” long each). Leave a ½” section of space on the end for a glue tab.
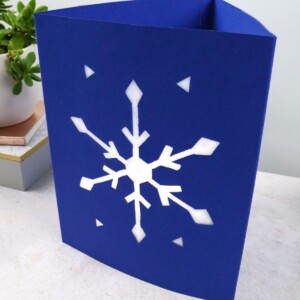
- Make your snowflake template. First, draw a hexagon with ½” walls.
- Draw 6 lines about 3” long from the center.
- Mark each line 1” from the center.
- Use your marker to make each of your 6 lines into a narrow rectangular shape.
- Turn your marks from Step 4 into snowflake designs as shown.
- Draw a rhombus at the top of each line.
- Cut out your snowflake template.
- Put your snowflake in the middle of your cardstock paper in the middle section.
- Trace your template.
- Put your cutting mat behind your cardstock.
- Cut out the snowflake with your craft knife.
- If you prefer, you can skip the cutting and just draw a snowflake directly onto the cardstock.
- Apply glue around the snowflake cutout and attach the semi-transparent paper.
- Fold the cardstock into 3 even parts.
- Add glue to the 1/2'” tab and form your lantern into a triangular shape as you close it.
- Add an LED light inside so that your lantern glows if you wish!
- Remember not to put a real candle in since this is a paper lantern. Enjoy!
Notes
* or mulberry paper
Tried this craft?Leave a comment below with your rating! I love the feedback and respond to every comment!