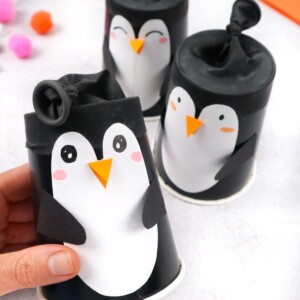
DIY Penguin Poppers
DIY Penguin Poppers are the perfect craft for kids! Whether for a winter party or a fun activity at home, this cute craft is easy to make and super fun to play with.
Equipment
- Scissors
Materials
- Black paper cup
- Black balloon
- Black construction paper
- Orange construction paper
- White thin paper
- Black marker
- Pink marker
- Glue stick
- Double sided tape
- Pom poms
Instructions
- First, let’s make our penguin’s body. To do this, draw a round, apple-like shape on a piece of paper (as shown) and cut it out.
- Next, fold a piece of orange paper in half and draw a triangular beak shape. Cut it out.
- Let’s make the wings. Draw them on your black construction paper and cut them out.
- Next are the eyes and cheeks. These will be drawn directly onto your penguin with your black and pink markers.
- Now, grab your orange beak and glue it onto your penguin’s face. It should be placed underneath the eyes and between the cheeks.
- Now, use your craft knife to cut the bottom/base out of the cup completely.
- Next, take your balloon and tie a knot at the end. Cut off the rounded end.
- Turn the cup upside down and add double-sided tape in a few places around the rim. This will be to add extra support for your balloon.
- Stretch the balloon over the rim of the base. It should stay in place.
- Now, use your glue to attach your penguin body to the cup.
- Glue the wings on either side of the cup.
- Finally, add your pom poms into the cup. Your penguin popper is ready! To use it, pull back the knot of the balloon and shoot the pom poms out. Have fun!
Tried this craft?Leave a comment below with your rating! I love the feedback and respond to every comment!