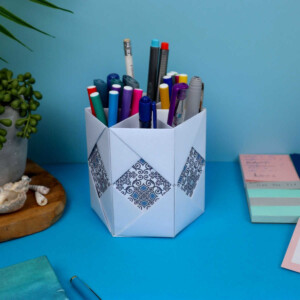
DIY Pencil Holder Out of Paper
Organize your desk with just some paper! Make this DIY pencil holder, organize the mess and have fun crafting. A perfect paper craft for teens and adults.
Video Tutorial
Equipment
- Scissors
- Ruler
- Pencil
Materials
- 5 thick square paper sheets cut from an A4
- 1 thick paper sheet for the bottom, cut from an A4
- Glue or double-sided tape
- Decorative paper optional
Instructions
- Gather all your materials to get started on your DIY pencil holder.
- Fold a sheet of paper in half and divide it into two halves.
- Fold both the bottom and top half inward and fold towards the center. You should have four equal parts now.
- Unfold the paper and turn it so that the creases are vertical. Repeat the previous step and divide the paper into four equal parts, albeit in this particular direction.
- You should have a sheet of paper that has 16 equal parts—4x4 squares.
- Fold all four corners.
- Fold the left part and then the right part inward towards the center.
- Reverse the paper and turn the left and right corners inward towards the center.
- Slide one end into the opposite end and tuck it in place. One individual component is officially complete! Now you can go ahead and make six more.
- You can tuck in bits of colorful paper to decorate your pencil hold at this stage.
- Once you've made all six components, arrange them, so the decorated side faces outward. Use double-sided tape or glue to stick them together.
- To make the bottom, trace a hexagonal outline of the pencil holder, and allow a 1.5-2 cm gap for flaps. Use a pair of scissors and cut this outline out.
- Fit this bottom into the pencil holder, and once you're satisfied, you can stick it in place to secure it even more.
- Fill it up with your stationery, and you're all set!
Tried this craft?Leave a comment below with your rating! I love the feedback and respond to every comment!