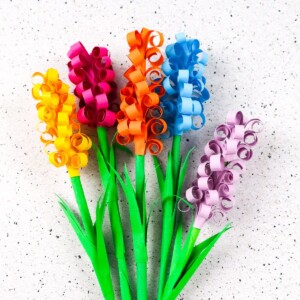
DIY Paper Hyacinths
The cutest paper flowers you can use as a decoratrion. Suitable for all ages, these handmade flowers add a personal touch to your decor.
Equipment
- Scissors
- Pencil
- Ruler
Instructions
- Draw a horizontal line across your colorful paper and then draw 1/4” lines perpendicular to that line to form your fringe.
- Cut the fringe.
- Begin to curl your cut fringe sections around a manicure stick.
- Continue curling each section of fringe around the stick.
- Ensure that each section has been wrapped around the manicure stick, from bottom to top.
- Add some glue to the corner of a strip of green paper and roll the paper diagonally upward around a manicure stick.
- When you are done rolling, you will be left with a long, thin tube for your stem.
- Make your leaves by folding a small piece of green paper accordion-style (each fold should be about ¼” thick).
- Cut into your folded green paper to make leaves.
- Unfold your paper to see your beautiful leaves.
- Take your rolled hyacinth paper, add some glue to the back, and place it over the end of your stem with the swirls pointing up. Continue wrapping it in an overlapping fashion and add more glue if you need to.
- Add some glue to the bottom of your leaves.
- Wrap your leaves around the stem tube at a slight angle.
- Your flower is done! Repeat as many times as you want with a variety of hyacinth colors and enjoy!
Tried this craft?Leave a comment below with your rating! I love the feedback and respond to every comment!