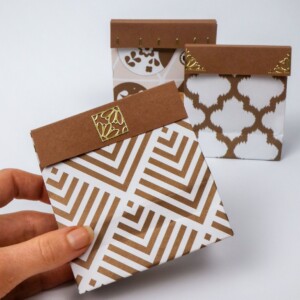
DIY Gift Bags
Make your very own DIY gift bags to make the gifts to your loved ones even more special. These are cute and relatively easy to make.
Video Tutorial
Equipment
- Ruler
- Pencil
- Hobby knife
- Scissors
Materials
- Patterned paper or gift wrapping paper
- Small piece of paper for the top
- Double-sided tape or glue
- Glitter glue
- Stickers
Instructions
- Gather all your supplies.
- With the ‘wrong’ side of the paper facing upward, fold one edge, around an inch or so in size. Line this folded edge with double-sided sticky tape.
- Fold the other edge downward, align with the other side and press down firmly.
- Fold the edges in towards the center into triangles and press down. Fold it again along the length of the longest side. Press and hold to crease.
- Open the folded parts up.
- Grab either end of the edge and fold it inward to create a square. Fold the other two ends in, making sure to overlap them one over the other.
- Next, fold the paper again, this time up the entire length, on either side of the bag.
- Trim the edges till you have the desired length.
- Make an incision using a craft knife to allow the tongue or flap of the lid to slip in.
- To make the lid, cut out some paper in the exact dimension you want your lid to be.
- Fold the paper inward in a 2:1:2 ratio.
- To make the flap or tongue, cut a strip of paper and cut an arc shape in one end.
- Tape double-sided sticky tape along one end of the inner flap. Also, use sticky tape to attach the tongue.
- Carefully fix the lid onto the bag and slide the flap into the incision you made earlier. Press the edges to stick them in place.
- Decorate the bag, and voila, your DIY gift bag is ready.
Tried this craft?Leave a comment below with your rating! I love the feedback and respond to every comment!