DIY Drawer Dividers Out of Cardboard
Make an organizer out of cardboard and get your drawers organized! These are cheap budget organizers for your office!
Video Tutorial
Equipment
- Pencil
- Scissors
- Craft knife
- A4 cutting mat
Materials
- Cardstock
- Glue
Instructions
- Gather all the necessary materials.
- Take out one drawer and empty its contents.
- Measure the inside of the drawer and draw these measurements on plain card stock.
- Cut the card stock according to your measurement.
- Collect all the drawer's contents again and arrange them on your cut card stock according to how you would like them divided.
- Using a cutting mat placed above the card stock as a visual guide, draw a rough outline around the contents using a pencil.
- Take the contents off the card stock and use a ruler to straighten out your rough outline.
- Number all of the compartments you have outlined.
- Place the cardstock on the drawer again for a final fit and a final look of your desired divider layout.
- Take the card stock out of your drawer and start creating the individual dividers.
- Start by cutting out divider number one.
- Choose a cardstock design for this divider and place the cut-out piece in the middle of the non-patterned side of the card stock.
- Using a pencil, roughly outline the cut-out card stock.
- Take out the card stock and use a ruler to draw a final outline, taking 2 mm off each side of the rough outline.
- Outline the "sides" of the divider according to your preferred divider height.
- Use the overlap-side-base-side-overlap pattern when drawing your outline.
- Cut the excess sides along each side of the overlaps.
- Fold the overlaps inwards.
- Flip the card stock to reveal the patterned surface.
- Fold along the rest of the lines to build the box.
- Attach all sides and overlaps using glue.
- Repeat steps 1 to 21 for each of your dividers/compartments.
- Redo this project over and over until all your drawers at home have dividers.
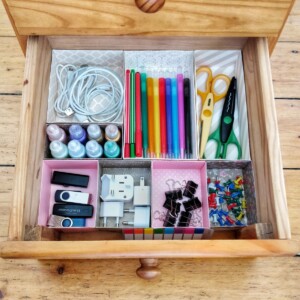
- Congratulations, you have just saved your family from hours of rummaging through the clutter!
Tried this craft?Leave a comment below with your rating! I love the feedback and respond to every comment!