DIY Bottle Vase (Step-by-Step Tutorial)
Make your very own DIY bottle vase. It's a beautiful clay decoration anyone can make on a budget and beautify their homes. A great upcycling idea for bottles!
Video Tutorial
Equipment
- Rolling pin (or another glass bottle)
- Tape measure
- Precision knife
- Pencil
Materials
- Glass bottle
- Air drying clay
- Ground coffee
- Acrylic paints grey and brown
Instructions
- Gather all your supplies to get started.
- Cut a portion of the clay and promptly repack the remaining portion in an air-tight container.
- Use your hands to knead the clay to remove any lumps and to make it soft and pliable.
- At this point, you can choose whether you want to speckle your clay or not. If you do, then add a cup of ground coffee powder and knead it into the clay evenly.
- Use a rolling pin or a bottle to roll the clay over a flat surface. Make sure you measure the dimensions of the bottle with a measuring tape to ensure you’ve rolled out enough clay to cover it.
- Next, based on those measurements, use a craft knife to cut out a clay sheet. Set aside the excess clay for now—you’ll need it to make the bottom part for the bottle.
- Place the glass bottle you plan to use over the sheet to check for size. Now, carefully place the sheet over the bottle and roll it around so it is covered.
- Use your craft knife to make notches down one end of the sheet. This will help you blend both ends together more effectively.
- Next, use your fingers to blend the two ends of clay together and smoothen out any line or crack that may indicate that this is where you joined the clay. You can use a drop or two of water—not too much, mind, or the clay can turn sticky—to smooth over any cracks.
- When you’re working with the neck and mouth of the bottle, you’ll need to mold the clay into the curves. Again, use a drop of water to smoothen it out.
- Also, cover the rim with clay too. You can use your craft knife to cut away any excess bits at the rim and also even it out.
- To make the ‘bottom’ of the bottle, take the clay you set aside earlier and flatten it out with a rolling pin. Place the bottom of the bottle over it and use a knife to cut the clay around the bottles.
- Flip the bottle over with the rin balanced on your work surface as you blend the clay into the bottom and sides of the bottle. Use water to smoothen out any cracks.
- Allow the clay to dry for 48-72 hours before you start decorating it.
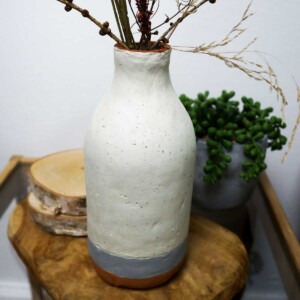
- You can paint the vase any way you like. When you’re done, apply a clear matte or glossy-finish sealant to protect the surface of the clay.
- Once that dries, your DIY bottle vase is ready to use!
Tried this craft?Leave a comment below with your rating! I love the feedback and respond to every comment!