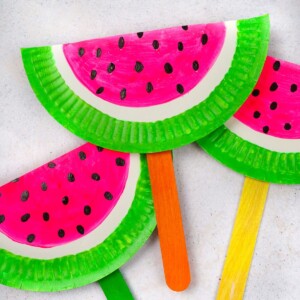
Cutest DIY Paper Watermelons
Make your own DIY paper watermelon with this fun and easy craft project. Perfect craft for kids and families.
Video Tutorial
Equipment
Materials
- Paper plate
- Acrylic paint pink, green, black
- Cotton swab
- Double-sided tape or hot glue gun
- Large crafting stick
Instructions
- Grab a paper plate and turn it over so that you are looking at the back. Use your green paint to start painting the rim of the plate.
- Continue painting with green paint all around the rim of your paper plate until you have a beautiful green border all around.
- Now, start to paint the center of your plate pink. This is when it will really start resembling a watermelon! Keep in mind that you might need two coats of pink for this if the first coat isn’t as vibrant as you’d like. Allow the paint to completely dry before moving on.
- Let’s add those watermelon seeds now! Take your cotton swab and some black paint. Start to add black dots on top of your pink paint.
- Continue adding your dots until the entire circle is dotted with watermelon seeds. Again, let the paint dry before moving on with the project.
- Turn your plate over so that you are looking at the unpainted side. Fold it in half. Next, add a piece of double-sided tape to both sides of your craft stick.
- Insert your stick in between both sides of your plate and get ready to close your plate so that your beautiful watermelon design shows on both sides of the stick.
- Close the plate securely and enjoy your watermelon craft!
Tried this craft?Leave a comment below with your rating! I love the feedback and respond to every comment!