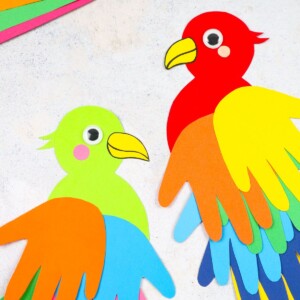
Colorful Handprint Parrots
Looking for a creative and engaging craft idea? This DIY handprint parrot craft is a fun art project for toddlers and preschoolers.
Video Tutorial
Equipment
- Scissors
Materials
- Craft paper sheet A4
- 5 sheets Colored craft paper 7"x 7" or A5
- Black marker
- Glue tape *
- 1 Googly eye
- Pencil Optional
Instructions
- Trace your hand (or your child’s hand) on the paper. Arrange all your colored paper beneath this hand.
- Start cutting the traced hand. When you are done, you should have six colored hands.
- Draw your parrot’s body, using a circle for the head, a larger oval underneath for the body, and a triangular tale on the bottom.
- Cut your parrot out.
- Draw a round cheek for your parrot and cut it out.
- Draw your parrot’s beak and cut it out.
- Gather all your parrot’s features. It’s time to put everything together.
- Take one colorful handprint and glue it to the bottom of the parrot’s tail, with fingers facing downward. Grab another handprint and glue it a little bit above the first one.
- Keep gluing until only one handprint remains.
- Add the last handprint feather as your parrot’s wing. It should be placed above the rest of the handprint cut-outs.
- Draw a funny-shaped feather, cut it out, and glue it to the back of your parrot’s head.
- Attach your beak, eye, and cheek to the head. Add a googly eye or draw one on.
Notes
*Or any craft glue
Tried this craft?Leave a comment below with your rating! I love the feedback and respond to every comment!