How to Make Resin Keychains
Want to make your own DIY accessories? These DIY resin keychains make for perfect gifts!
Video Tutorial
Equipment
- Gold flakes
- Glitter powder
- Mica powder
- Resin pigment
- Dried flowers
- Scissors
- Pliers
- Tweezers
Materials
- Epoxy resin and hardener
- Small plastic cups
- Big plastic cup
- Toothpick
- Wood skewer
- Silicone molds
- Spatulas
- Heat gun
- Blank keychains
- Face mask
- Gloves
Instructions
- Gather all your supplies to get started on these DIY resin keychains. Also don your protective gear before you work with the chemicals.
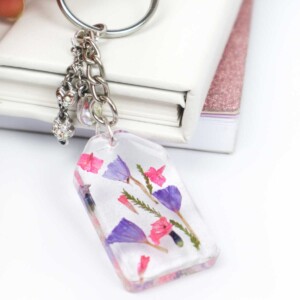
- The first step is to arrange your dried flowers in the layout you want and to plan your design. Once you mix the resin, you will hardly have any time to think or experiment.
- Mix equal parts resin and hardener in a plastic cup and use a stirrer or stick to thoroughly and evenly mix the two together. You can use a heat gun or torch to get rid of the bubbles, or just sit the mixture in a warm bath for 3-4 minutes to pop the bubbles.
- Pour a bit of resin into the molds and if bubbles pop up, use a heat gun to flatten them out.
- Use a pair of tweezers to place the flowers and any other decorative elements you’re planning to use–gold foil, mica powder, glitter, leaves, and more. You can also use colored dye or mica powder to color the resin completely, or just add a drop or two and swirl some patterns into it.
- Allow this to set–cure–for 6-8 hours.
- Next, prepare another batch of resin–add foil, color, etc. if needed–and then cover the surface evenly. Allow this to cure for 24-48 hours.
- You can create a domed finish if you like. Just prepare a small batch of resin and allow it to harden a little so it turns tacky and then pour just a bit of it over the surface. Use a toothpick to even out the edges and don’t cover up the hole.
- You can use a nail filer or a bit of sandpaper to smoothen any irregularities or bumps
- Let this cure for another 12-14 hours–under a protective cover–before inserting the keychain jump ring into the hole.
- Your DIY resin keychains are ready!
Tried this craft?Leave a comment below with your rating! I love the feedback and respond to every comment!