How to Make Polymer Clay Earrings (Step-by-Step)
Make your very own DIY jewelry with polymer clay. It's a fun DIY accessory project for adults and teens! Super cute and can be used to make multiple DIY gifts.
Video Tutorial
Equipment
- Dotting pen
- Filling knife (or any cutting blade)
- Rubber stamps
- Cookie cutters
- Fine sandpaper
- Pliers
- Rolling pin
- Cardboard piece
- Parchment paper
- Sellotape
- Scissors
Materials
- Polymer clay
- Jump rings
- Earring hooks
- Earrings posts + backs
- Glue E6000
Instructions
- Assemble all your materials to get started on this project.
- Prepare your work surface by lining a sheet of cardboard with parchment paper and taping it in place.
- Next, choose the different colors of clay you wish to use and pinch off the required amount.
- Use the warmth of your hands to smoothen the clay and roll each piece into cylinders. Line up each roll and press them together before rolling them into a flat sheet that’s around 5mm thick. Keep alternating between folding, twisting, and rolling your clay to get the desired pattern or effect on your clay.
- You can also experiment with different colors. Additionally, you can line up different colored rolls of clay, cut off half-inch pieces, lay them next to each other, and finally, roll them all together, too!
- Feel free to add some designs to your clay, too. You can speckle the clay with little clay dots, press a stencil to etch a design, and use craft tools to poke holes, score lines, and other designs onto the clay.
- There’s no limit to the varying combinations of colors, textures, and designs you can experiment with.
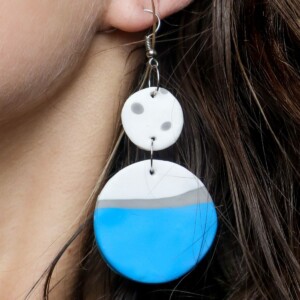
- When you’re happy with the way your clay looks, grab different shapes of cookie cutters and press them into the clay to get any number of shapes you desire. You can also make two-piece earrings with danglers, or stick to studs, too.
- Peel away the excess clay, and feel free to reuse them to make more earrings, as well!
- Don’t forget to poke holes into the clay for the jump hooks to go through later.
- Transfer all the different pairs onto a baking tray lined with parchment paper. While you’re doing this, preheat your oven.
- Bake the earrings for around 30 minutes at 230F (110C) (or as suggested on the packaging instructions) and then cover them with aluminum foil so they don’t crack after they’re baked.
- Once the earrings have cooled down, you can use sandpaper to scrub off any excess clay shavings and also to smoothen the earrings. You can also set the clay with a coat of clear glossy or matte-finish varnish specifically designed for polymer clay.
- Then, attach the hooks or the studs to the earrings, and voila, your earrings are ready!
Tried this craft?Leave a comment below with your rating! I love the feedback and respond to every comment!