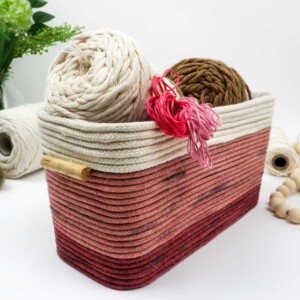
DIY Rope Basket
Make your very own DIY basket. This project will increase your storage space, you can use it for collecting all sorts of items. On top of it, it'll do for a beautiful decorative piece.
Video Tutorial
Equipment
- Scissors
- Old pot
- Gloves
Materials
- Plastic box or just use any box you have, can be cardboard too
- Clothesline rope
- Fabric dye powder
- Wooden sticks optional
Instructions
- Gather your supplies and plan the color pattern you intend to use for this project.
- Cut the rope into different batches for different colors, at the desired length.
- Mix the food dye powder with water and stir with a wooden stick to mix it evenly. Don’t forget to wear protective gloves and to spread newspapers!
- Dip the rope into the dye and use the stick to move it around and coat it in the dye evenly. Check to make sure there are no white spots or patches.
- Repeat this process with all the colors. Allow the rope to dry completely before you proceed.
- Grab your hot glue gun and start applying glue around the bottom of the basket. You will be working your way up, alternating between applying glue and sticking the rope in place.
- When it’s time to change over to the next color of rope, simply meld the ends of both together with hot glue and secure them in place.
- Continue to wind the rope around the basket until you’ve reached the top. Then, just tuck the ends in and apply a little hot glue to finish it off!
- The final touch is to glue the little stub handles on to the sides and you’re all set! Load up your basket and enjoy your craft skills!
Tried this craft?Leave a comment below with your rating! I love the feedback and respond to every comment!